How to Use Dropbox: A Complete Beginner’s User Guide in 2026
Dropbox is one of the first cloud storage services. It’s packed with useful features that beginners and pros love. Read on to learn how to use Dropbox for cloud storage and backup on Windows, Mac, Android and iOS devices.
Dropbox is a robust cloud storage service that’s simple to navigate and packed with features. It’s one of the premier cloud services that has withstood the test of time. If you’re wondering how to use Dropbox on your device, stick around because we cover all that and much more.
Dropbox won itself a spot on our list of the best cloud storage services due to its reliable syncing, streamlined apps and multiple integrations. Keep reading to discover how to use the key features that Dropbox provides.
-
09/15/2021 Facts checked
Cloudwards.net updated this article to include current Dropbox pricing, step-by-step instructions and more information about Dropbox features.
-
08/07/2024 Facts checked
We updated the article to include more relevant information on what Dropbox is and its main uses.
-
02/24/2025 Facts checked
We added up-to-date information about Dropbox’s key features.
-
05/09/2025 Facts checked
We rewrote this article to include up-to-date instructions and information on features and pricing.
What Is Dropbox?
Dropbox is a cloud storage solution that allows you to share, store, access and collaborate on files via the cloud. This popular cloud storage platform lets you review and edit videos, sign digital files and request virtual signatures. Our Dropbox review has more in-depth details about the tool.
What Is Dropbox Used For?
You can use Dropbox to store files and folders in various formats, saving you precious local storage space. Use it to access your files from anywhere on any authorized device with an internet connection. We’ve listed its various use cases below.
10,000+ Trust Our Free Cloud Storage Tips. Join Today!
- Demystify cloud storage terminology and key concepts in plain language
- Discover easy-to-implement techniques to securely backup and sync your data across devices
- Learn money-saving strategies to optimize your cloud storage costs and usage
- Secure file storage: Dropbox uses AES 256-bit encryption and TLS encryption to secure your files while at rest and in transit, respectively. That said, read about our security concerns in our Dropbox security and Dropbox encryption articles.
- Collaboration and file editing: You can collaborate on shared files with others in real time. What’s more, you get to edit files without leaving the platform and track file engagement over time.
- File syncing: Dropbox will automatically sync your files across all your devices when you activate the file sync feature. This means that your files will be consistent across the desktop app, web app and mobile devices.
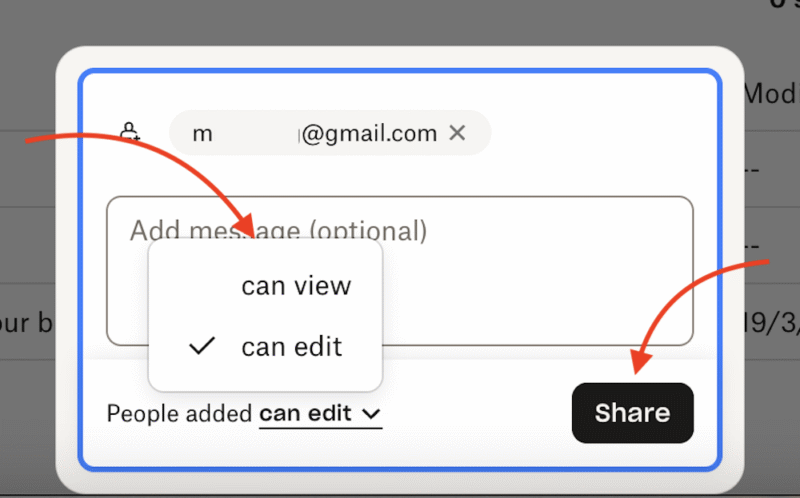
- File sharing: Dropbox lets you share files with registered and unregistered users. People and businesses can set strict permissions to manage how recipients utilize those shared files.
- Data backup: Dropbox Backup allows you to save important files in the cloud for easy restoration in case of a data catastrophe. Switching on the automatic backup feature will save your files to the cloud after a specified time period.
- Robust note-taking: Dropbox Paper is an add-on that lets you add text, images, code snippets and even videos to your notes. Our Dropbox Paper review has more details about this whiteboard and document editing add-on.
- File recovery: You can recover and restore deleted files from between 30 days to one year, depending on the plan you’re using. This means you can recover previous versions of files if the new one is corrupted, lost or deleted, so you don’t have to start from scratch.
Is Dropbox Free?
Dropbox has a free plan that provides 2GB of cloud storage and accommodates a single user. However, to unlock advanced features like granular file permissions and end-to-end encryption, you’ll have to get a paid plan. The paid plans include Dropbox Business Plus, Business, Essentials, Plus and Enterprise. Find more details in our Dropbox pricing review.
How to Use Dropbox for Free
Sign up for the Basic plan on the Dropbox website to use Dropbox for free. This plan is ideal for individual users who don’t intend to upload many files to the platform. You can also use the free trials for each paid plan except for Dropbox Plus. The trials last for only 30 days, but they are a good place to get started with the service.
How to Create and Log In to a Dropbox Account
Creating a new account takes only a few minutes, and you can do it from the Dropbox website, the desktop app or the mobile app.
- Head to the Dropbox website and choose the plan you want.
- Enter your card details along with your preferred billing cycle (monthly or yearly).
- Click the checkbox at the bottom of the page to accept the Dropbox terms, privacy policy and automatic renewal policy.
- Click the blue button to complete your purchase.
- Start using your Dropbox account for file sharing, syncing, storage and more.
How to Use Dropbox Smart Sync
Dropbox Smart Sync lets you mark files as “online-only,” which saves them in the cloud and frees up your hard drive space. You can access the files from your computer or mobile device, and edit them without having to save them locally.
Dropbox Smart Sync also saves files that you haven’t used in a while as online-only. These files are still available to you on Finder or File Explorer. However, they won’t eat into your local storage space unless you download them from the cloud.
How to Use Dropbox to Share Files
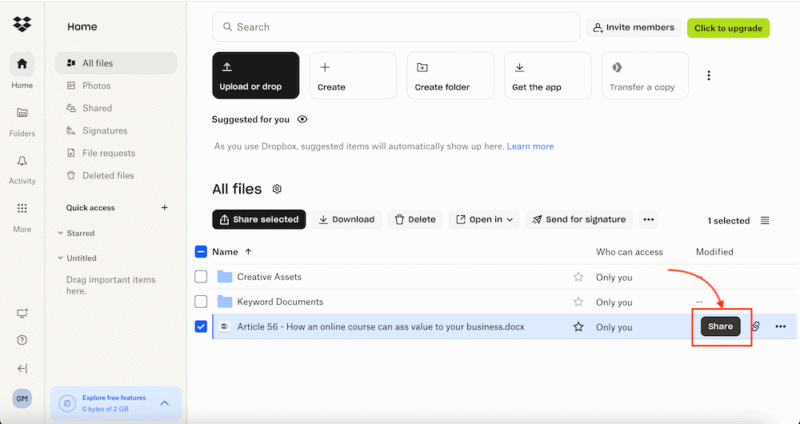
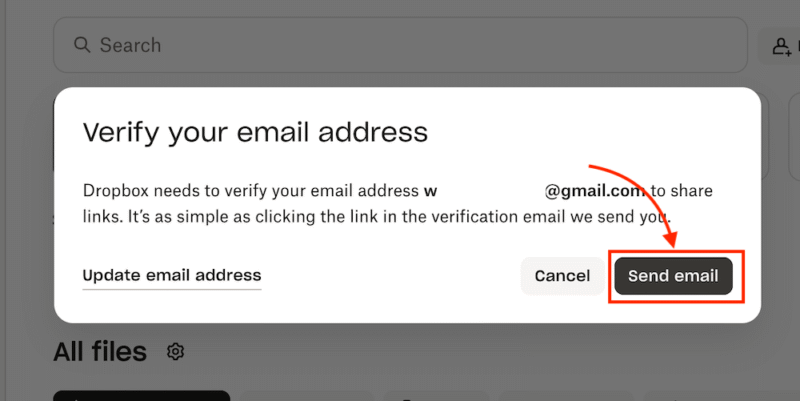
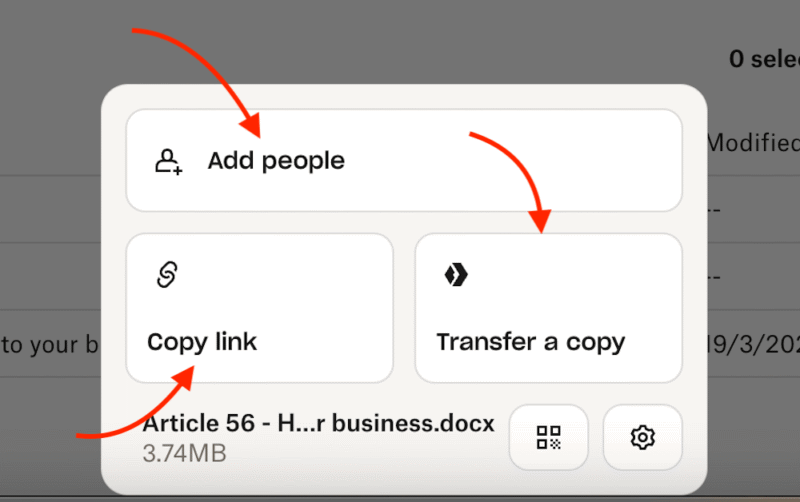
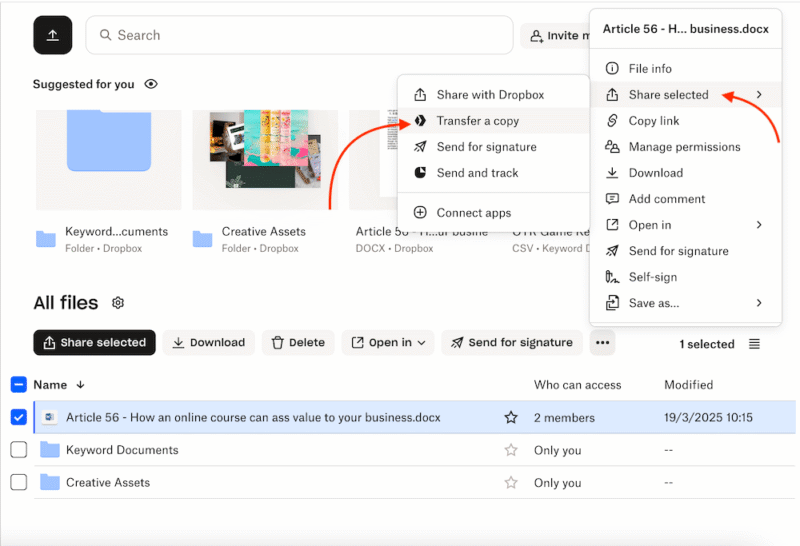
Sharing files on Dropbox web is as simple as adding them to the platform. You can set different permissions for your recipients to help control how they access the shared files. While this guide provides an overview, we have a more detailed article on how to share files on Dropbox.
Use Dropbox to Download Files
You can download files from your Dropbox account to your computer or mobile device. Using the web app, we did it in just three steps.
- Choose the File to Download
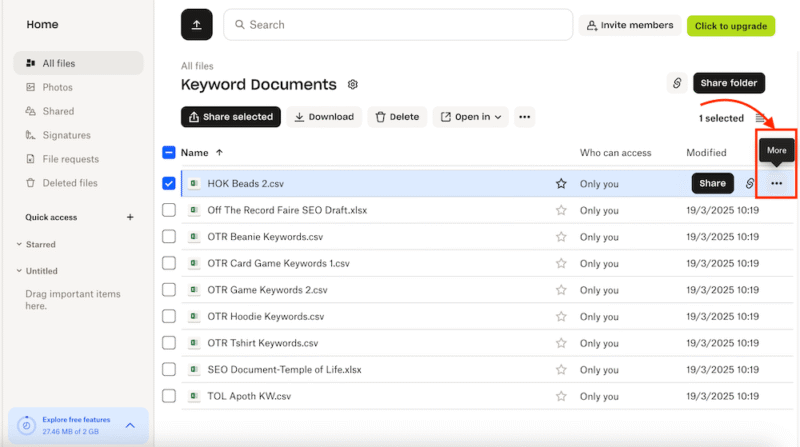
Start by identifying the files you want to download from Dropbox. Click the three dots on the right-hand side of the file name to reveal the dropdown menu.
- Locate and Select the “Download” Option
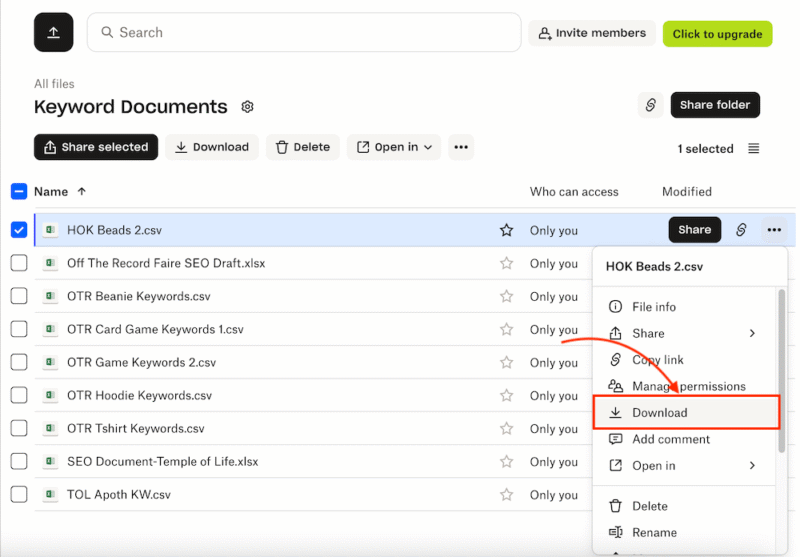
On the dropdown menu, you’ll see a “download” option. Click on it to initiate the download process.
- Download the File to Your Device
The file will immediately be downloaded onto your desktop or mobile device. You can find it in your downloads folder.
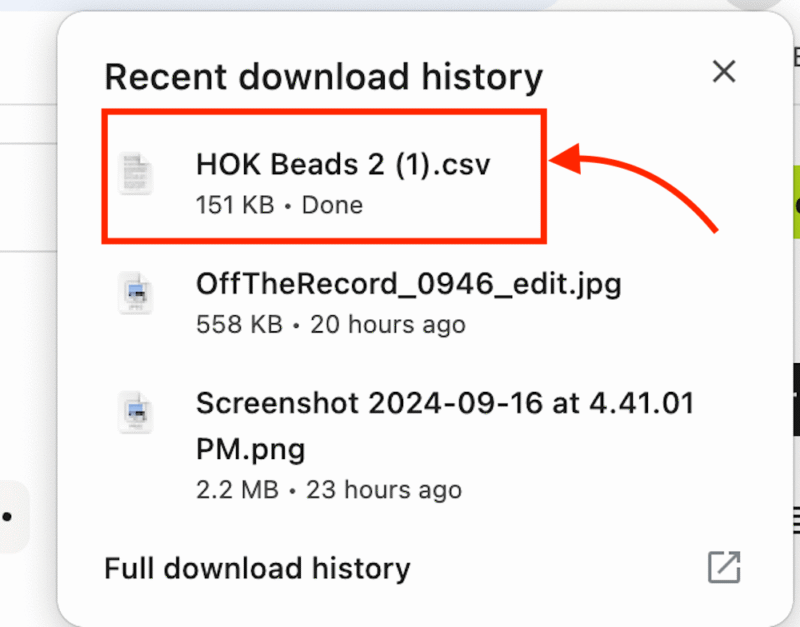
If you’re using the Dropbox mobile or desktop app, the process is the same. The only difference is that on the mobile app, the download button is labeled “save to device” instead of “download.”
Use Dropbox to Restore Files
You can use Dropbox’s “file version history” feature to restore previous versions of a file in case you accidentally delete or lose it. Previous versions are available for 30 or 180 days, depending on your Dropbox plan. Here’s how to use the file version history feature.
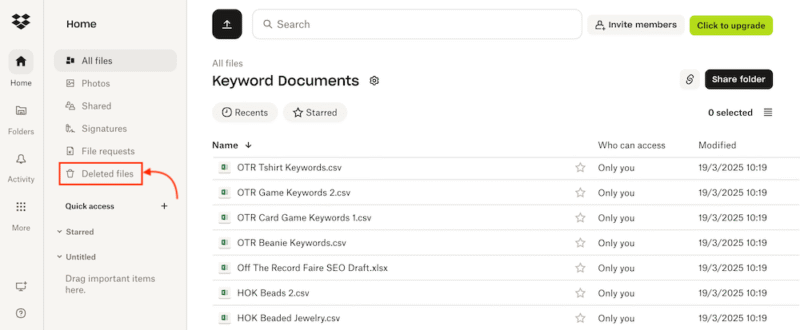
- Locate the “Deleted Files” Button
Find the “deleted files” button and click on it. You can locate it on the left-hand side menu on the Dropbox app or browser version.
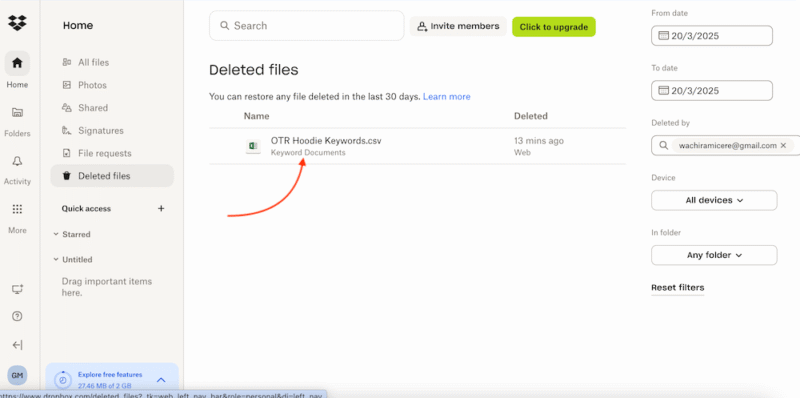
- Choose the File to Restore
Among the deleted files, find the one you want to restore and click on it to reveal the restore window.
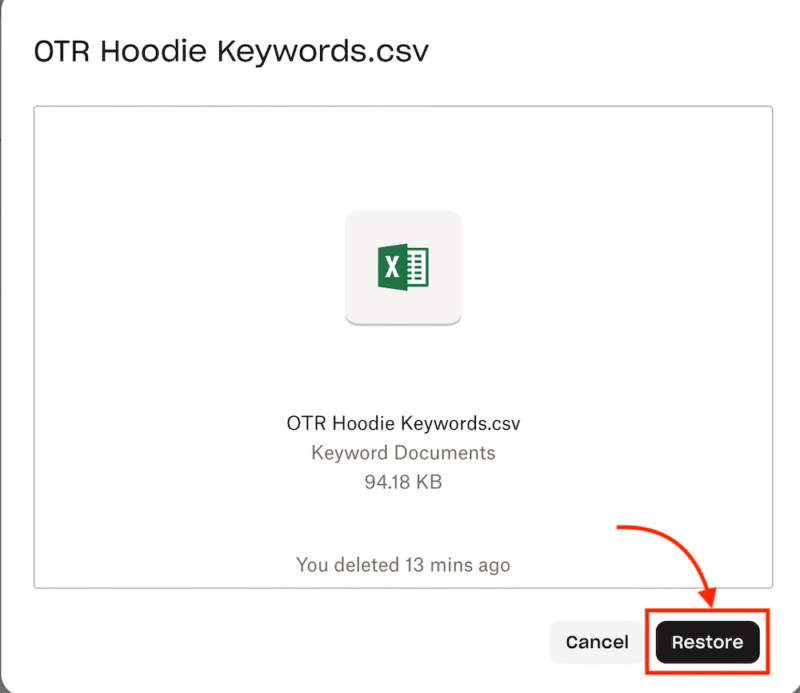
- Complete the File Restoration Process
Click the “restore” button to complete the process. The file will be restored to its previous Dropbox folder.
Use Dropbox to Request Files
You can request files from people who don’t have a Dropbox account using the “file requests” feature. They can securely add files to a specific Dropbox folder on your account using custom upload links.
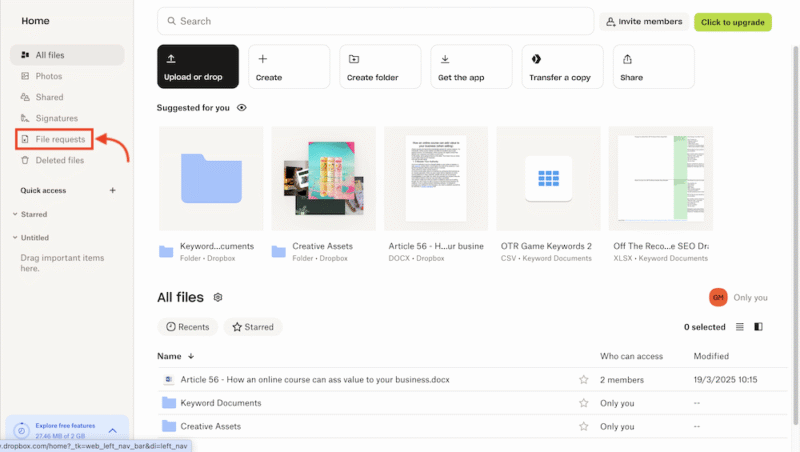
- Locate and Select the “File Requests” Button
You’ll find the “file requests” button on the left-hand side menu; click on it.
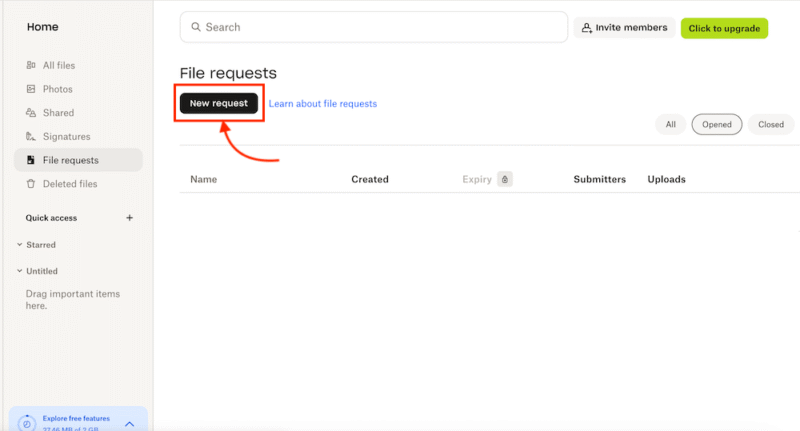
- Click the “New Request” Button
Next, select the “new request” button to begin the process.
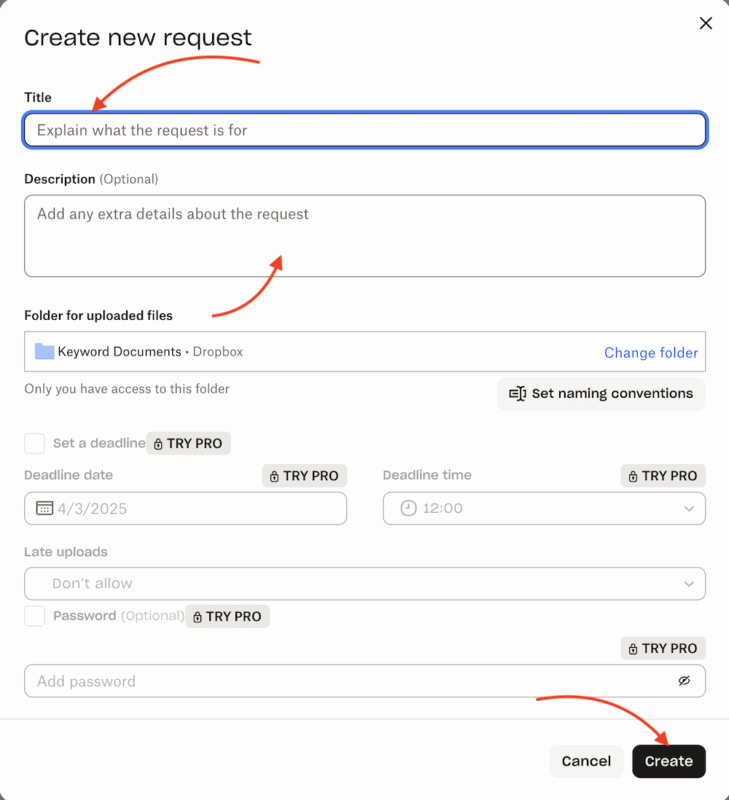
- Create a Name for the Requested File
A window will appear asking you to name and describe the files you want to request. After inputting the information, click “create.”
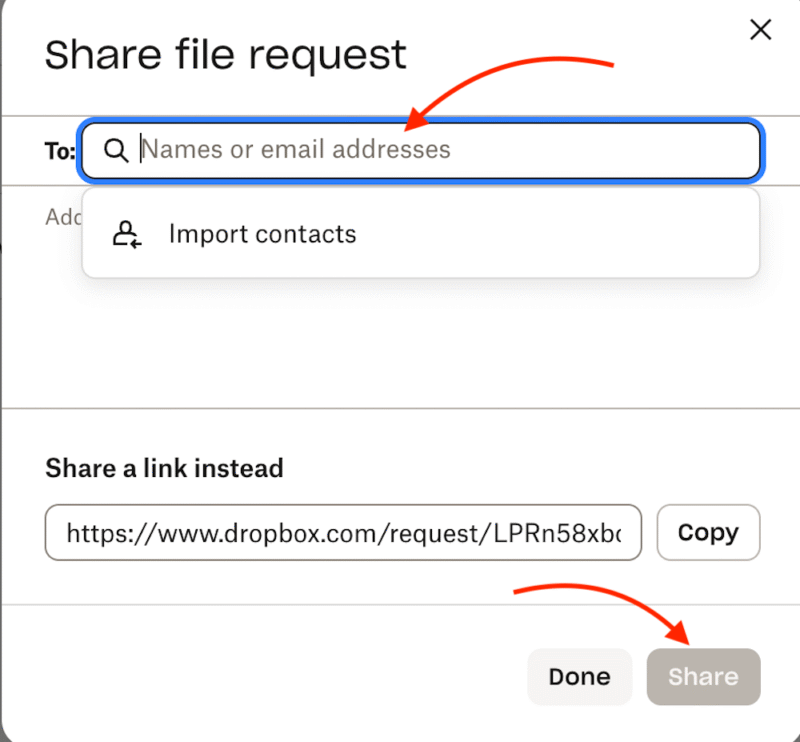
- Add a Contact and Complete the Process
Choose the person you want to share the folder with by adding their contact name or email address. You can either share the folder via Dropbox or copy the provided link and send it to them manually.
How to Use Dropbox to Send Files
Dropbox has a feature called Dropbox Transfer that allows users to send files and documents that don’t require live collaboration. You can also create a link or send an email invitation to send files and folders using Dropbox. The steps below are for the Dropbox Transfer method.
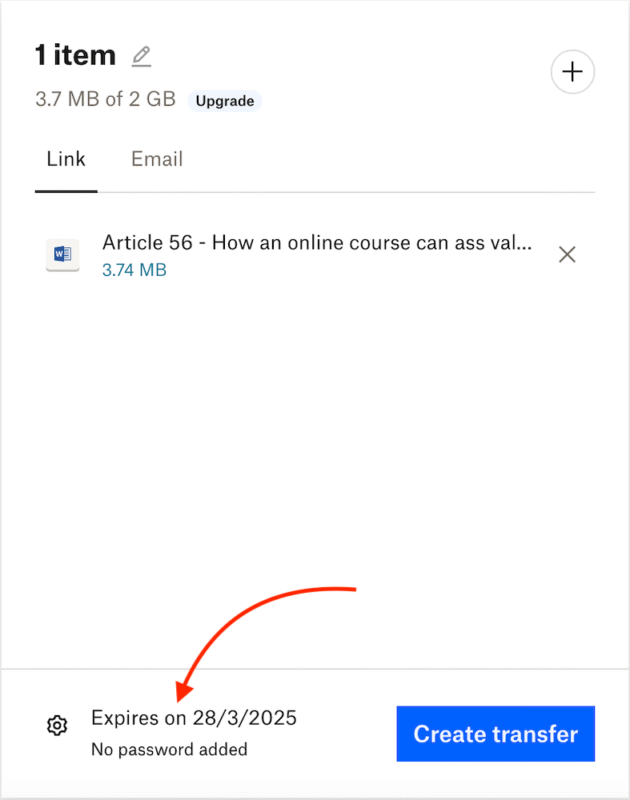
- Set a Password or Expiry Date (Optional)
If you want to send the file using a transfer link, you can set a password or an expiry date to manage access to these files.
- Add the Recipient’s Email Address
If you’re sending the files or documents to someone’s email, add their email address and click “send transfer.”
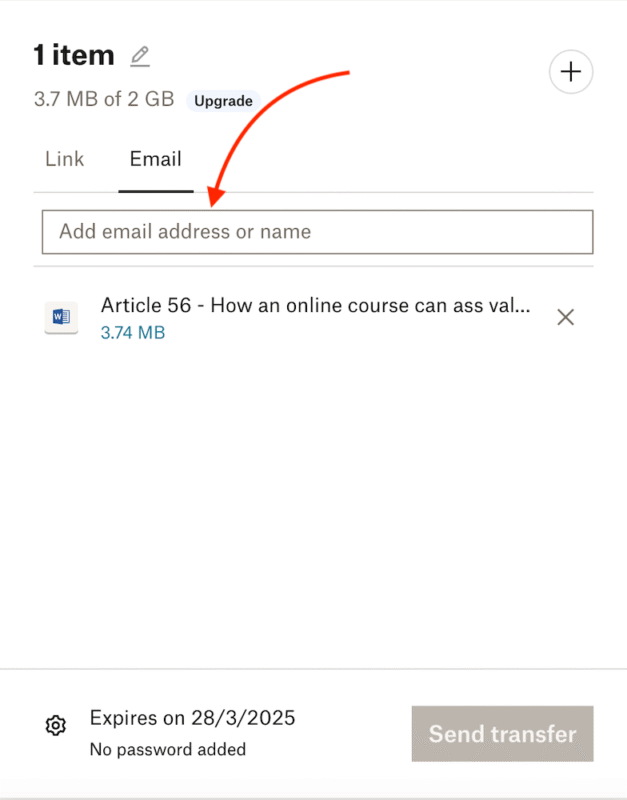
If you’re using the desktop and mobile apps, head over to the Dropbox folder, select the file you want to send and click share. You’ll then follow the same process as above.
How to Use Dropbox to Send Large Files
The best way to send large files is via email using a sharing link. Select the file you want to send and open it in Dropbox. Once Dropbox is open on your device, click the “share” button and copy the link. Send the link via email to the recipient, and that’s it. You can also use Dropbox Transfer to send large files up to a specified size limit.
How to Use Dropbox for Backup
You can keep a copy of the files on your computer using the “backup” feature on Dropbox. With the app installed on your desktop, you can complete the backup process with just a few clicks.
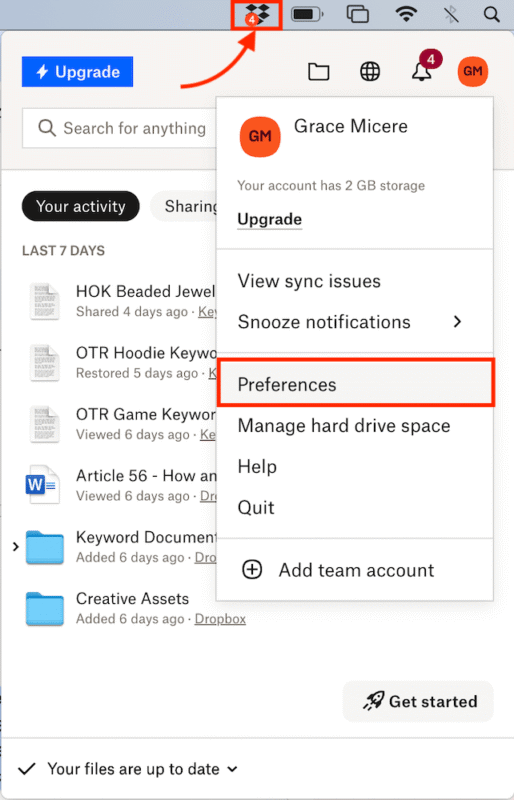
- Open the Dropbox App on Your Desktop
Open the app from your menu bar for Windows users or taskbar for Mac users. Then click on “preferences” to reveal more options.
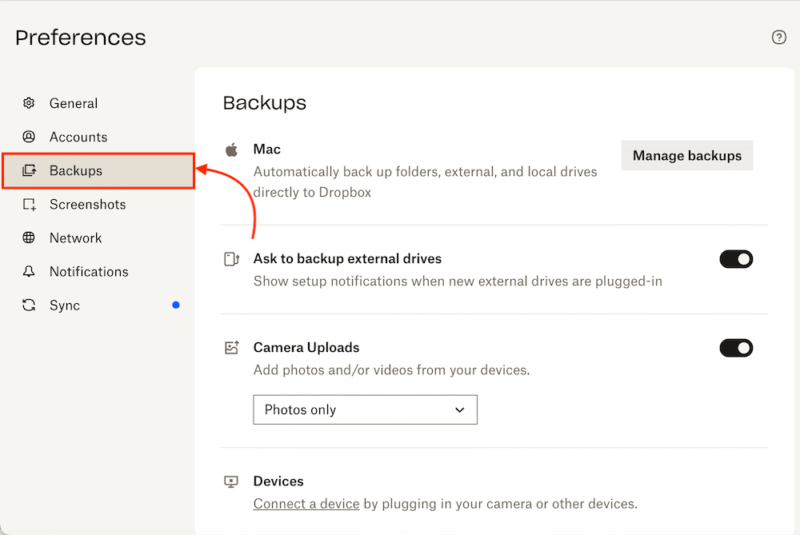
- Select “Backups” to Manage Your Options
On the pop-up window that appears, click on “backups” to reveal your backup options.
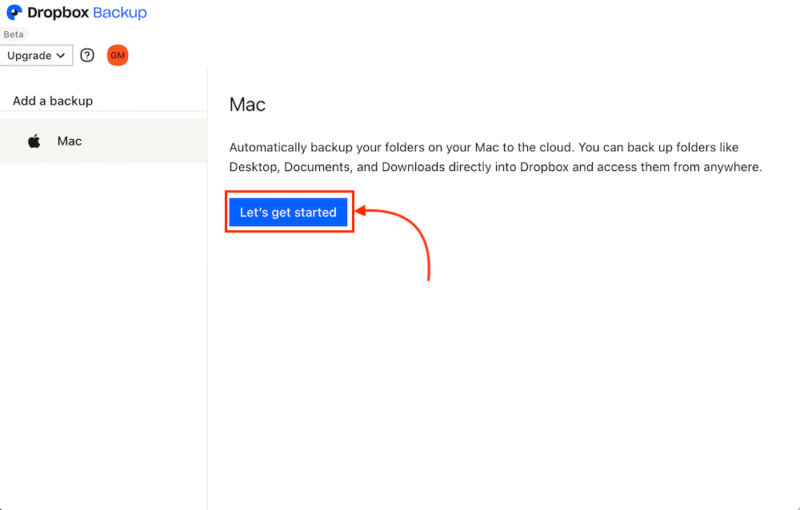
- Begin the Backup Process
On the next window, click “let’s get started” to begin the backup process.
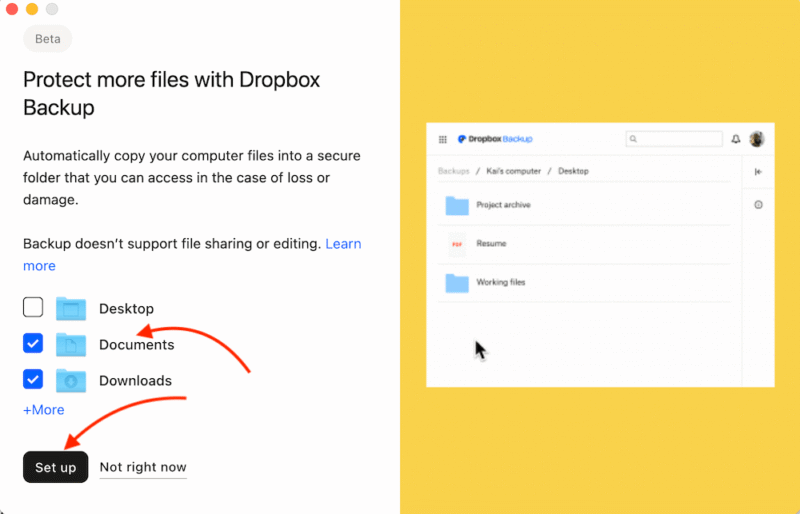
- Choose Folders to Back Up
A window will appear asking you to choose the key folders or files you want backed up. Select them and click “Set Up.”
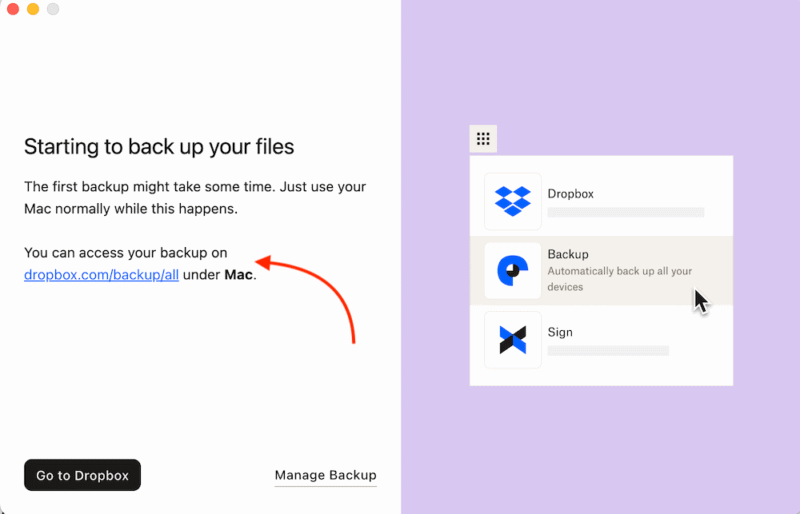
- The Backup Process Begins
Your backup will have begun and may take some time to complete. You can use your computer as usual while the process continues.
How to Upload Photos Using the Dropbox Mobile App
Many users have the Dropbox mobile app for managing their photos and files. Uploading photos to the platform is easy, and the process is similar on Android and iOS mobile devices.
Final Thoughts
Now that you’ve learned how to use Dropbox, it’s time to take it for a spin. You can now confidently use it to store and share files and folders. And if it works well for you, you can always upgrade to a bigger plan to unlock more features.
What are you looking for in a cloud service? Have you used any other cloud storage services in the past? Which one was it? Did it work for you, or did it fall short? Let us know in the comments, and as always, thank you for reading.
FAQ: Dropbox Explained
You can use Dropbox as a beginner by trying out the free version to get familiar with the platform before paying for a bigger plan.
The downsides of Dropbox are that it lacks zero-knowledge encryption, offers limited free storage and has expensive paid plans.
You can send files through Dropbox using Dropbox Transfer directly to the recipient’s email address or using a link that Dropbox will provide.
Dropbox is a cloud storage platform that lets you share, store, access and collaborate on files over the cloud.


