How to Share Files on Dropbox in 2025
If you want to know how to share files on Dropbox, this step-by-step guide will show you several easy ways to share Dropbox files.
Dropbox is the OG of cloud storage services and continues to gather interest from cloud storage users around the world. Apart from boasting third-party integration and team collaboration tools, it is also one of the easiest services to use for sharing files. In this article, we will describe how to share files on Dropbox using the web browser, Dropbox folder or mobile app.
Key Takeaways: Sharing Dropbox Files
- Dropbox has easy-to-use file sharing tools for its web, desktop and mobile app interfaces.
- It is possible to set permissions for different users while sharing files or folders.
- The file transfer option can be used to share files or folders with non-Dropbox users.
- With the acquisition of Boxcryptor, Dropbox might finally bring end-to-end, zero-knowledge encryption to its Business plan users.
The recent acquisition of Boxcryptor by Dropbox may bring zero-knowledge encryption of user data to this cloud storage service. It’s a great time to be getting started with Dropbox — read our full Dropbox review or what is Dropbox guide for more details — so without further ado, let’s dig into easy step-by-step directions on how to share Dropbox files.
-
01/11/2023 Facts checked
Rewrote this article; added information about the Dropbox-Boxcryptor acquisition.
How to Share Dropbox Files From a Web Browser
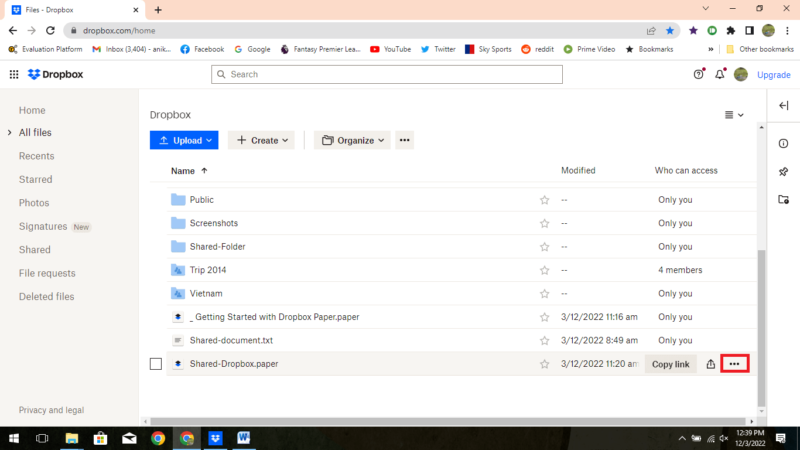
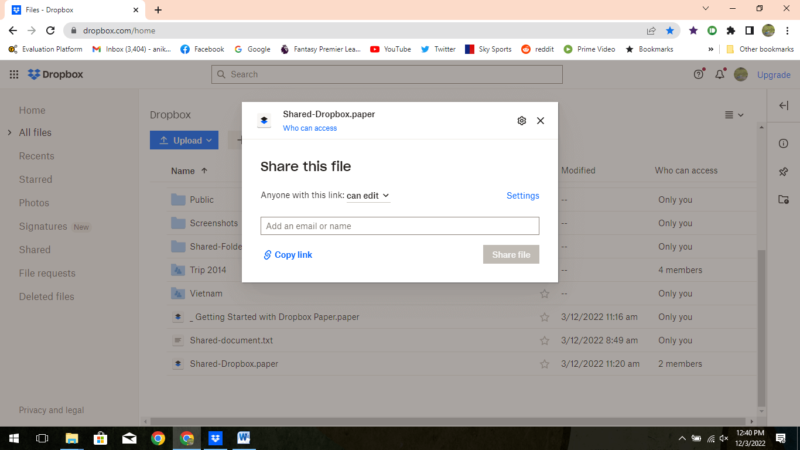
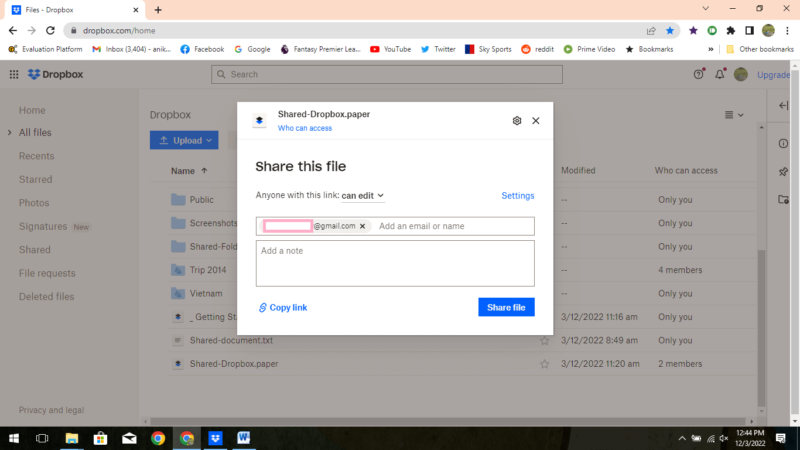
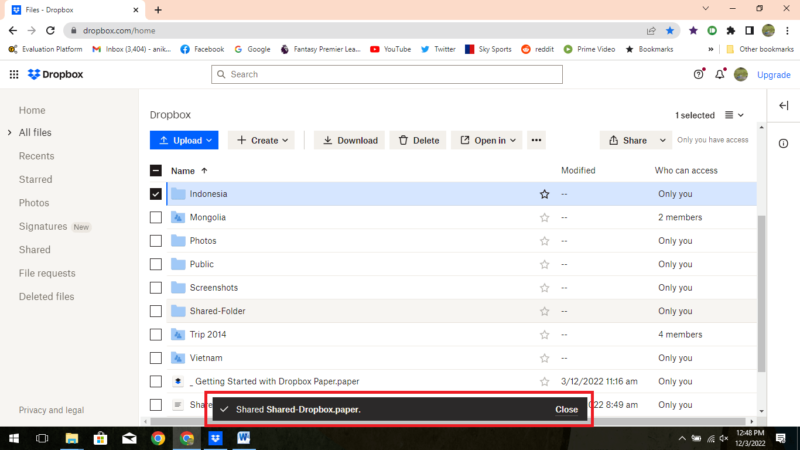
It is easy to share Dropbox files on Dropbox web. You can allow recipients different types of access such as “view only,” “comment” or “make edits.” Here are the steps to share files on Dropbox.
How to Share Files With Your Dropbox Folder
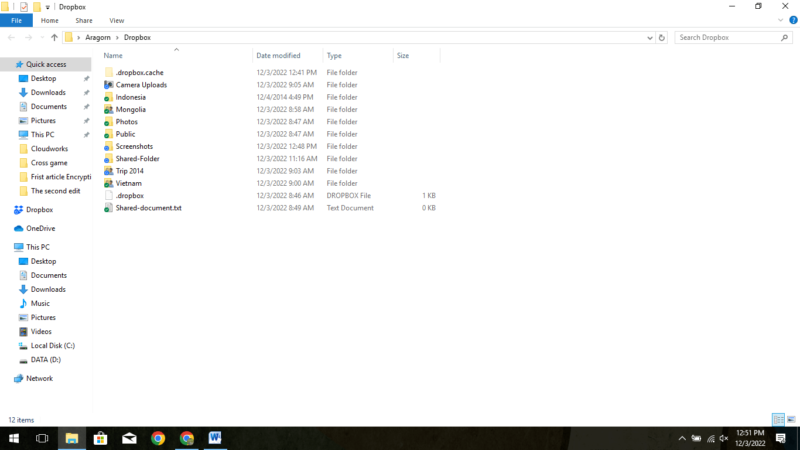
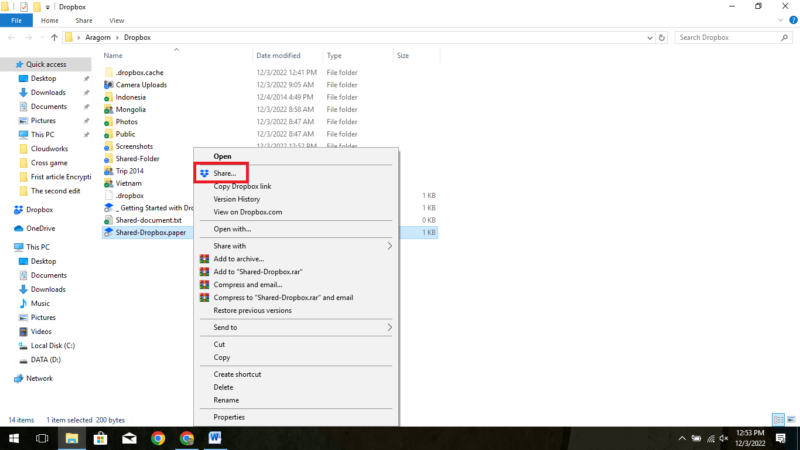
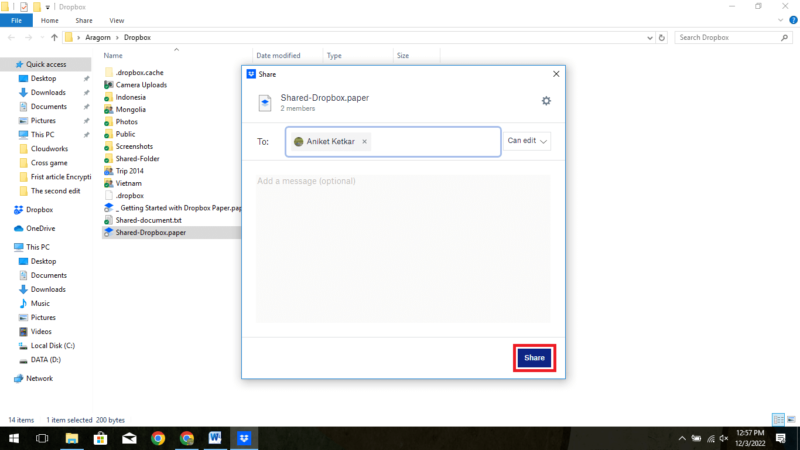
The Dropbox desktop app creates a Dropbox folder on your computer. This folder displays files and folders in your Dropbox account. It is possible to share files and folders using the Dropbox folder on the desktop (read our guide to understand Dropbox file size limit). Here’s how to do it.
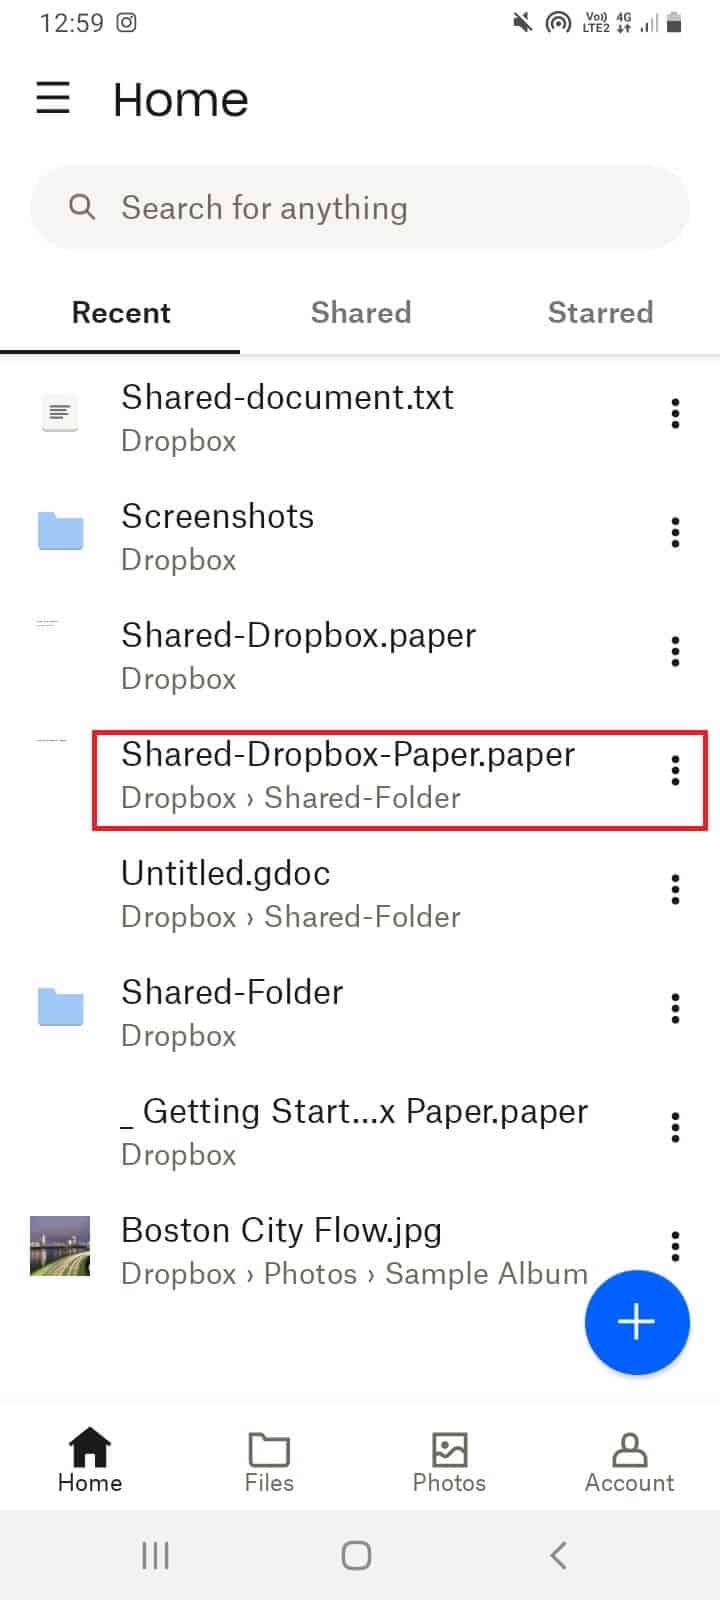
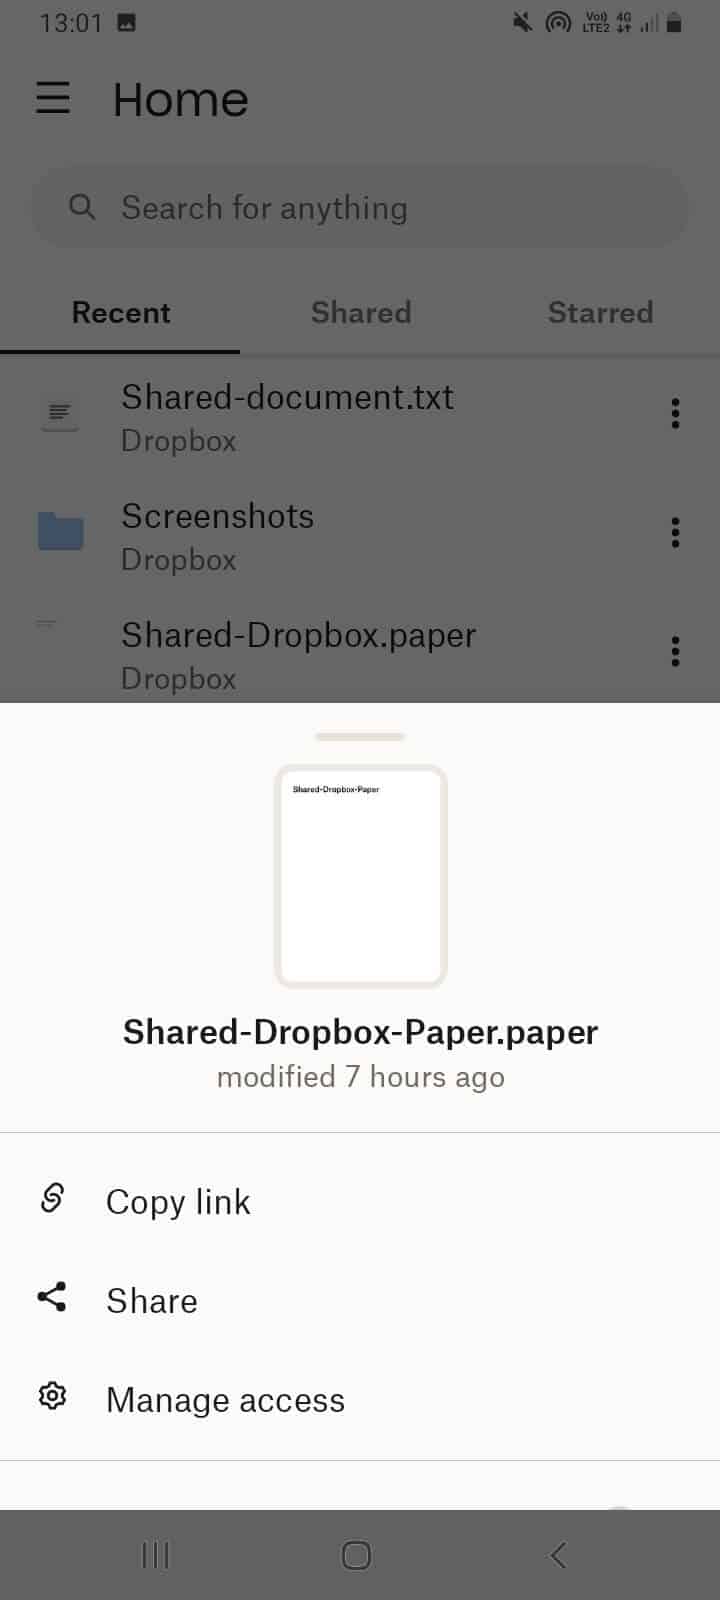
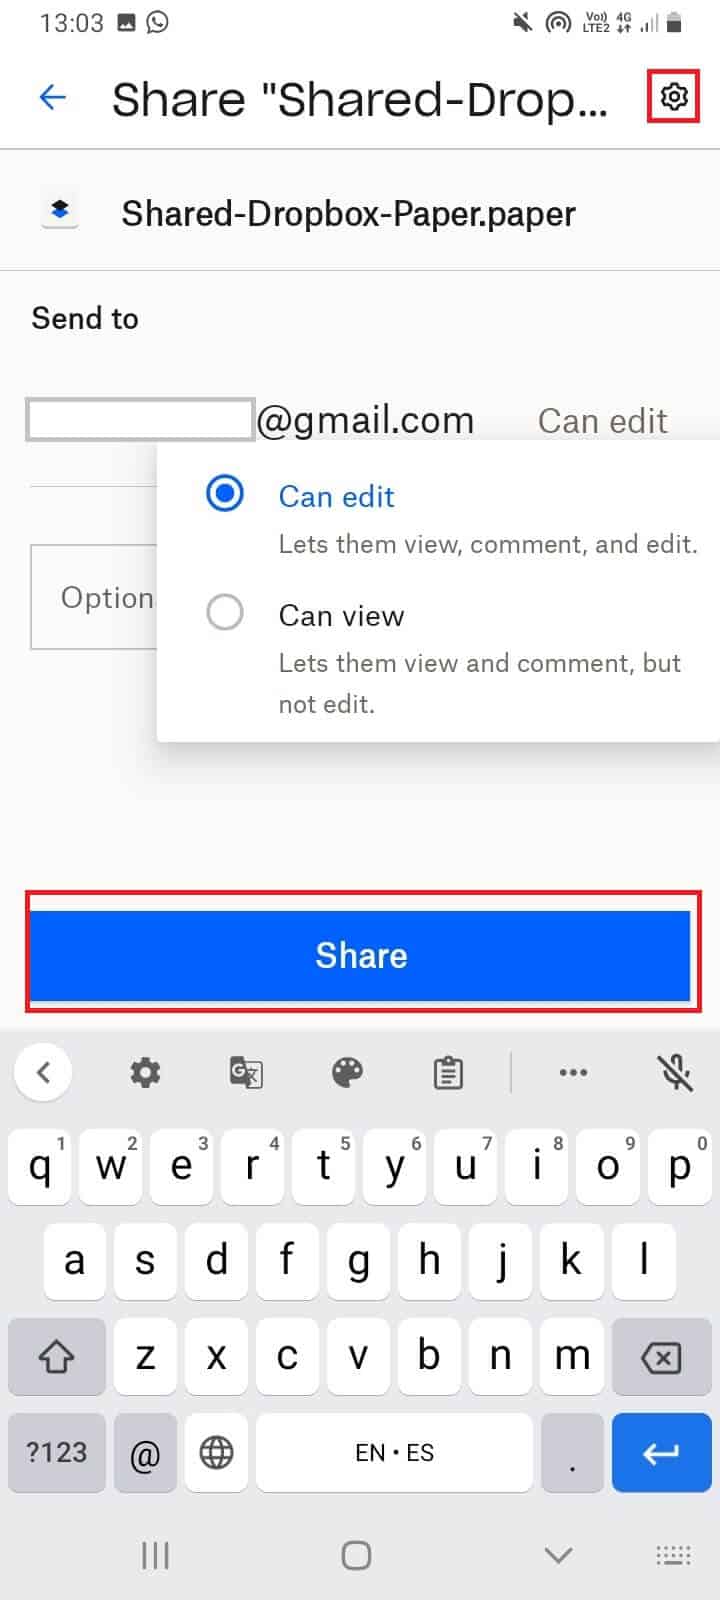
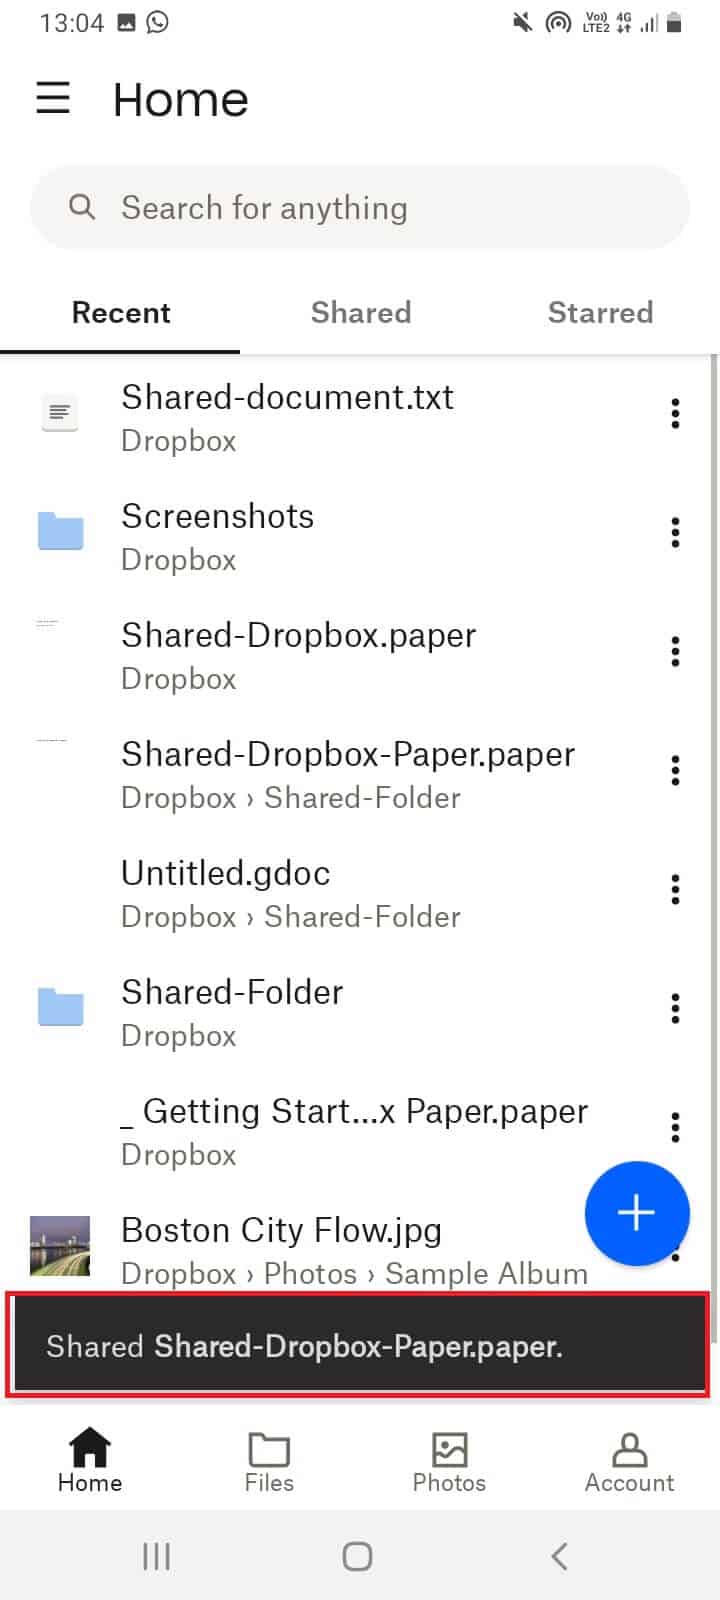
How to Share Files Using the Mobile App
Dropbox’s mobile app can also be used to share files or folders with other users.
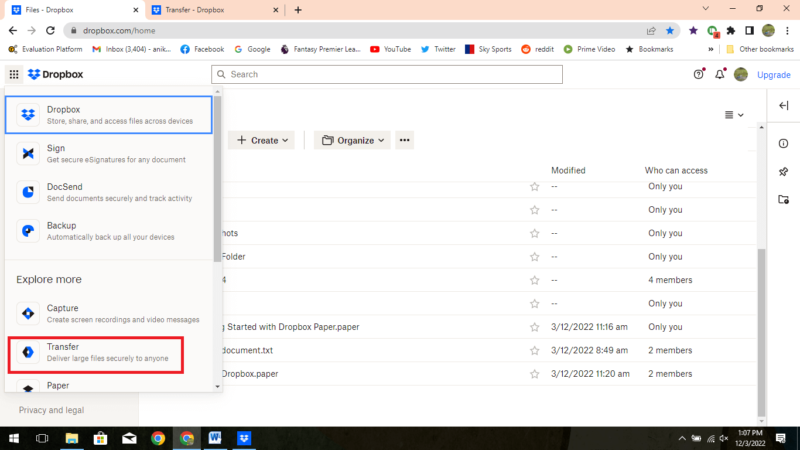
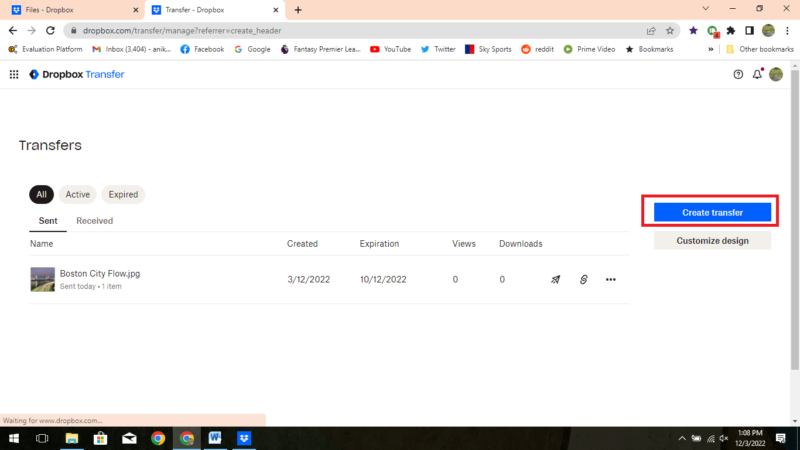
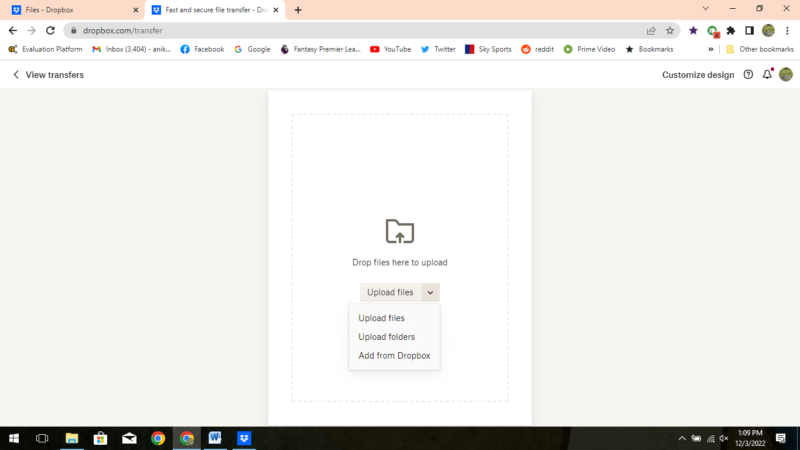
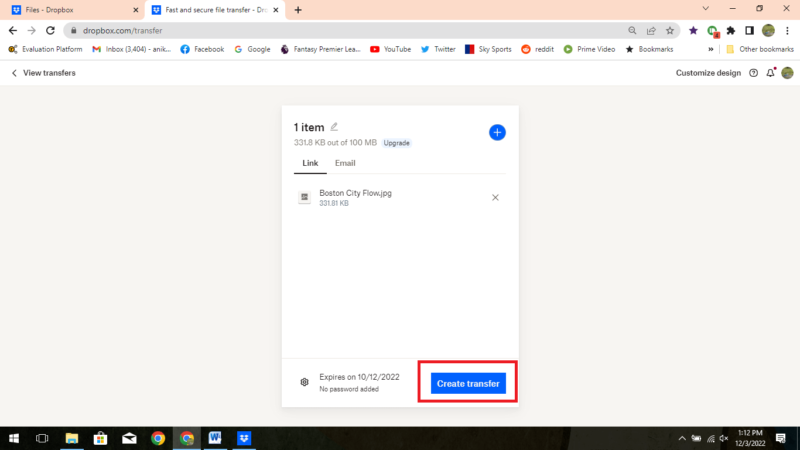
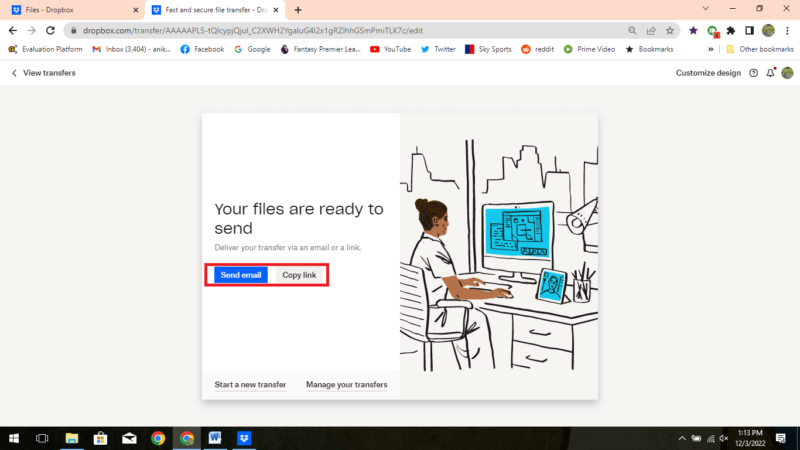
How to Share Files to Non-Users With Dropbox Transfer
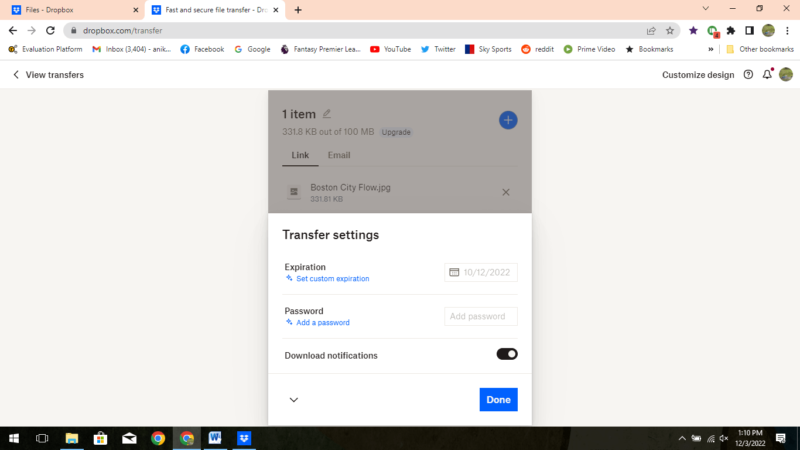
If you want to share files or folders with non-Dropbox users, or if the recipients do not have enough storage space to use normal sharing functions, you can use Dropbox Transfer. This service allows you to transfer files up to 100MB with the basic plan and up to 100GB with the Professional plan.
There is no restriction on the number or type of files you can send. Additionally, Professional plan users can add an expiration date and password to the file being shared.
It’s worth noting that Dropbox Transfer creates a separate copy of the file for the recipient. Hence, while it is a handy tool for sharing files with non-Dropbox users, it is not the best tool for working on collaborative projects.
Sharing Encrypted Files
While Dropbox has continued to evolve since its inception, perhaps its biggest flaw is the lack of end-to-end, zero-knowledge encryption. If you are worried about the privacy and security of your data, you might want to look at other options such as MEGA, Sync.com and pCloud.
Dropbox users can add this end-to-end encryption using third-party services such as Boxcryptor or Cryptomator, which involves additional hassle.
Recently, Dropbox acquired Boxcryptor and announced its plan to add end-to-end, zero-knowledge encryption for its paid Business plan users. However, this utility has yet to be implemented.
How to Set File Sharing Permissions
When sharing files, you can set permissions to allow recipients to edit files or view only. This allows additional protection of user data and restriction of access from unknown users. To prevent data loss, users can also use other features like adding a watermark or setting a password on the Professional plan.
- Assign View or Edit Roles
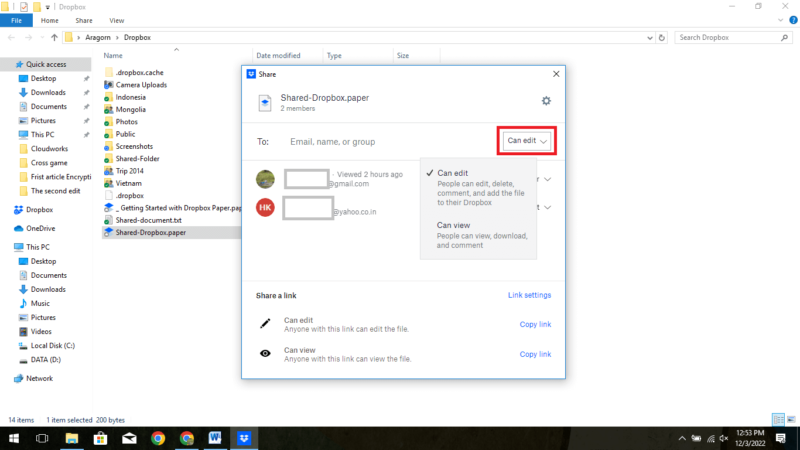
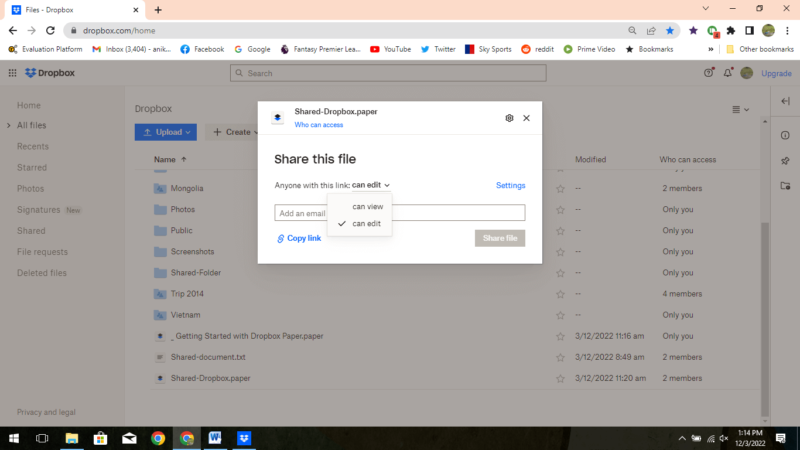
To share a file or folder with someone, use the sharing window to set permissions such as “can view” or “can edit.” These permissions will determine whether recipients can make changes to files and folders or only view them.
- Remove Unwanted Users
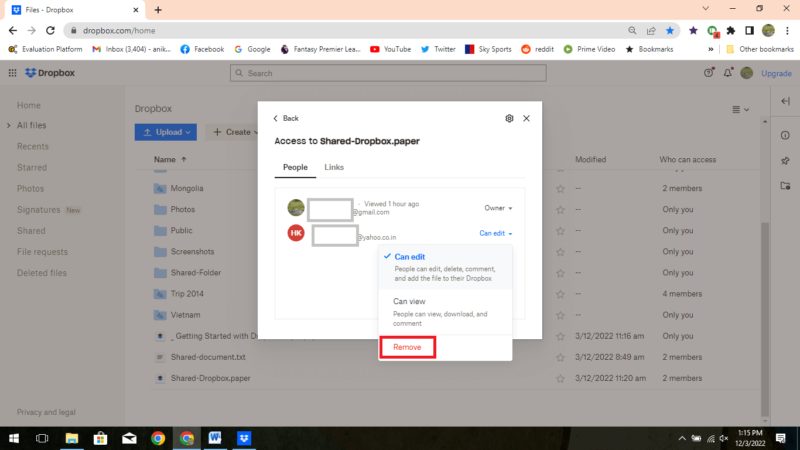
In the sharing window, under the file name at the top, click on the “who can access” link to view all the users with access to the file. You can click on the dropdown menu next to a person’s name that will allow you to change permissions or remove unwanted users from the list of those with access.
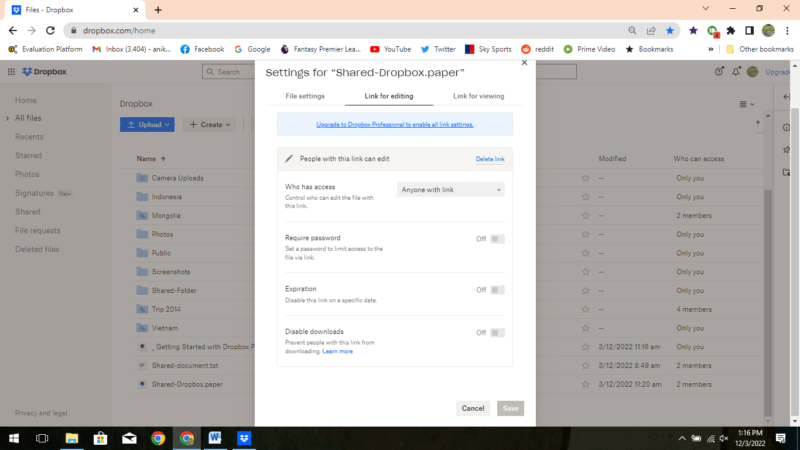
- Edit Link Settings
Anyone with a shared link can access and edit that file or folder. To prevent this, the Professional, Standard, Advanced and Enterprise plan users can edit link settings to add password protection, set an expiry date and disable downloads. You can access this tool by using the “settings” button in the sharing window that appears just above the email/name search box, or by clicking on the settings icon that appears at the top-right corner of the file sharing window.
Final Thoughts: How to Use Dropbox to Share Files
Dropbox makes it very easy to use sharing options on its desktop, web and mobile apps. It is also possible to set individual permissions and roles. Professional, Standard, Advanced and Enterprise plan users can set passwords, expiration dates and disable downloads.
Apart from the in-built file sharing options, users can also create sharing links and use third-party services such as WhatsApp to share files or folders.
Dropbox has a file transfer tool to share files with the non-Dropbox users or with those without sufficient cloud storage on their Dropbox accounts. File sharing tools of Dropbox are equally useful for both the Basic plan users and the Professional plan users.
Additionally, the recent acquisition of Boxcryptor by Dropbox might finally bring end-to-end, zero-knowledge encryption to its cloud storage service. However, for now this utility has only been announced for Business plan users and has yet to be implemented.
What did you think about our step-by-step instructions for Dropbox file sharing? Do you think the acquisition of Boxcryptor by Dropbox will make a big impact on the security infrastructure of the service? Let us know your thoughts in the comments section. Thanks for your time.
FAQ
Using the “share” tool in Dropbox, Dropbox users can easily send you files with “view” or “edit” access. Files and folders can be shared by inputting emails of desired recipients in the sharing window or by creating the links to share through third-party apps.
Dropbox file sharing utility is very easy to use across all its platforms such as web, desktop and mobile app. This utility allows users to set permissions of “view only,” “can view” or “can edit.” The Professional, Standard, Advanced and Enterprise plan users can also set passwords, expiry dates and disable downloads.


