How to Use Surfshark in 2025: Easy Step-by-Step Instructions
If you're new to VPNs, Surfshark is a great provider to get started with. It's intuitive, affordable and straightforward to use, making it a solid choice for VPN novices. Read on to find out how to use Surfshark.
Key Takeaways:
- Surfshark is easy to download and straightforward to use, making it a safe, affordable VPN choice.
- While it doesn’t have the fastest servers around, Surfshark’s wide variety of server locations makes it a decent option for unblocking streaming sites.
- With advanced features like an ad blocker and a multi-hop option, Surfshark certainly has some unique advantages when pitted against other popular VPNs.
Surfshark makes downloading its VPN app super simple, but once you’ve downloaded it, you might need some help to adjust the settings to make the VPN work the way you want it. That’s why we created these step-by-step instructions to ensure you know how to use Surfshark.
While the app is intuitive to use, you’ll need a foundational knowledge of VPNs, IP addresses and servers to know how to use the Surfshark VPN app. By using our guide, you can be sure you’re getting the most from your purchase. If you’re interested in learning more about whether Surfshark is the VPN for you, check out our recent Surfshark review.
An Introduction: How to Use Surfshark
Below, we’ll give you a detailed overview of how to sign up and download Surfshark, as well as how to set up some key features and how to use them. Before we dive into those details, though, we’ll explain some basics about Surfshark.
What Does Surfshark Do?
Surfshark is a VPN, which means it routes your laptop or mobile device’s internet connection through one of its private servers to enhance your privacy and security by hiding your IP address. This is why VPNs are so popular for gaming, torrenting and streaming. They give you privacy and the ability to access geoblocked sites around the world.
Protect Your Privacy. Get Our Free VPN Guide Now!
- Comprehend the essential role a VPN plays in safeguarding your digital life
- Gain a deep understanding of how VPNs function under the hood
- Develop the ability to distinguish fact from fiction in VPN promotions
Founded in the British Virgin Islands in 2018, Surfshark is quite the newcomer in the VPN sector. However, this provider has already gained a lot of momentum. With a network of more than 3,200 servers in 65 countries, it’s an excellent option for unblocking streaming sites like Netflix.
Surfshark has some other cool features that make it a good VPN choice. Its ad blocker, CleanWeb, worked pretty well for us in removing pop-up ads and malware. It also has a feature called MultiHop, which lets you route your connection through multiple VPN servers, supposedly giving you added security and privacy (although it does increase latency).
All in all, Surfshark is a respectable, straightforward VPN choice with a clean app interface. Ready to download it? Let’s get started.
How to Sign up and Download Surfshark
Signing up to Surfshark is very straightforward. Once you’ve clicked the ”get Surfshark” button on the Surfshark homepage, you’ll be directed to the signup page.
- Pick a Plan
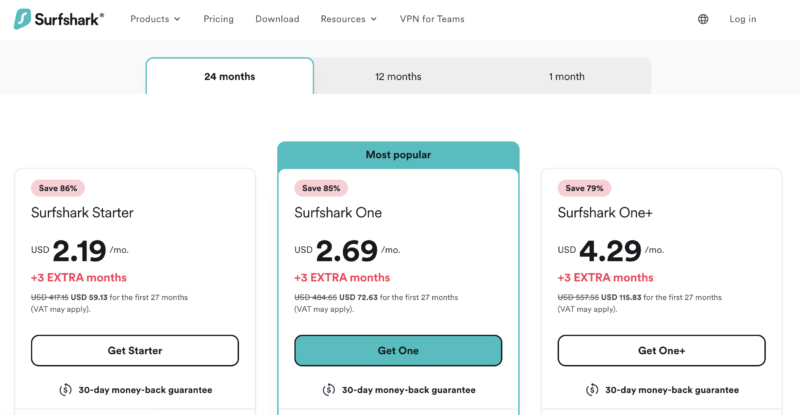
The first thing to do is pick your plan. The most economical option is the 24-month plan, which works out to around $2 a month. As a nice touch, Surfshark offers a 30-day money-back guarantee, so if you’re not happy with the service, you’re not tied in.
- Enter Your Details
Once you’ve picked your plan, the website will automatically scroll down the page for you and ask you to enter your email address.

- Consider Surfshark One
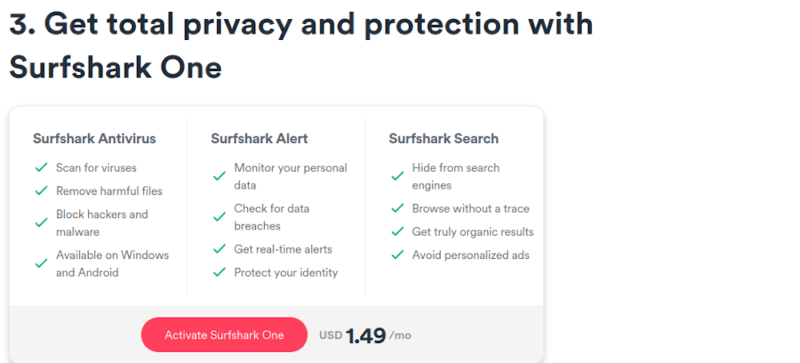
Remember the cool features we mentioned Surfshark offers? A couple more come exclusively in Surfshark’s “One” offering. This includes a monitoring system that flags passwords or email addresses that have appeared in a data breach. In this case, we chose not to go for Surfshark One, but it depends on your individual privacy concerns, so choose if you want Surfshark One.
- Choose Your Payment Method
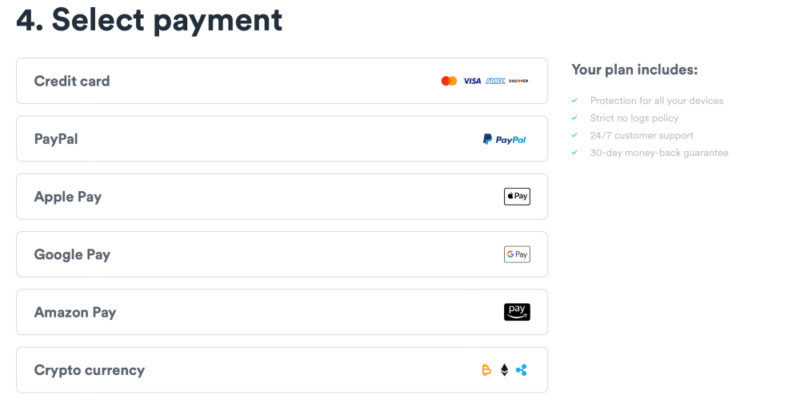
We like that Surfshark offers a range of payment methods — even cryptocurrency. Choose the payment method you want to use.
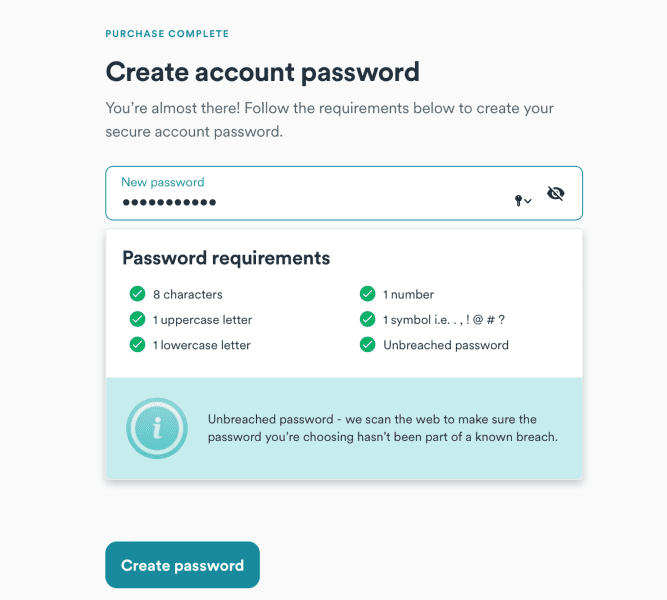
- Create a Password
Once that’s done, you’ll receive an email confirming your purchase and you’ll be asked to create a password.
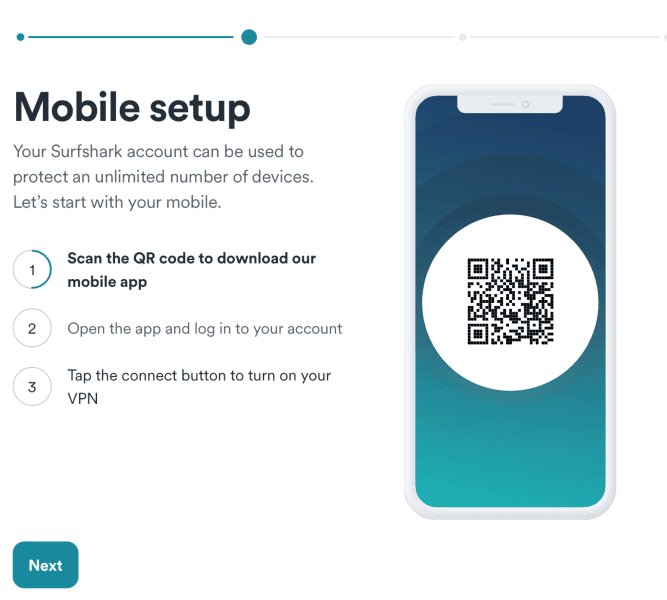
- Set up Surfshark on Your Mobile
A nice touch with Surfshark is that your account can be used on an unlimited number of laptops and mobile devices. If you’d like to set up Surfshark on your phone, scan the QR code that appears on your screen, and then enter your login details.
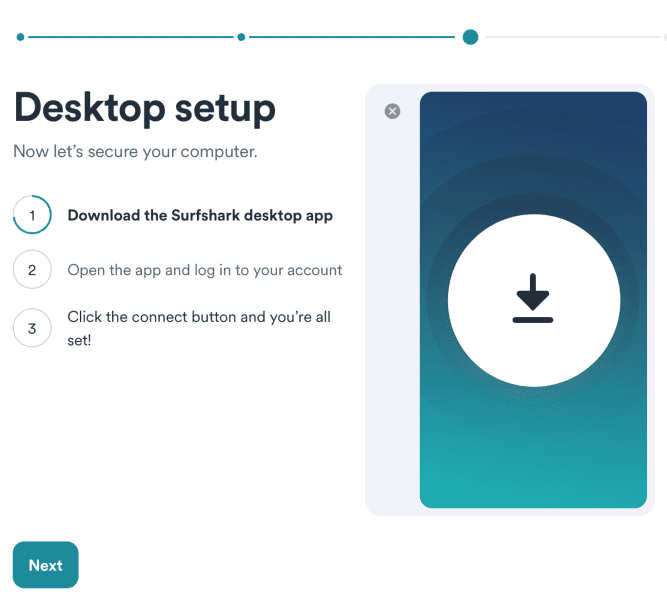
- Set up Surfshark on Your Desktop
The next page lays out how to install Surfshark on your desktop. To do this, click the download button. Then, find the app in your “downloads” folder and open it.
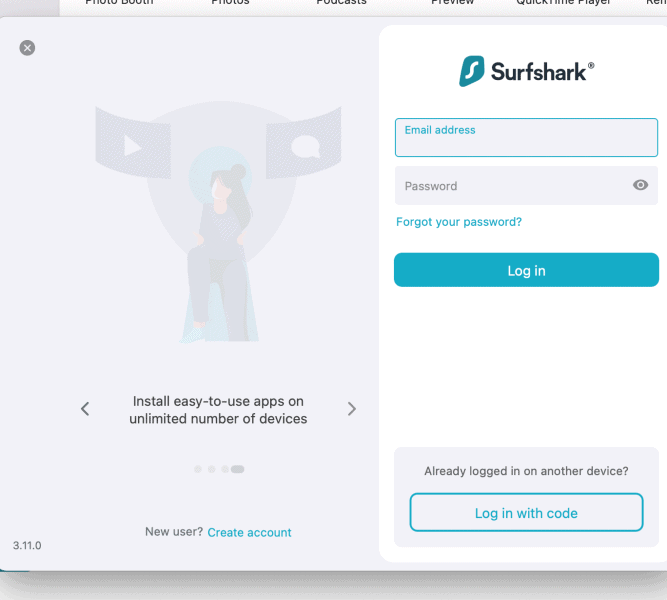
- Log in to Your Account
Once you’ve downloaded the app, it’s time to log in. Enter the same email address and password you created earlier and sign in to your account.
How to Set up Surfshark’s Key Features
Now you’ve officially got a Surfshark account. Here’s how to use some of Surfshark’s essential features, like auto-connect, split tunneling, kill switch, ad-blocker and more. We also have a full guide on how to use Surfshark dedicated IP feature.
- Set up Auto-Connect
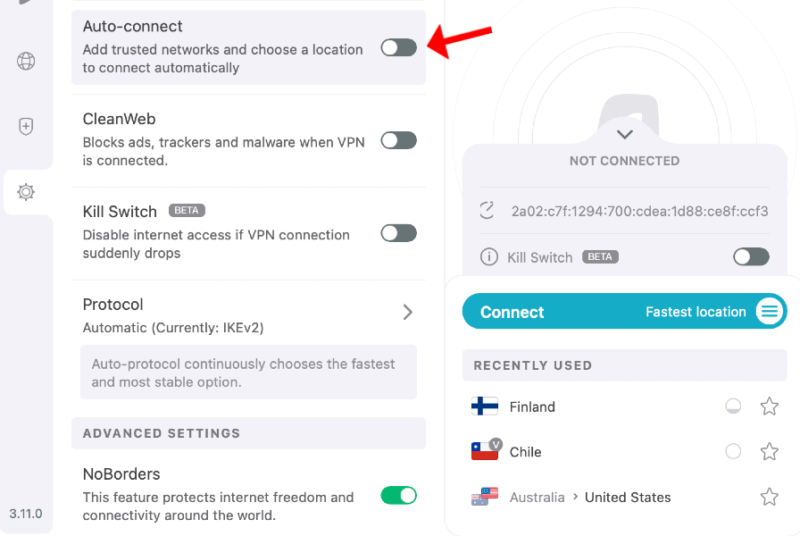
If you turn on auto-connect, your device will automatically connect to the WiFi or ethernet connection through the VPN. In your Surfshark app, click the settings icon in the left-hand corner, then click “VPN settings.” From here, you can turn auto-connect on and set your preferences.
- Enable VPN Split Tunneling
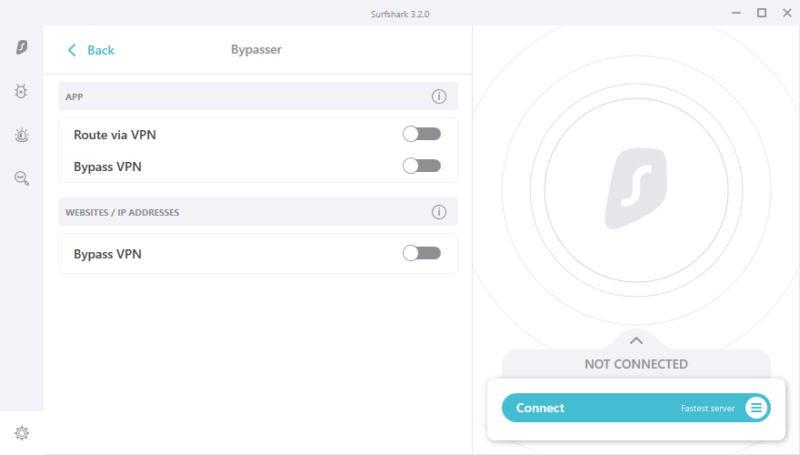
Surfshark calls its split tunneling feature “Bypasser,” which enables only some of your internet traffic to pass through Surfshark servers, while the rest uses the internet. Like before, go to the settings menu and click “Bypasser.” From here, you can select applications and websites you want to be excluded from the VPN. Please note, this feature is not available on iOS.
- Use the Kill Switch
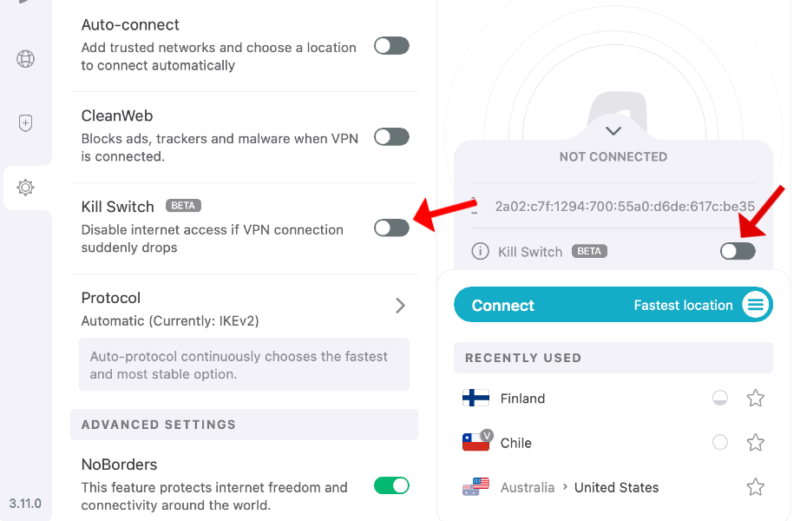
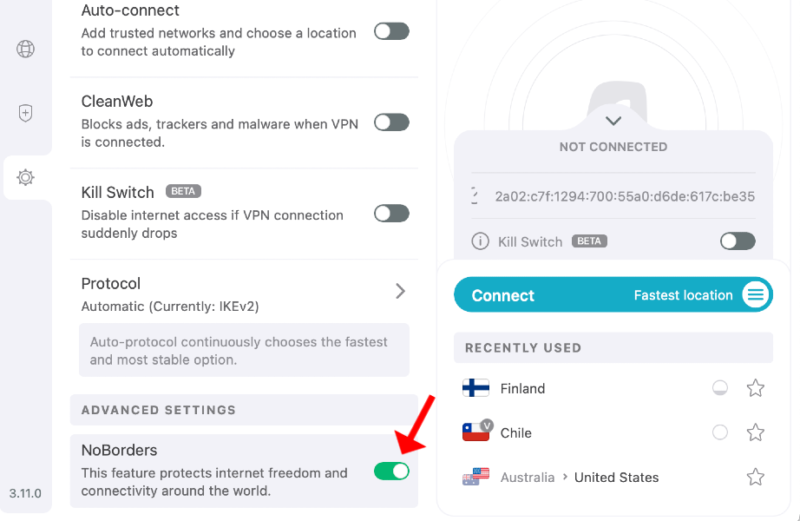
A kill switch is a tool to secure your privacy in the event your VPN connection drops. If this happens, the kill switch will turn off your internet connection, protecting your data and location from exposure. You’ll see the kill switch toggle as an option on the right-hand side of your application below the Surfshark logo. You can also access it in the “settings” tab. Please note that this feature is still in beta.
- Authorize CleanWeb
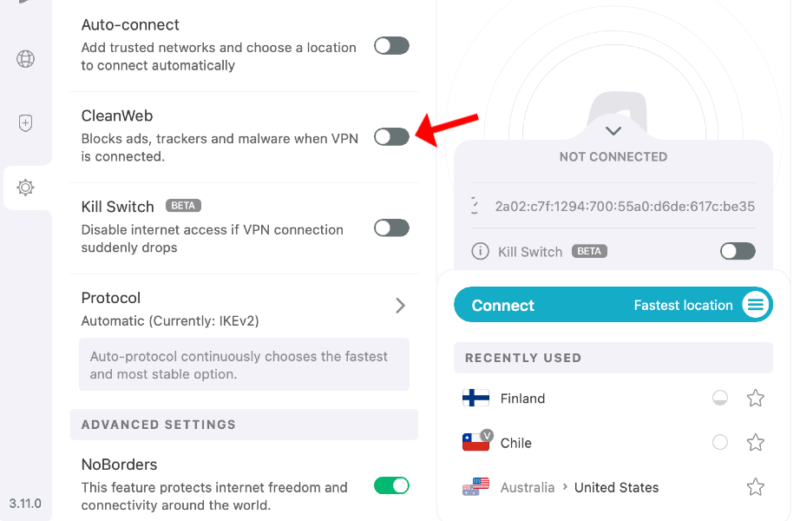
CleanWeb is a solid cybersecurity feature that blocks malicious adverts and websites. With CleanWeb switched on, you’ll see far fewer ads. To launch it, go to the settings tab, click “VPN settings” and click the toggle to turn on CleanWeb.
- Use NoBorders Mode
NoBorders is a feature that bypasses network restrictions in restricted countries. NoBorders mode should turn on automatically when needed. However, you can turn it on manually by going to the “settings” tab, then “VPN settings” and clicking “NoBorders.”
- Choose Protocols
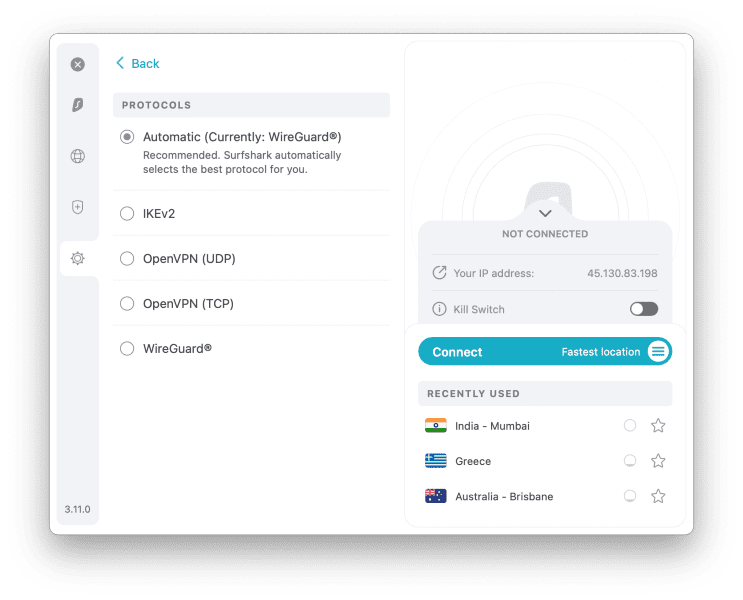
Surfshark offers a choice of protocols, all of which can be found when you click the “protocol” section in the “settings” tab. You can choose from IKEv2, OpenVPN and WireGuard. Each protocol has its own merits: IKEv2 is very fast and great for mobile; OpenVPN offers high levels of security; and WireGuard is extremely fast and secure.
How to Connect & Disconnect Surfshark
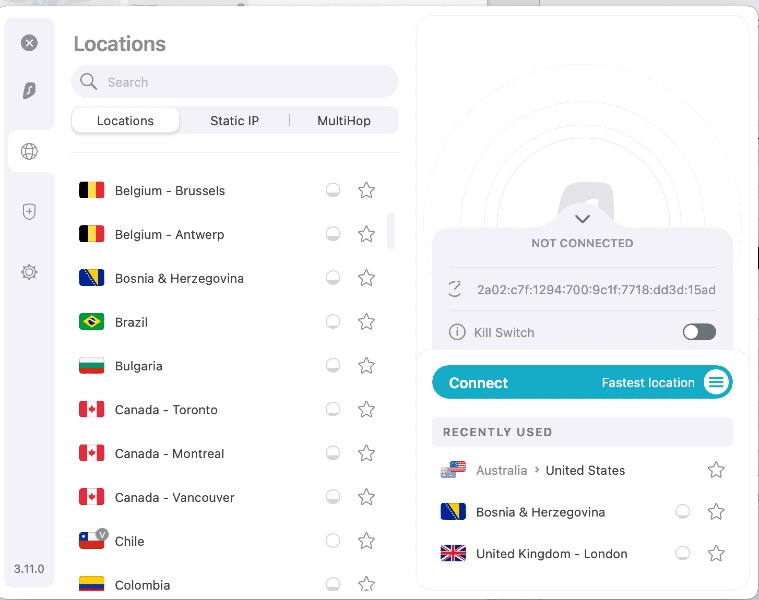
Once you’re logged in, Surfshark’s settings menu offers a range of servers to choose from, depending on what you want to access. Follow the steps below to get connected.
- Select the Country You Want to Access Your VPN Connection Through
Click your country of choice, and Surfshark will automatically connect you. You can also click the blue “connect” button and Surfshark will automatically pick the fastest server. It will thenshow an intermediary page, saying “attempt 1 of 4” to connect. In our case, the VPN connection succeeded on the first try. From there, you can browse the web with your privacy needs covered.
- Disconnect From the VPN
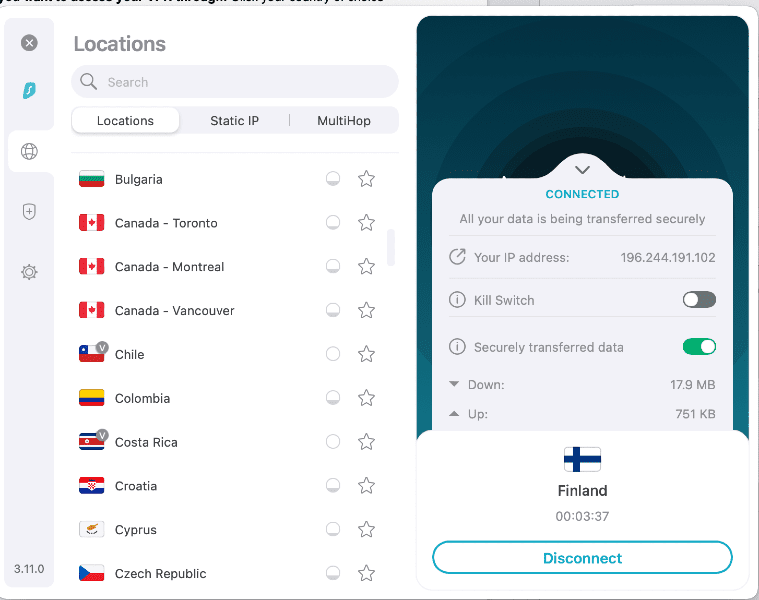
Disconnecting from the VPN connection is straightforward: Just click the button that says “disconnect” in the app.
Final Thoughts
Overall, the Surfshark app is intuitive and straightforward to use for VPN newcomers, with a solid range of server locations and advanced settings. While it’s not the fastest VPN on the market, it’s a cost-effective option for everyday streaming and gaming needs. For another VPN that offers unlimited simultaneous connections, read our Surfshark vs IPVanish guide.
If you’ve already given Surfshark a go but find that it doesn’t fit your needs, refer to our guide on how to cancel Surfshark – a straightforward guide to help you cancel any recurring subscription costs. If you want to look for other options, head to our guide on the best Surfshark alternatives.
As always, we’d love to know your thoughts. What did you think of our Surfshark VPN how-to guide? Have you tried Surfshark? Would you recommend it to friends? Let us know what you think in the comments. Thanks for reading.
FAQ
Signing up to Surfshark is super straightforward. Once you’ve clicked the “get Surfshark” button on the homepage, you’ll be directed to the signup page. This webpage is laid out really intuitively, with step-by-step instructions that guide you through creating an account.
After you’ve signed up and downloaded the application, you’ll be asked to log in. Once you’ve done this, you’ll be taken to the application homepage. Click your country of choice, and Surfshark will automatically connect you.
Surfshark is a VPN provider with a network of more than 3,200 servers in 65 countries. It works by routing your laptop or phone’s internet connection through one of its private servers. By doing this, you get enhanced privacy and security.


