How to Back Up Android Phone in 2025: Keeping Your Android Device Safe
Learning how to back up Android phone devices is simple and important to make sure you don’t lose important photos or files. In this guide, we’ll show you three simple ways you can back up your Android phone, using Google Drive, other cloud storage services or your Windows PC.
Learning how to back up Android phone devices is crucial to avoid app data loss. Accidents happen every day, from losing your phone to dropping it in water to suffering malware attacks. When this happens, the recovery process could involve a lot of costly steps if you haven’t backed up your data. This guide shows three easy ways to keep your data backed up and safe.
Key Takeaways:
- The easiest option is to back up your Android phone to Google Drive, which comes pre-installed on all Android devices.
- If you want an alternative to Google Drive because of its controversial history with privacy and data protection, you can use a third-party cloud backup service such as IDrive.
- You can also do a local backup using your Windows PC.
In this guide, we look at three ways you can back up your Android phone: using Google Drive, the online backup service IDrive and your Windows PC. Keep reading for the step-by-step instructions.
-
08/24/2022
Updated IDrive’s pricing information.
-
12/01/2022 Facts checked
Rewrote the guide, including step-by-step instructions.
How to Back Up Android Phone Devices to Google Drive
You have two options for a Google backup: Google Drive (under 15GB of files) and Google One (greater than 15GB). Google Drive comes pre-installed on all Android phones, so you don’t need to download it from the Play store (read our full Google Drive review). Drive is one of the best cloud storage solutions because of its ease of use, but it doesn’t have strong privacy.
To back up your device to Google Drive, you need a strong mobile or WiFi connection. Google Drive will let you choose between WiFi or mobile data. Android backup with WiFi is helpful when you need to upload large files.
10,000+ Trust Our Free Cloud Storage Tips. Join Today!

- Demystify cloud storage terminology and key concepts in plain language
- Discover easy-to-implement techniques to securely backup and sync your data across devices
- Learn money-saving strategies to optimize your cloud storage costs and usage
Google One is Google’s subscription-based storage plan that you can upgrade to once you’ve exceeded the 15GB storage limit.
Now that you know what to expect before backing up your Android to Google, let’s take you through the backup process.
How to Back Up Android Data Using Google Drive
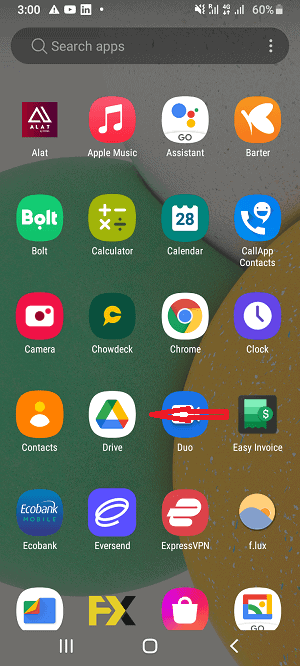
- Open the Google Drive App
Click the Drive Android app on your device and tap the triple bar icon in the top-left corner of the home screen.
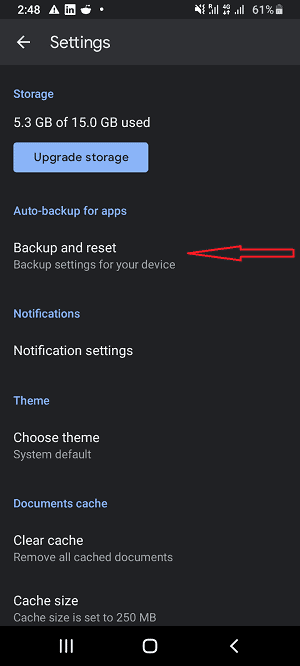
- Tap the Backup and Reset Option
Click on “settings.” You should see a backup and reset option.
- Tap the “Back Up Now” Button
A page displaying the amount of storage space you have left, a “back up now” icon and details of your backup should appear. The “back up now” icon should also have a toggle directly above it that says “backup by Google One.” Switch this toggle to “on.”
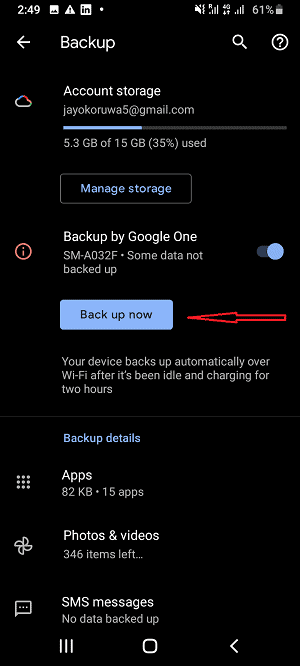
The backup process may last several hours, especially if this is your first time. In that case, Google recommends you use a WiFi network and leave your phone plugged into a charger overnight. Once the file transfer is complete, you’ll be able to see the time the backup finished.
How to Back Up Android Photos With Google Photos
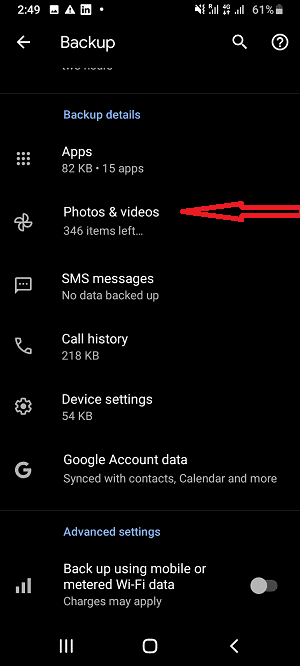
- Give Google Photos Access to Your Files
If you haven’t already, you’ll need to download Google Photos from the Google Play Store before you can back up your photos and videos. Once you’ve installed Google Photos, tap “photos & videos,” and give Drive permission to access your files and media.
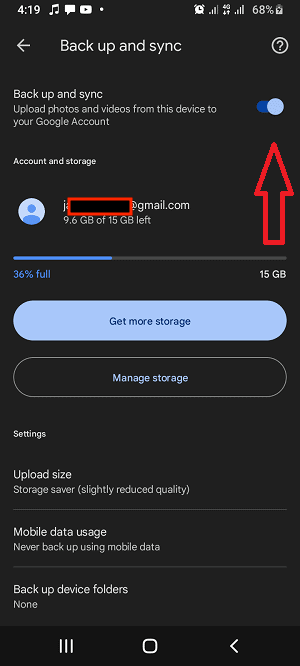
- Select “Back Up and Sync”
The next page that shows will have a “back up and sync” option at the top. Toggle on this option to upload your photos and videos to Drive.
How to Back Up Android to Online Backup Services
Google Drive offers convenience and a rich feature set, but it’s not our favorite storage service for Android, given Google’s history of sharing user data with governments and elements of its privacy policy that allow it to do so.
Cloud storage services and online backup services often share similar features for saving your device data online, but backup services often provide easier systems to regularly transfer data after the initial setup process.
We’ll show you how to back up your files with IDrive, an online backup service that values user privacy. Read our full IDrive review to learn more about the service. You can also check out how it differs from Google Drive in our Google Drive vs IDrive comparison guide.
- Open IDrive
Sign up for the service — it comes with 10GB free — and log in. Tap “backup” on the homepage. When you do this, you’ll see a list of all the files on your phone you can back up.
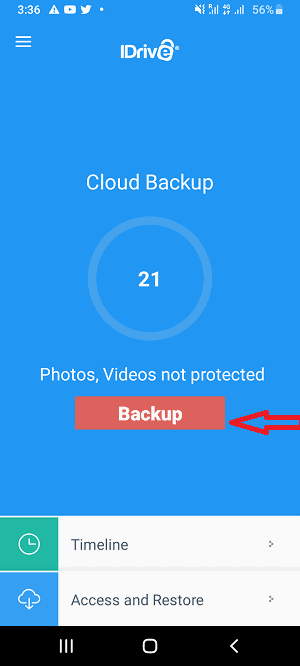
- Choose the Files You Want to Back Up
You can choose individual files or select all your files for backup. IDrive only lets you select all your files if you grant it access to your contacts, storage, SMS and phone permissions. Otherwise, you’ll have to select all your files manually. Once you’ve selected all the files you want to back up, click on “backup now.” This starts a one-time manual backup.
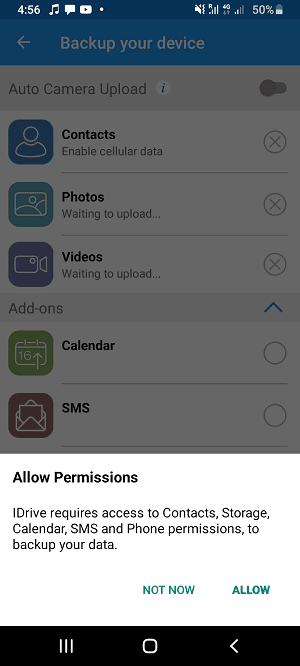
- Schedule Your Automatic Backups
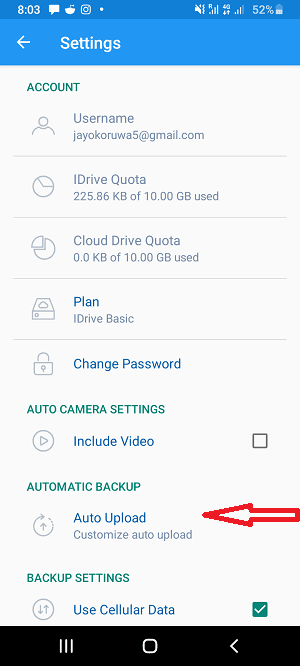
To enable scheduled backups, which automatically back up all your files at regular intervals, tap the “menu” tab at the top-left corner of the home screen and navigate to the “settings” tab.
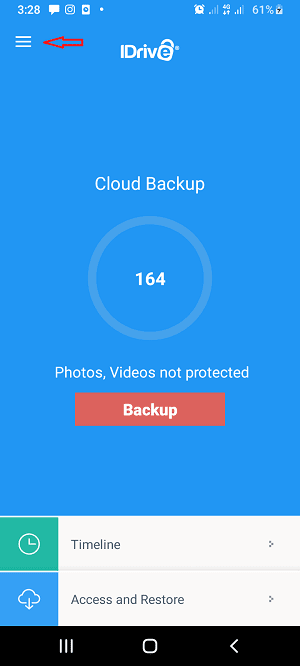
- Schedule Automatic Backups
Scroll down to “automatic backup,” tap “auto upload,” and select “schedule backup.”
- Choose the Backup Frequency
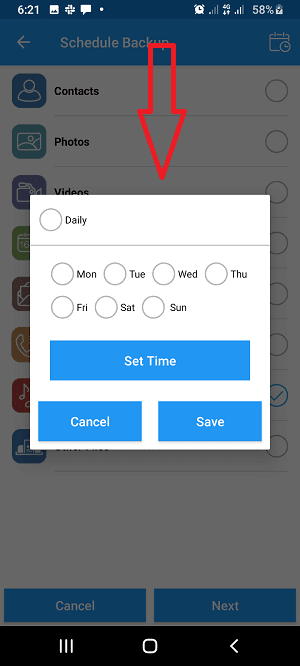
The next screen will have a list of different file categories on your device. Tap a category and select a start time and frequency for your backups. Once that’s selected, your files will automatically backup at the times you specify.
- Choose Whether to Use Cellular Data or WiFi
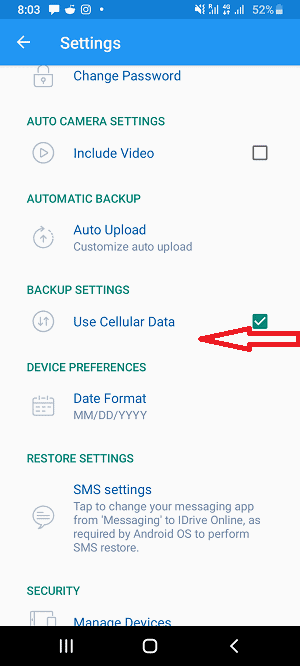
Finally, on the “settings” page, there’s an option to use cellular data when backing up your files. However, remember that WiFi is better for backing up large files.
How to Back Up Android Locally to Windows PC
As you may already know, backing up files on your Android to your PC is an example of local backup. While cloud backup involves storing files on remote servers accessed via the internet, local backup refers to the process of storing files on physical devices. Both cloud backup and local backup can be powerful tools in your phone data protection strategy.
Which option is better depends on your storage needs, and at times it may be best to go for a combination of both. To learn more about the advantages and disadvantages of each, watch our cloud backup vs local backup video.
- Plug Your Android Phone Into Your Windows PC
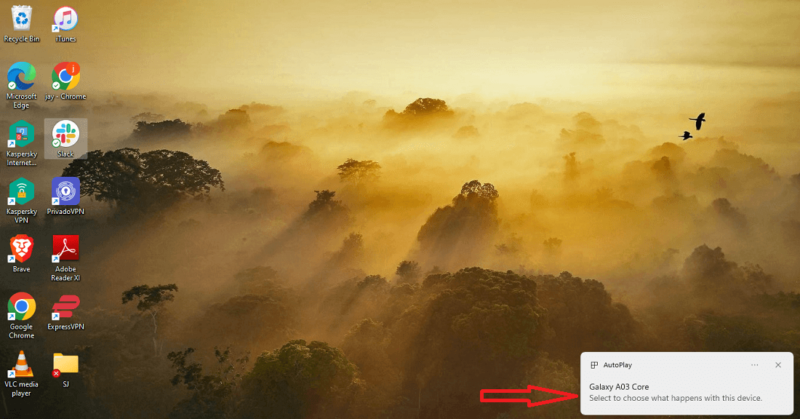
Use a USB cord to connect your Android device. Once you do this, you should get a notification that Windows has recognized your device.
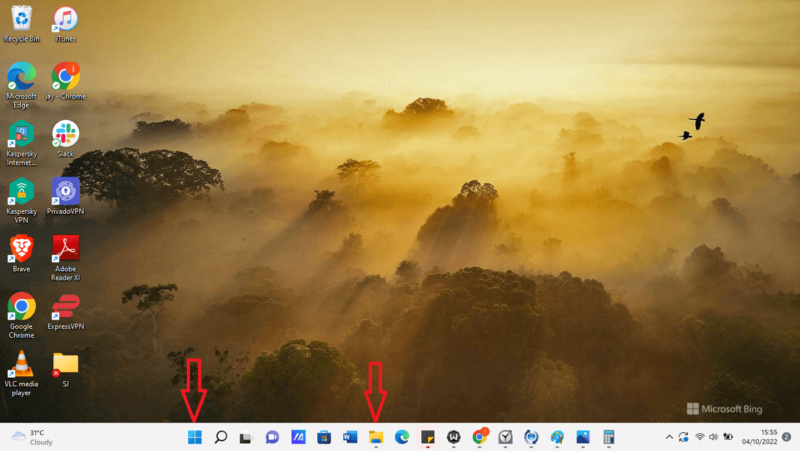
- Open Windows File Explorer
Locate Windows File Explorer on your taskbar or by clicking the “start” menu. Navigate to the left menu bar.
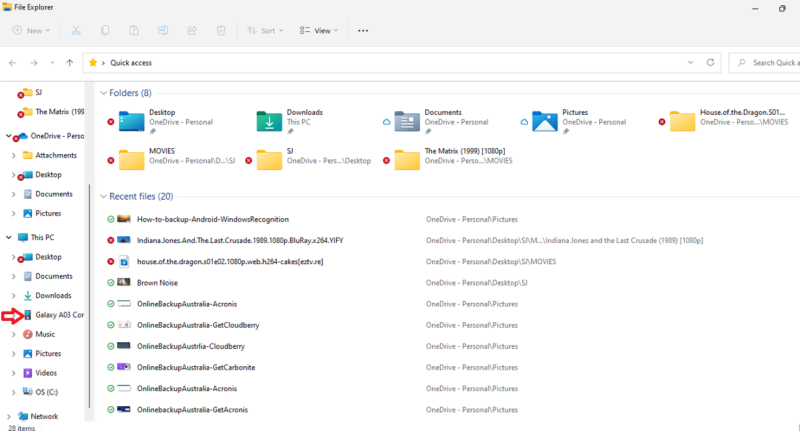
- Locate Your Device Name
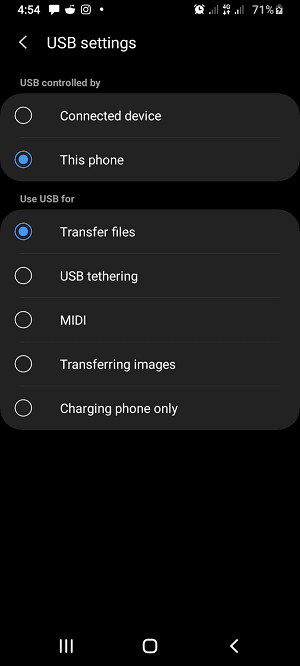
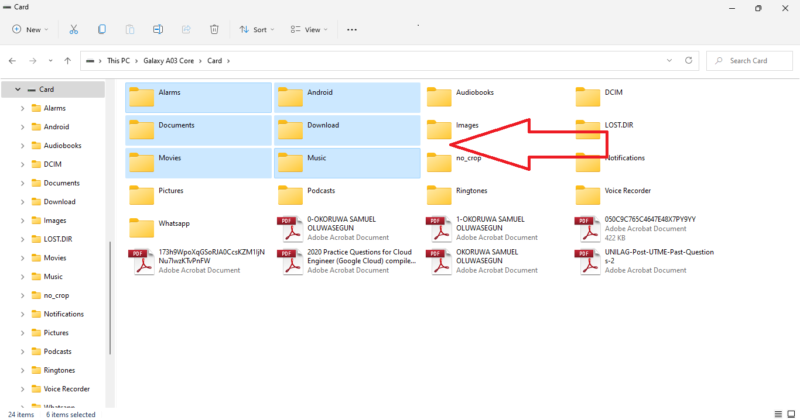
Scroll down until you see the “this PC” menu and look for the name of your Android device beneath it. If you can’t find it, it might be because your phone-PC connection isn’t in “transfer files” mode.
- USB Settings
To change this, pull down the notification panel and check for the “USB” notification. Tap it and select “transfer files.”
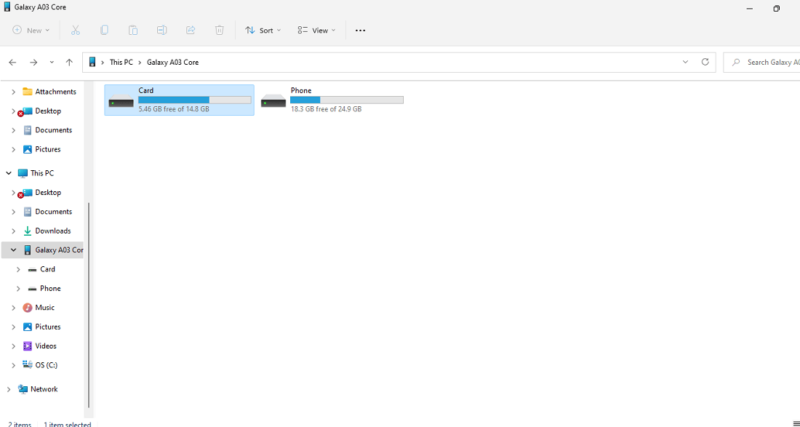
- Click on Your Device Name
On your PC, click on your device name, and you should be able to see folders containing all the files in the phone’s internal memory and SD card.
- Transfer Files From Your Phone’s Memory to Your PC
Select the files you want and copy them to the location of your choice on your PC.
Final Thoughts
Which of these three options for backing up Android is best for you depends on your goals and what you’re looking to get out of the backup process. Hopefully, you now know what steps to take after you make a choice.
Backing up your phone is beneficial, but it’s only half the story. While backups protect your data from hardware crashes, they don’t necessarily shield it if your phone gets stolen. To make your data in your phone unreadable to anyone else but you, consider the benefits of encrypting your phone too.
Did you find this article helpful? Have you tried using any of these methods? Let us know in the comments section below and, as always, thanks for reading.
FAQ
You can back up your phone using a cloud backup service, your Windows PC, your Mac or Chromebook.
There’s no way to fully back up your entire device without root access — administrator-level access to system applications — which increases the risk of ending up with a bricked phone. With a cloud backup service or a PC, you can only back up data like files, documents, contacts, photos, SMS, songs, videos and more.
You back up your Android to your PC via USB.
You can back up your Samsung phone using Google Drive or another cloud backup service. However, if you want an alternative to these options or plan to stick with Samsung, you can use Samsung’s cloud service to back up your device.


