How to Fix an IDrive Backup Failure in 2025
Experiencing problems with your backup is annoying and can lead to data loss. That means you should try to fix an IDrive backup failure as soon as you notice the issue. If you’re not sure how to do this, read on for instructions.
Given how cheap some online backup providers are and how often hard drives fail, it’s no surprise many people want to keep a copy of their data in the cloud. However, a backup isn’t as useful if it’s not up-to-date, and a backup failure might put your data at risk. In this guide, we’ll show you how to fix an IDrive backup failure and explain why they occur in the first place.
Key Takeaways:
- IDrive is an excellent provider, but backups can fail in a variety of ways.
- The logs can be a great way to get more information on the failure.
- There are several useful ways to fix backup problems.
With every piece of software, there’s a risk an unexpected error will occur. Backup providers — even the best of the best — are no exception to this rule. However, there are tricks to solve these backup failures and ensure your data is safe.
The basic troubleshooting tips and fixes we’ll look at should help with most backup errors across many providers, but we’ll be focusing on IDrive. If you want to learn more about this provider, read our full IDrive review.
IDrive Backup Failure Types
There are a few reasons you might have issues with your backup, but it’s also possible that something that seems like an error is IDrive running normally. Before you troubleshoot, it’s worth double checking where your local backup is being stored and that you’ve selected all the files, folders and other data you want to protect.
10,000+ Trust Our Free Cloud Storage Tips. Join Today!

- Demystify cloud storage terminology and key concepts in plain language
- Discover easy-to-implement techniques to securely backup and sync your data across devices
- Learn money-saving strategies to optimize your cloud storage costs and usage
File Issues: Red Files & Deleted Files
One issue you may come across when you’re selecting files for your scheduled backups is a red file in the folder structure. IDrive will ignore these files because they’ve been excluded. To fix this, go to the settings tab and change the exclusions list.
You could encounter actual problems, though, which usually come with error messages in the logs. For example, there’s a “file/folder does not exist” error, which means you’ve deleted a file and you need to update the backup file list.
Errors: Permissions & File Name
You can also get permission errors, where Windows is blocking IDrive from doing something and you need to increase its access level.
Another common set of problems are related to the file’s name. Usually, the file can’t be backed up because the file path is too long, the file name contains invalid characters or the file already exists in your backup. Simply changing the filename is the best solution.
Although you normally get a helpful error message, sometimes you get a generic “backup operation failed” alert with no details. In this case, you’ll need to go through the logs to find more useful information.
How to Find the IDrive Logs
Like with most services, the IDrive app saves logs of information. Since these can be handy for troubleshooting issues, especially if you end up talking to IDrive support, there’s a button in the desktop client that will take you straight to the logs.
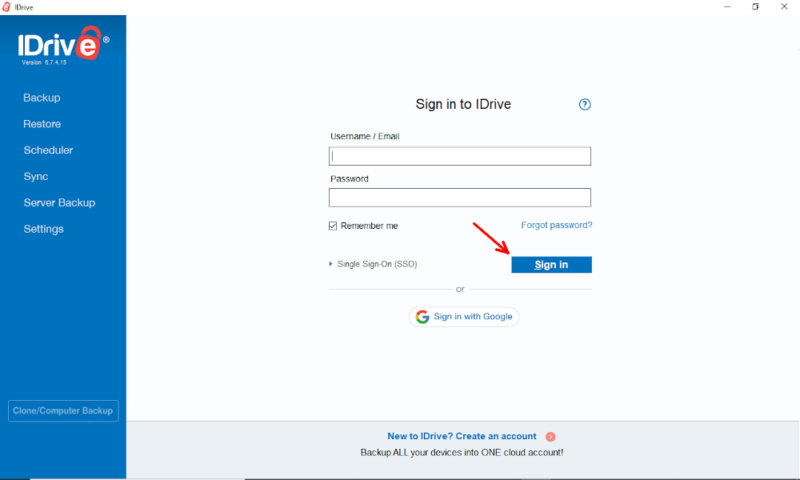
- Open the Desktop Client and Sign In
The easiest way to access the logs is through the client, so open IDrive on your PC or Mac and sign in.
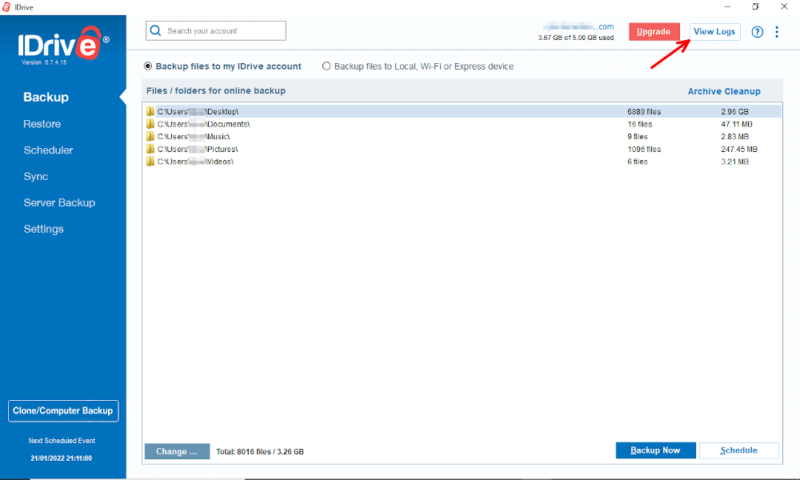
- Click the “View Logs” Button
Once you’ve logged in to your account, you should be taken to the “backup” tab. If not, find it on the left of the window. Then, click the “view logs” button in the top-right corner of the screen.
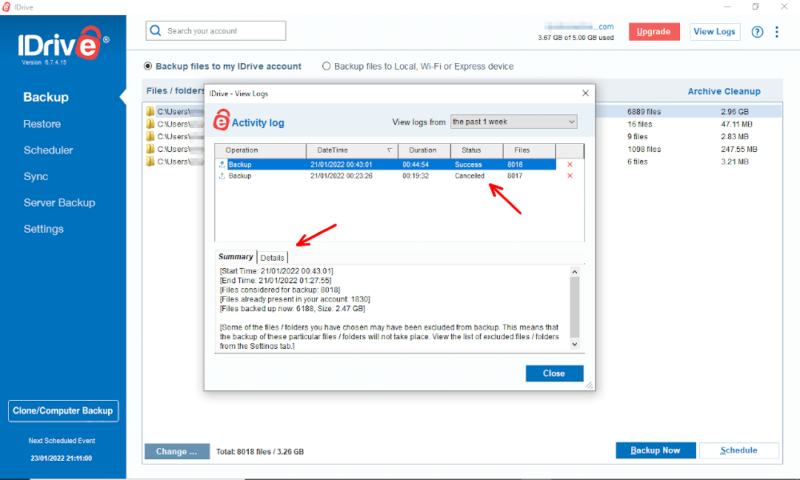
- View Your Logs
A new window will have opened. The top half will let you select from recent backups. The log details and summary sections underneath will give you information about specific files that were recently uploaded and general information like start time, end time and the number of files considered for backup.
How to Fix an IDrive Backup Failure
There are a few easy steps you can go through to try and solve the problem that’s stopping your IDrive backups from completing. After going through each of these steps, check to see if the missing files have been added to your backup and that it’s working correctly.
How to Refresh the Backup Selection in IDrive
A quick trick that can fix some errors is to force IDrive to refresh the backup selection. This stops IDrive from trying to back up files that aren’t present on the computer without affecting all the files that are still there.
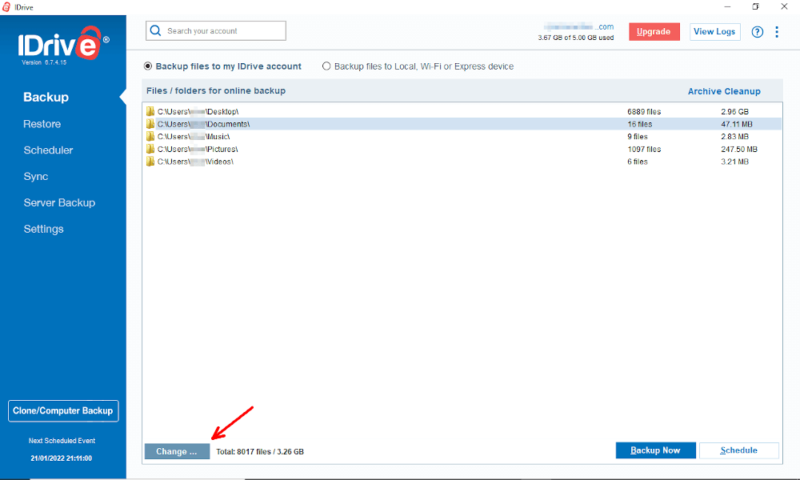
- Open the “Backup” Selection
In the “backup” tab, click the “change” button along the bottom.
- Add or Remove a Folder
This step is as simple as changing something in your backup set. We recommend adding an empty folder, so it doesn’t disturb your backup, but any edit will do. Once you’re done, press “OK.”
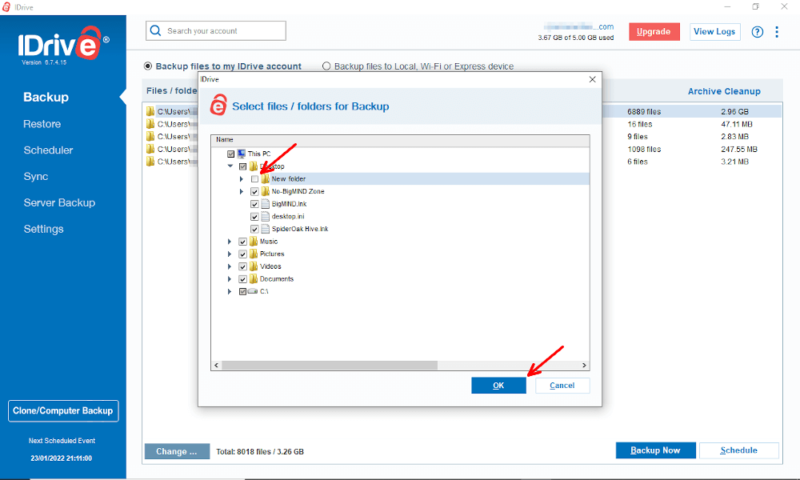
- Reverse the Change
Now go back to the same window and reverse the change you made. It will have updated the backup selection and has hopefully fixed your problem.
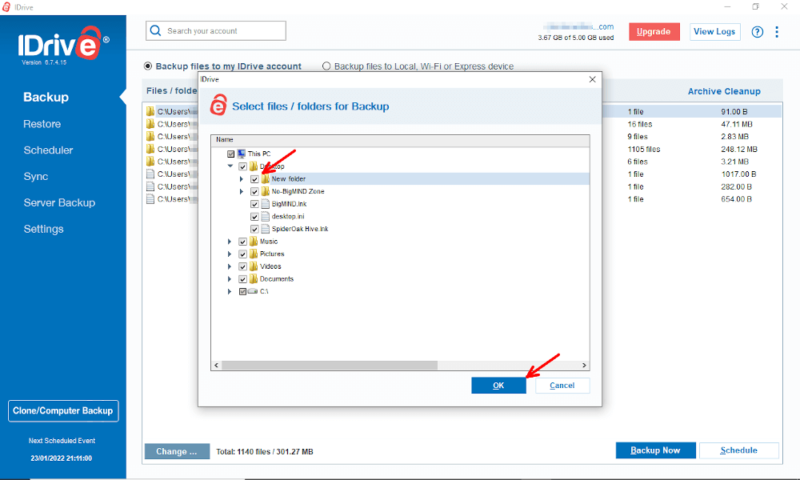
How to Run IDrive as an Administrator
Sometimes, IDrive will try to make a change that is forbidden by Windows. The best way to fix this is to give IDrive greater permissions. You should only do this with applications you trust, but the easiest way is to run the app as an administrator.
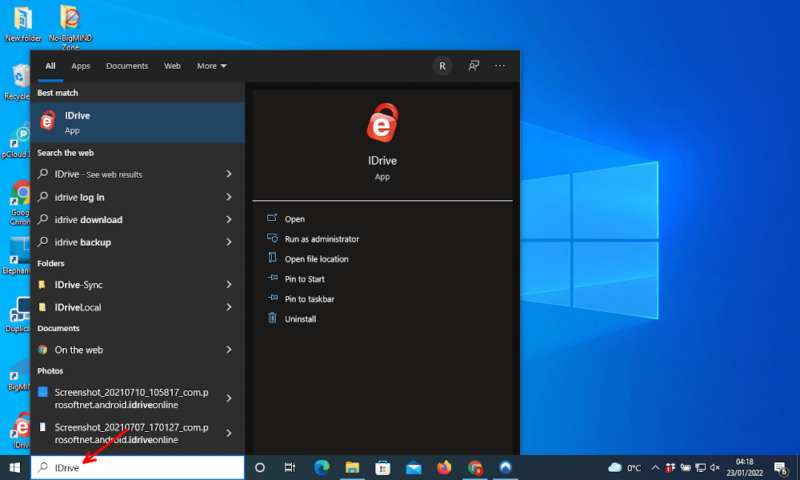
- Type IDrive Into Windows Search
Click the search bar in the bottom-left corner of Windows and enter “IDrive.”
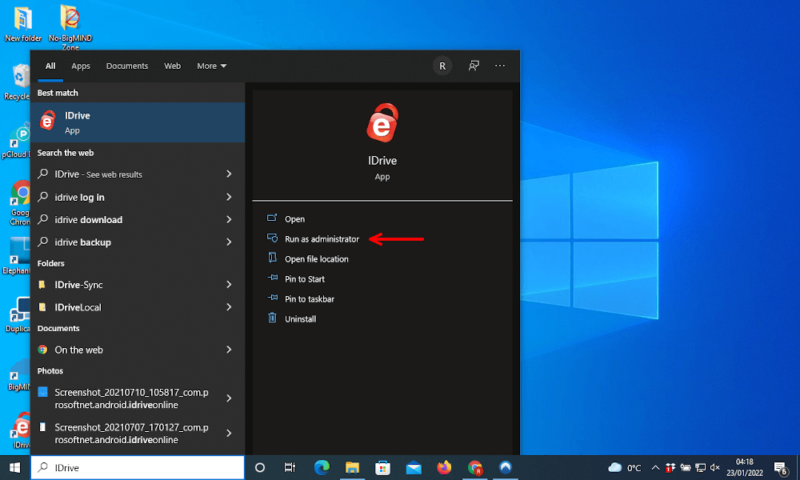
- Click Run as Administrator
Choose the “run as administrator” option from the list. You may need to enter your Windows password to continue, but once IDrive is open, you can use it normally.
How to Restart the Backup Engine
Occasionally, IDrive will fail because its backup engine got stuck or never started. Messing with services can be a bad idea, but as long as you follow these steps, it’ll be fine. Once you’re done, the problem might be solved.
- Open Task Manager
Open Windows task manager. You can find this by pressing down the “ctrl,” “shift,” and “escape” keys or right-clicking the taskbar along the bottom of the screen.
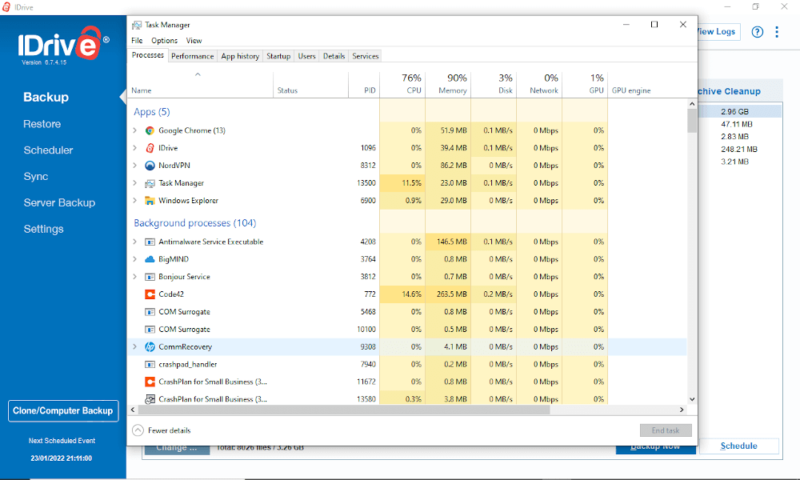
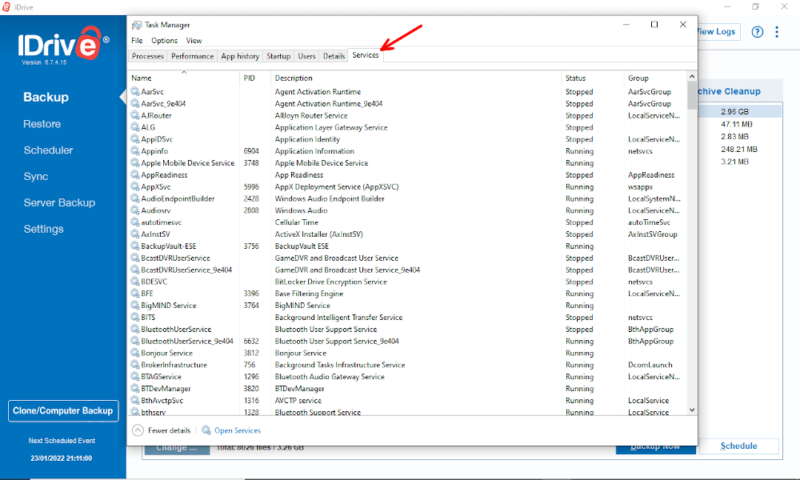
- Go to the “Services” Tab
Find and open the “services” tab along the top of the task manager window.
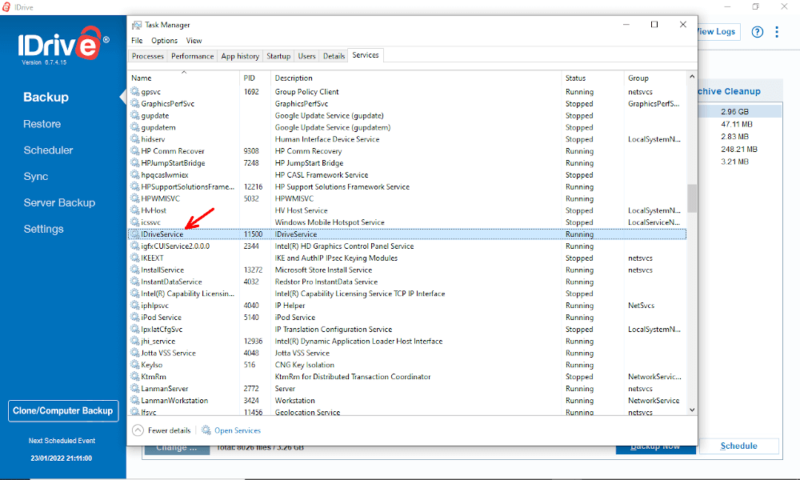
- Find the IDrive Service
Scroll down until you find “IDriveService” on the list.
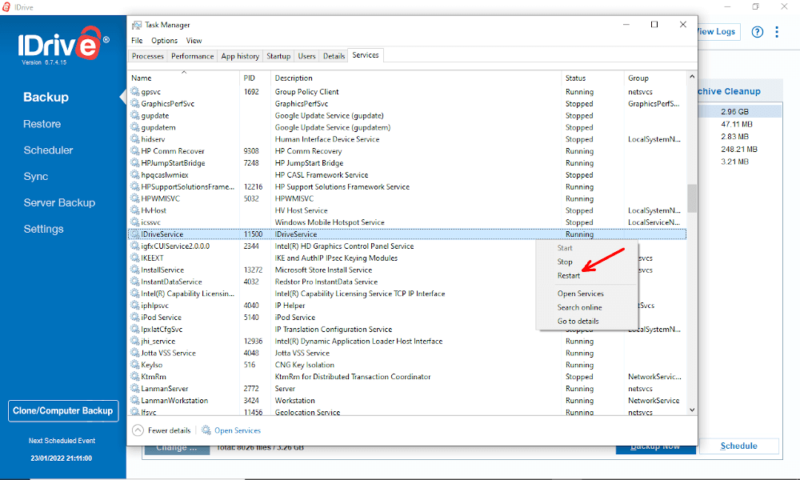
- Start or Restart the Service
Right-click the service and choose to “start” or “restart.”
How to Reinstall the IDrive Client
Sometimes you can run into compatibility issues if you’re not using the current version of IDrive or something went wrong when you first downloaded it. Either way, uninstalling and reinstalling the client can be a good idea.
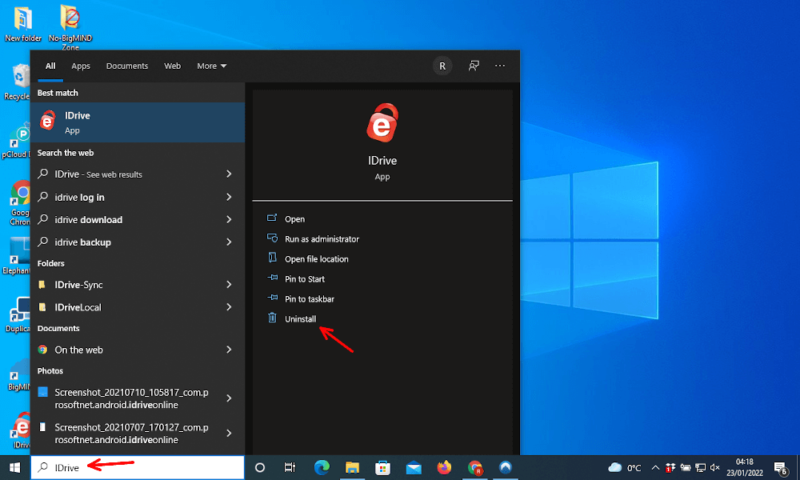
- Uninstall IDrive Through Windows Search
Search for “IDrive” in the Windows search bar and choose “uninstall” from the list.
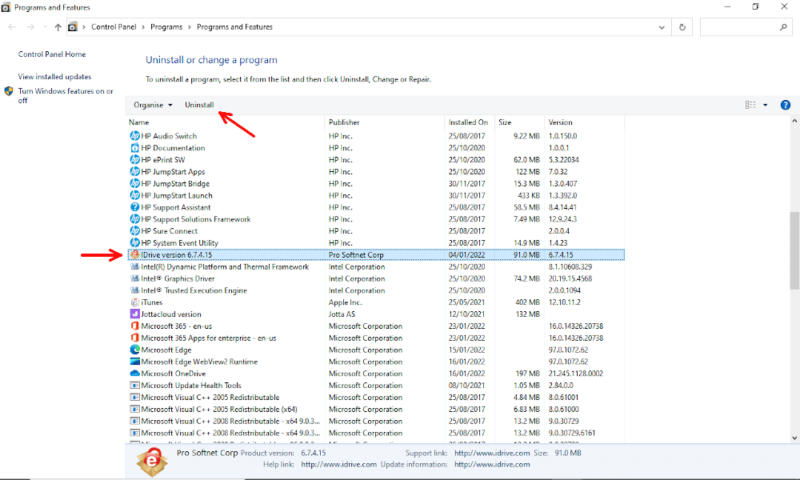
- Finish Uninstalling IDrive
In the window that has opened, find and select IDrive, then click “uninstall” and follow the on-screen prompts.
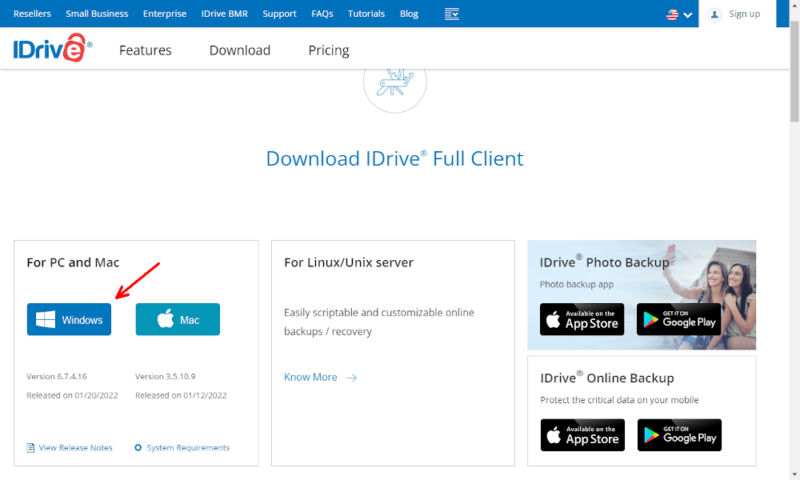
- Go to IDrive’s Official Downloads Page
On IDrive’s official website, go to the “downloads” page.

- Select the Latest Download
Check the version number and choose which operating system you are using. If you have multiple computers, make sure you get the correct version of the IDrive application for each device.
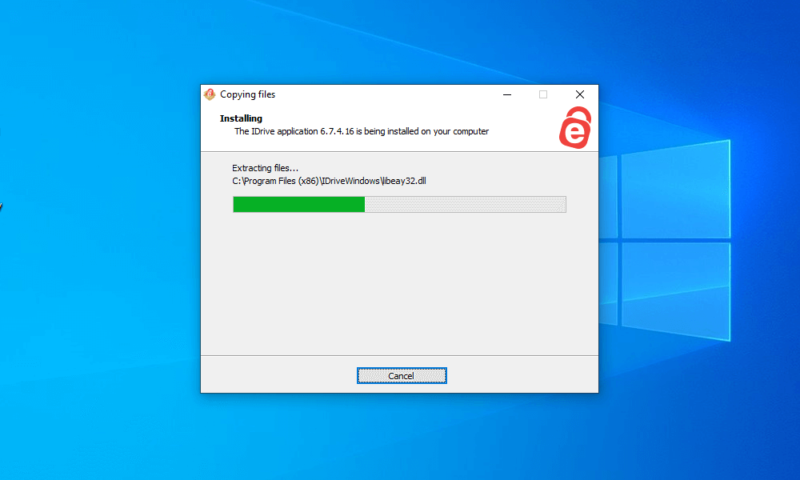
- Follow the Instructions to Download IDrive
IDrive’s installation is simple, just select where you want IDrives folders to be stored and wait for it to finish.
How to Contact IDrive Support
If these steps haven’t helped solve the issue, you might need to talk to the support team. This is found at IDrive.com/support or by clicking the “support” button at the top of IDrive’s webpage.
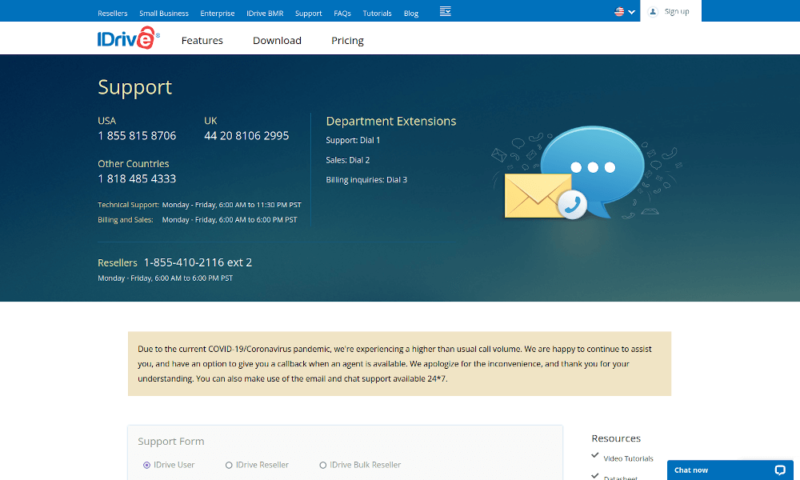
The support page has a handful of telephone numbers, a live chat option and a support form that allows you to send the customer support team an email. The person you end up talking to may need to see your logs, so be sure to have them on hand if you’re choosing to call or use the live chat.
Final Thoughts: Fixing Backup Failure With IDrive
IDrive is an excellent backup service and works almost all the time. However, if you run into issues, there are tools you can use to fix them. Even if you can’t resolve the problem on your own, the customer support team is there 24/7 through the live chat on the support page.
If IDrive is still having problems, even when you’ve exhausted these tools and spoken to the support team, you might have better luck with another online backup provider. One IDrive alternative we like is Backblaze (read our Backblaze review) for its unlimited plan and streamlined backup process.
Have you had problems with IDrive? Did these steps help fix your issue? Were there useful tools or tricks we missed? Let us know in the comments below. Thank you for reading.
FAQ
You can restart the IDrive backup engine in the Windows task manager by going to the services tab, finding the IDrive service, right-clicking and selecting “restart.”
IDrive has to be running to back up files. However, it can be minimized to the system tray, so you don’t need to have the full app open.
IDrive keeps up to 30 versions of your files.

