How to Install Covenant on Kodi
While Netflix, Amazon and Hulu are great, they don’t cover all the streaming bases. If, like me, you’ve filled out your list (never to be completed) and still want to watch something else, you’ll have to install Covenant on Kodi.
Kodi, if you’ve never heard of it, is a free, open source media player designed to work with Android, Windows and a host of smart TV operating systems. Kodi itself is used to store any media you already own, but that’s not much fun.
Kodi becomes interesting with addons, and particularly Covenant. This extension finds torrents of movies and TV shows from around the internet and streams them. Sometimes, you can even find subtitled movies that haven’t been released in your country yet. Do note, however, that while Kodi is legal, piracy is not, so make sure to protect your privacy.
Exodus vs Covenant
Before Covenant, Exodus was a favorite for streaming movies and TV shows. Exodus is no longer updated, but Covenant is exactly the same thing and is still being maintained. Think of it like the latest version of Exodus, which makes any guide on how to install Exodus on Kodi obsolete.
However, Covenant isn’t an official add-on for Kodi for obvious reasons. It can take a while to set up, so we wanted to help ease the process for you. Despite Kodi spanning multiple different platforms, the process is the same so don’t pay too much mind to what device you’re using.
How to Install Covenant on Kodi
Before you get started, you may want to make sure you’re using any of our best VPN for Kodi picks as you may get into legal trouble otherwise.
Enable Unknown Sources
Before we can get Covenant, we have to allow Kodi to install add-ons from unknown sources as Covenant isn’t officially supported. Depending on what version of Kodi you have, this may be enabled by default, but we’ll walk you through the steps so you can check regardless.
For this tutorial, we’re using Kodi 17.4, the latest version. If you have a previous version, the steps should be similar, although the interface is a little different.
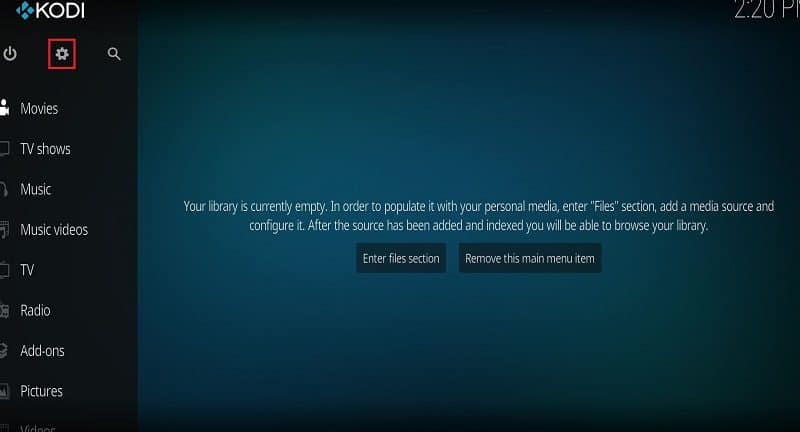
First, open up Kodi and click on the settings icon. It looks like a cog.
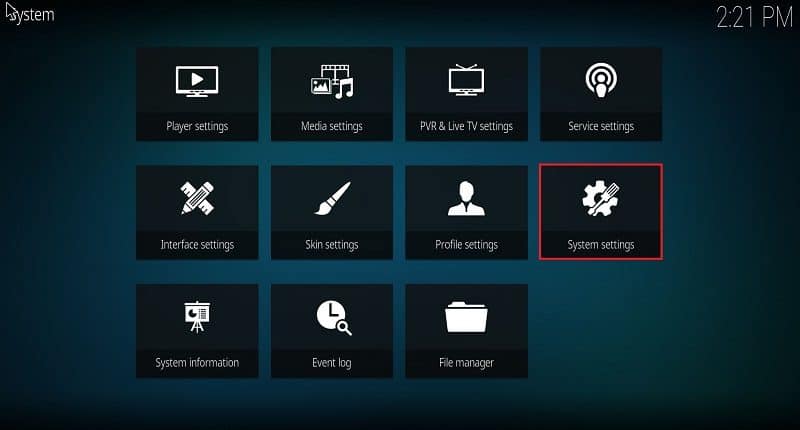
Next, go to “system settings” which should be the furthest right option in the second row.
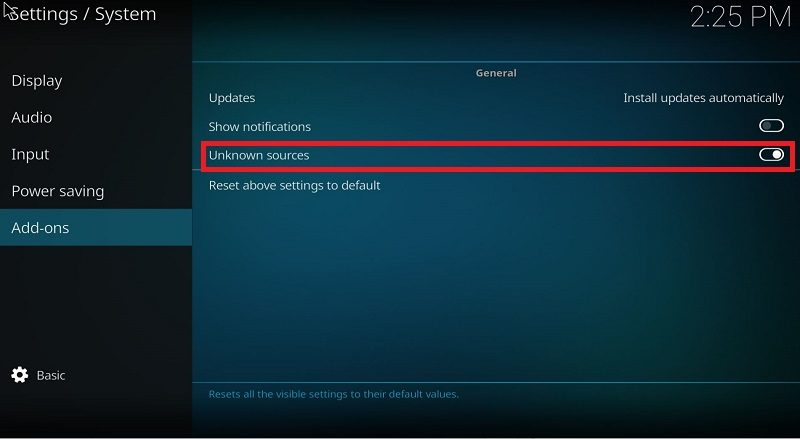
From there, just go to the add-ons section and ensure that the “unknown sources” toggle is to the right. A notification will pop up warning you about the risks of installing from unknown sources, but we know what we’re doing. Just click “yes” on that, and you’re good to go.
Now you have Kodi setup to allow Covenant to install properly. While it may not seem like a crucial step, it will make for a confusing process later if you don’t at least check.
Installing Covenant
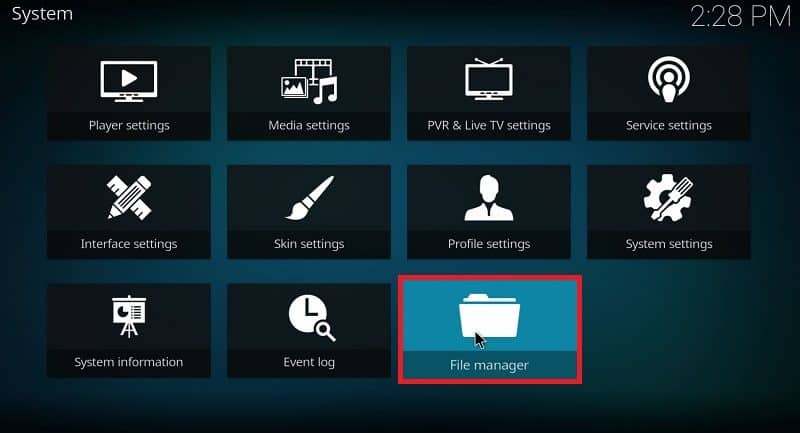
After you’re able to install add-ons from unknown sources navigate back to the settings menu (most likely by hitting “escape”). Now, we’ll head into “file manager,” the third option of the last row.
Inside the file manager, double-click on “add source” on the left-side column.
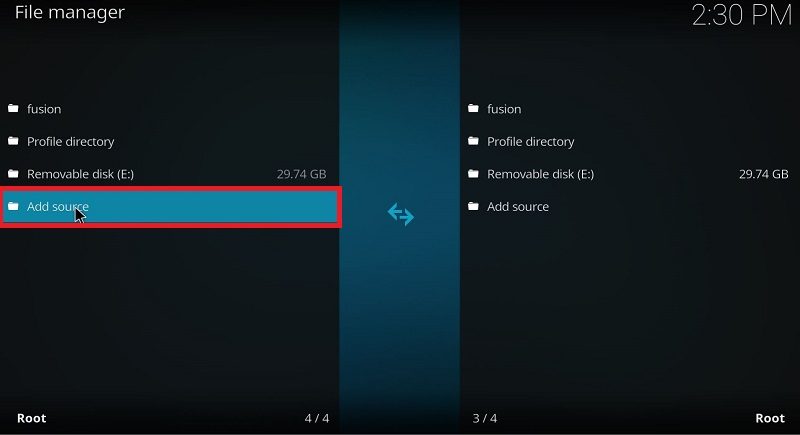
A window will appear asking for the path of the media you’re trying to add. Since we’ll be installing the add-on through a URL, go ahead and click on “none.”
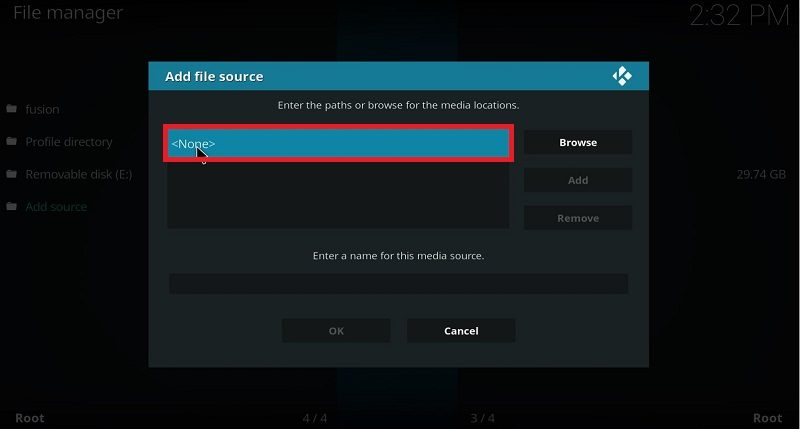
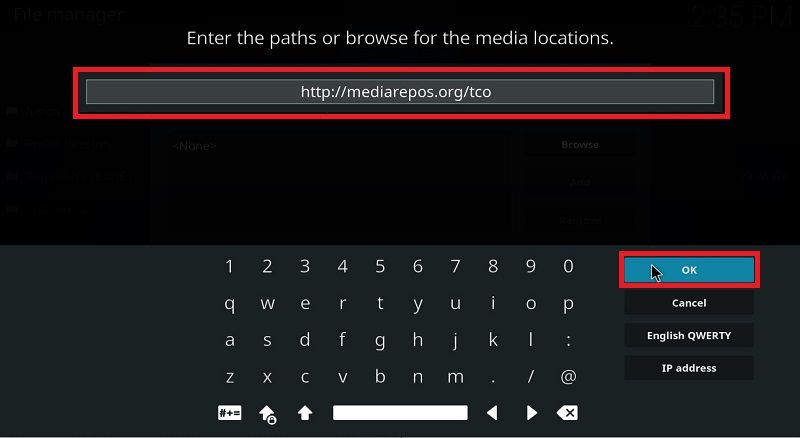
Now, we need to access the repository that has Covenant inside of it. In the address line that appears enter “http://mediarepos.org/tco” (exactly as it is written here) and click “OK.”
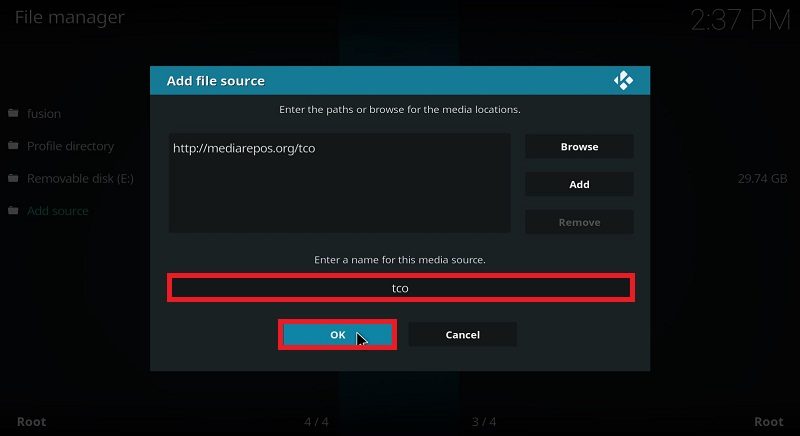
After, you’ll land back on the “add file source” window, with the URL you just entered at the top of the list. Enter the name “tco” at the bottom where it asks you to. It may already be there, so, in that case, you don’t need to do anything. Click on “OK” when you’re finished.
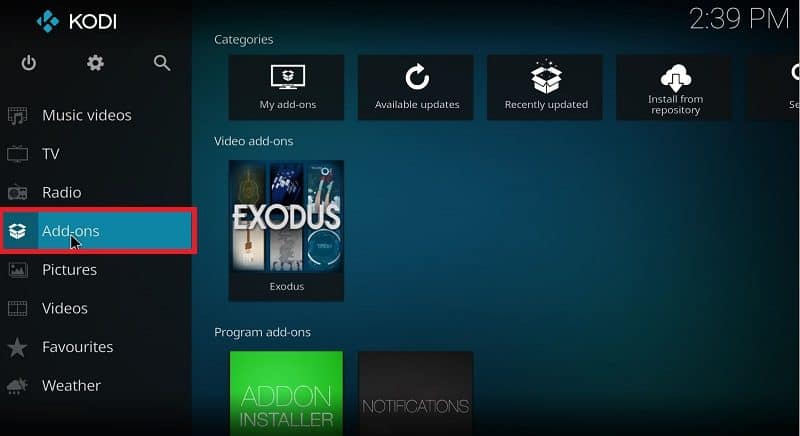
With access to the repository, we can now install it and get Covenant. Head back to the home screen and select “add-ons.”
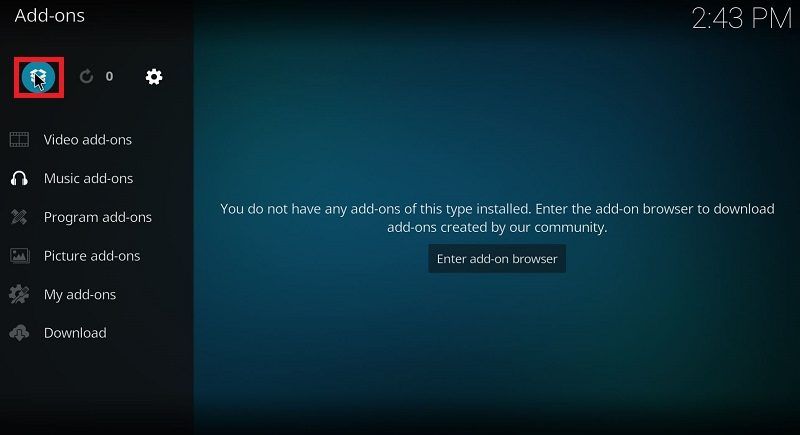
Once there, click on the browser. It’s a circular icon at the top that looks like an open box.
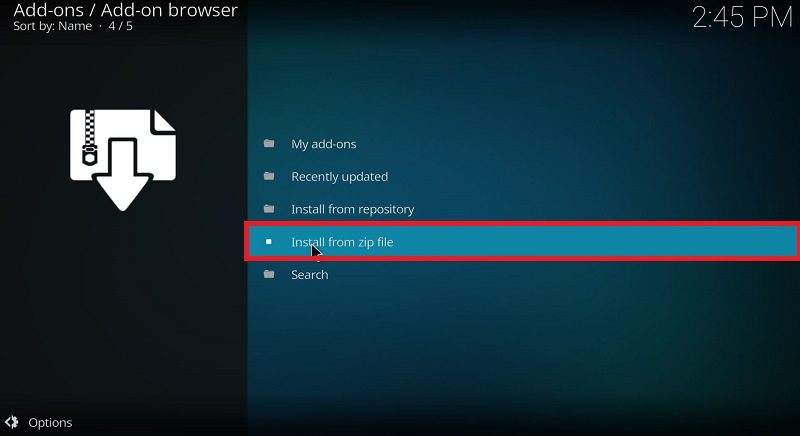
We can install the repository that we added before with the URL. Click on “install from zip file” in the options list. It should be the fourth from the top.
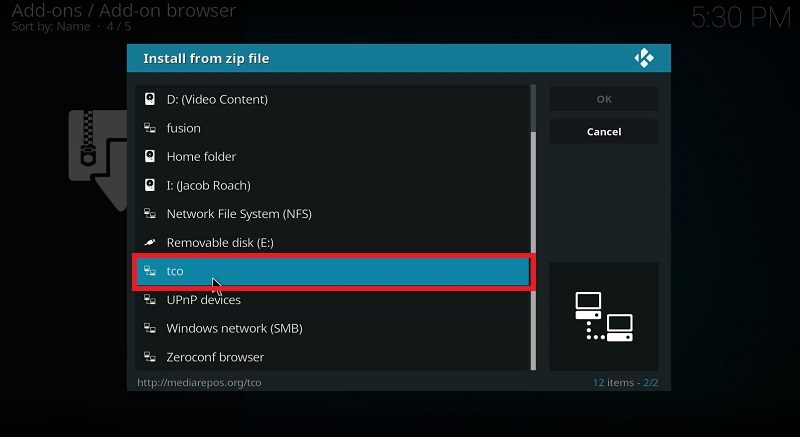
A window will appear with a folder hierarchy. Click on the item label “tco.”
Inside, there should be two items. Click on “-SmashRepo-.zip.” After a moment or two, an add-on notification will appear in the top right corner of Kodi. Make sure to wait until that notification appears before continuing.
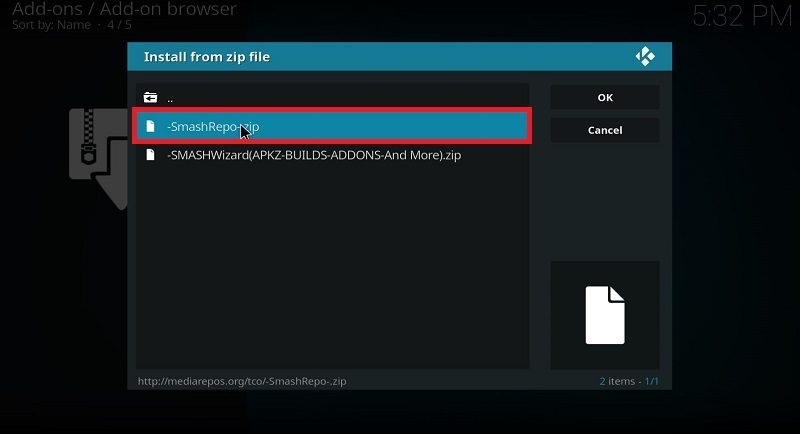
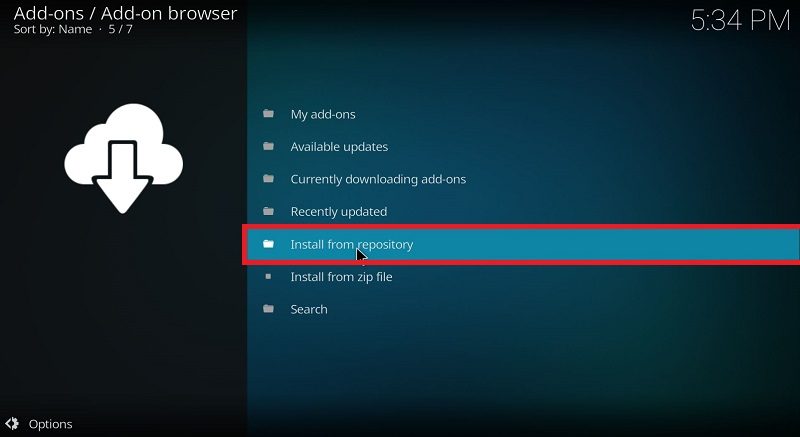
After the notification appears, select “install from repository” from the add-ons screen.
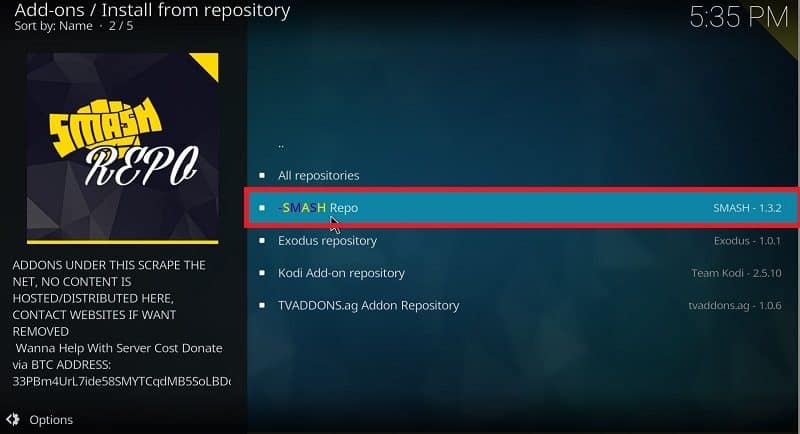
Once inside, you’ll see all the currently installed repositories. Click on “-SMASH Repo.”
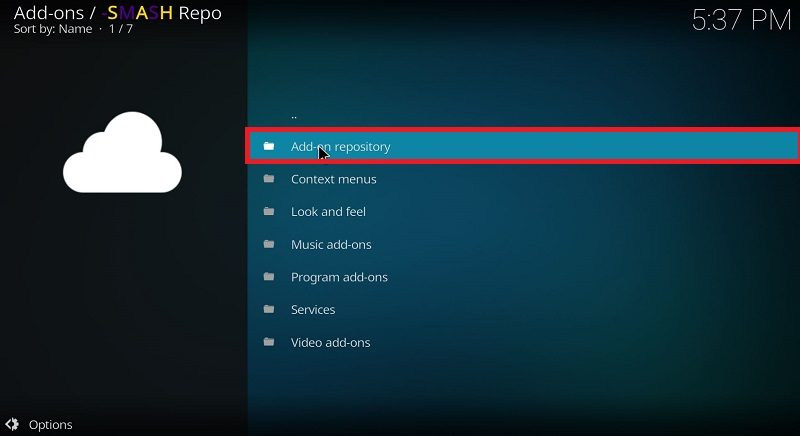
The repository contains all sorts of add-ons, but we want Covenant. Click on the top option, named “add-on repository.”
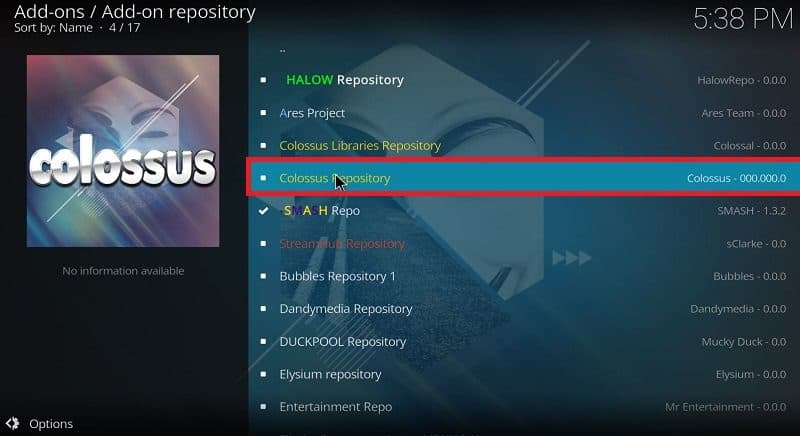
In this folder, click on “colossus repository.” There is another option labeled “colossus libraries repository,” but that’s not what we’re looking for.
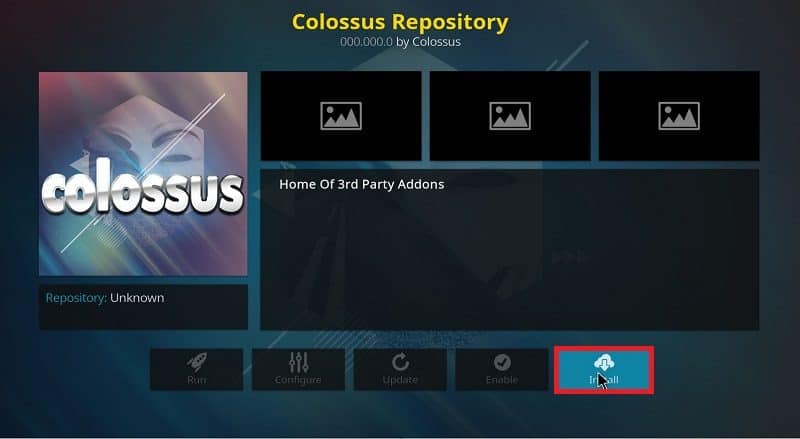
After, click on the “install” button in the bottom row of icons. It should be fairly easy to find because it’s the only option not grayed out. Wait for the same add-on installed notification, and then continue.
Once the notification has popped up, go back to the Kodi home screen. From here, it’s matter of getting back to the repository installation, so we’ll give the steps real quick.
- Go to the Kodi home screen
- Click on “add-ons”
- Click on the browser (open box icon)
- Select “install from repository”
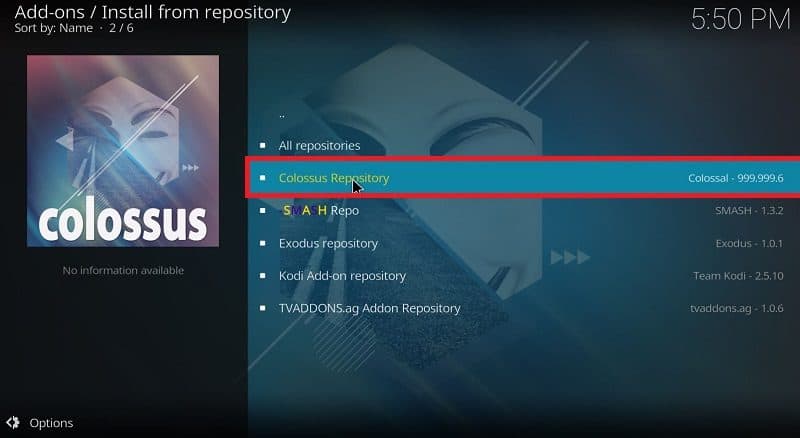
If you need screenshot references for the steps above, we went over the process earlier in the tutorial. Once you’re to this point, click on “colossus repository.”
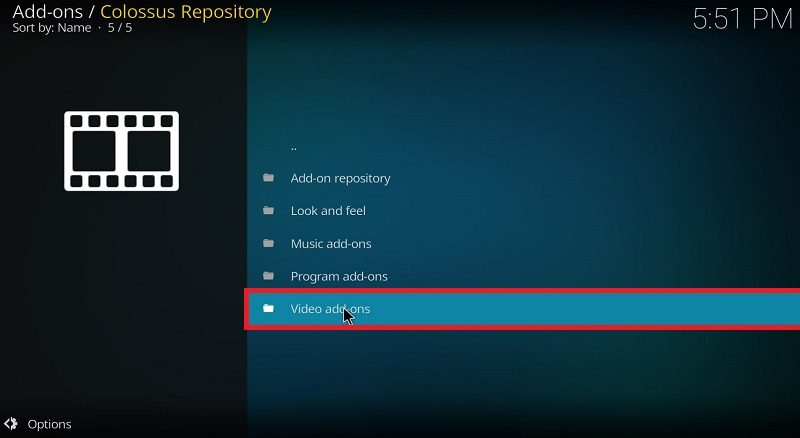
Inside there, click on “video add-ons” which should be the bottom option.
Scroll down the list and find “Covenant.”
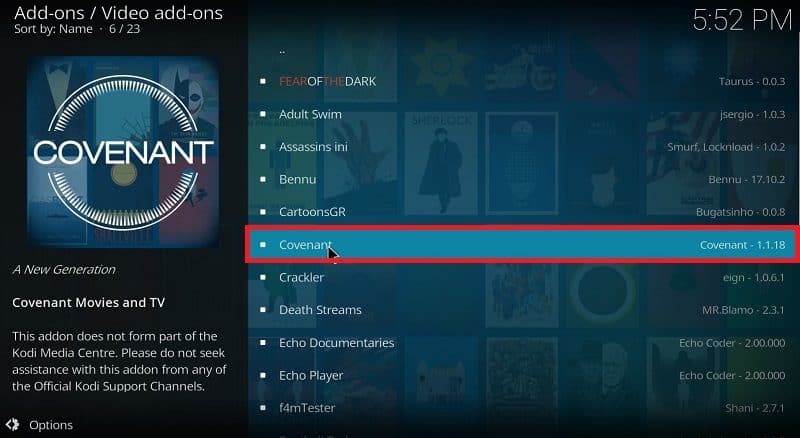
On the next screen, click on “install,” again the only option not grayed out.
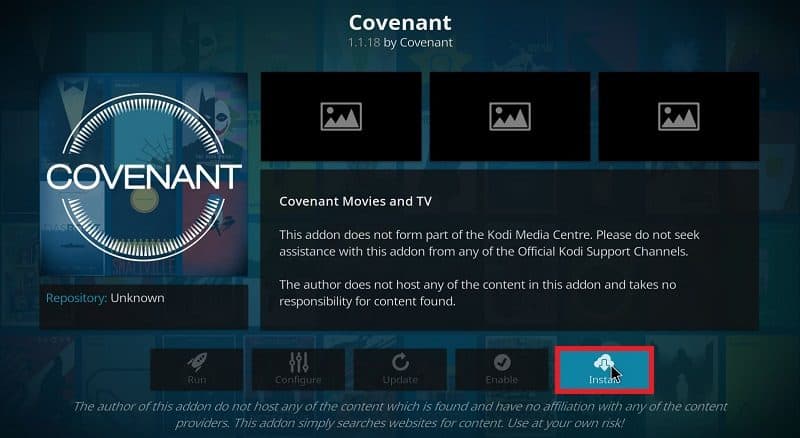
After that, just wait for the add-on installed notification and Covenant is ready to go. Once completed, you’ll be able to access it from the video add-ons menu.
Conclusion
Kodi is great for a number of reasons, not the least of which is Covenant. It’s like Netflix except nearly everything (even geoblocked content) is accessible. After installing, it’s hard to justify a Netflix subscription, much less a cable bill.
There are risks, though. Since you are streaming torrents online, you’ll want to keep yourself protected. Consider securing your internet connection with any of our best VPN providers if you haven’t already, and read up on the risks of torrenting in our article on alternative torrent sites.
Do you use Kodi? Let us know in the comments below; thank you for reading. If you’d prefer not to use Kodi but still want more from your Netflix subscription, make sure to check out our best VPN for Netflix article. Also, if Kodi itself is giving you trouble, make sure to read our full Kodi guide.

