How to Back Up Mac Devices: MacBook Pro, Air & Others
You can back up a Mac using built-in software like Time Machine and iCloud, or by using third-party tools like IDrive or Backblaze. Learn how to backup Mac devices using all of these methods with our step-by-step guides.
Backing up your Mac regularly is the best way to ensure your data is protected if something goes wrong. In this guide, we’ll teach you how to back up Mac devices using iCloud and Time Machine, Apple’s built-in options. To cover all the bases, we’ll also discuss our top three choices for backing up your Mac using a third-party solution.
iCloud and Time Machine are the built-in backup tools for Apple devices. While these work just fine for basic use, other tools offer better features, more storage and affordable prices. We’ll highlight our top picks in this article, but our best backup software piece has more details.
-
06/27/2025 Facts checked
This article was rewritten to include updated information about the best options to back up a Mac and step-by-step guides.
How to Back Up Mac Devices With Backup Software
You can back up your Mac using tools like IDrive, pCloud or Backblaze. These alternatives offer more granular control of your backup and stronger security and privacy features. We’ll use IDrive, the best backup software for Mac, as an example in this section.
- Sign Up and Log In to IDrive
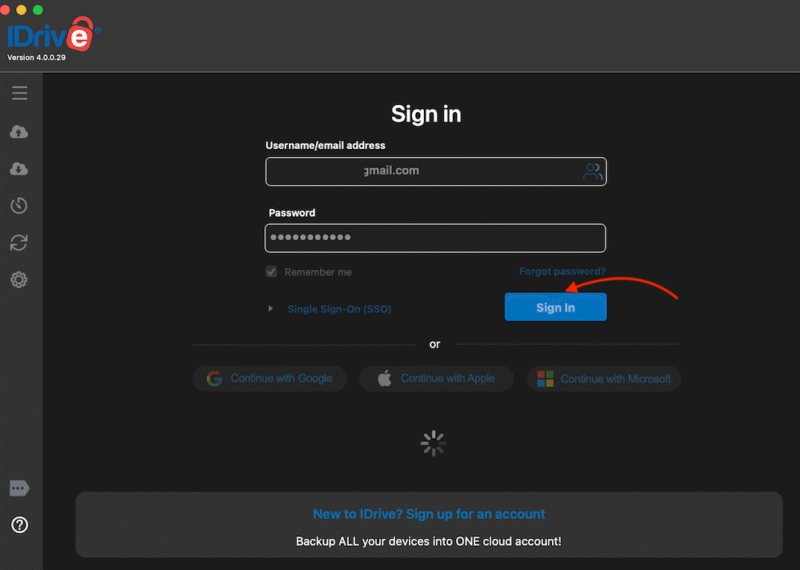
Go to IDrive’s official website and sign up for the service. Once you’ve signed up, download the macOS IDrive app and log in to your account.
- Choose the Backup Type and Start the Process
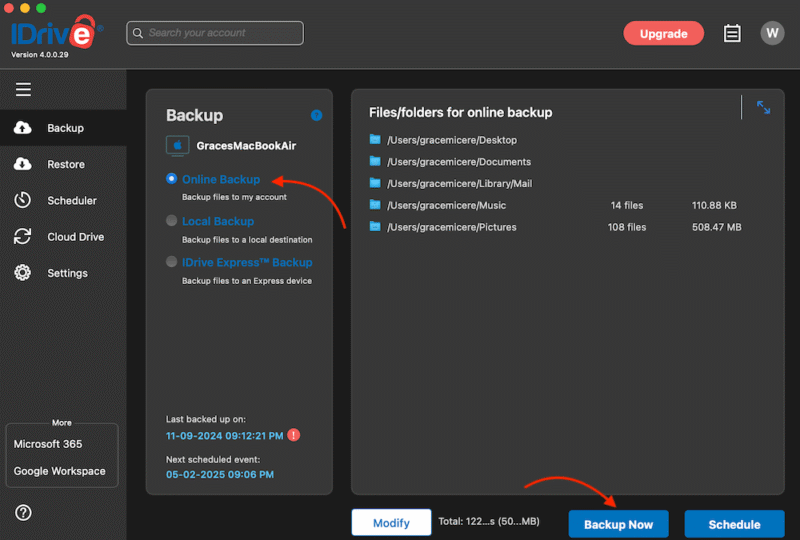
Once you’re logged in, you need to choose whether you want a local, online or IDrive Express backup. Pick an option and click “backup now” to start the process.
- View Backup Progress
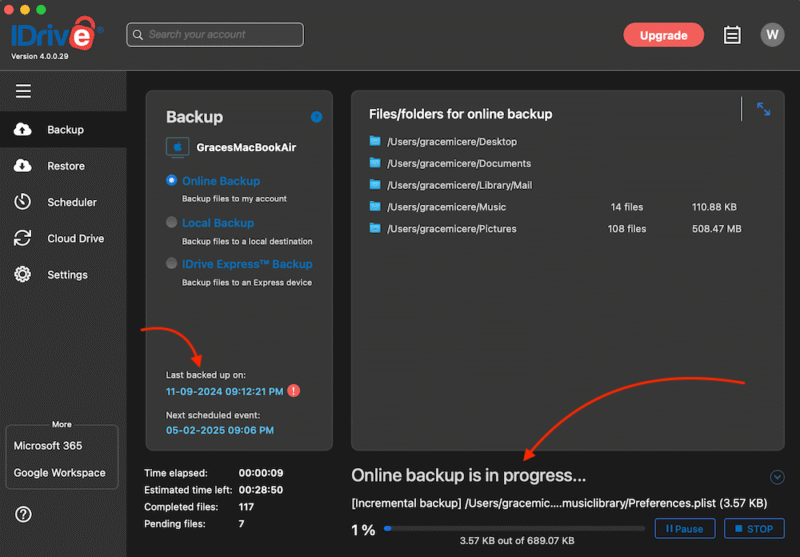
You can see the progress of your backup in the same backup window once the process begins. This window also shows when your last backup took place and when your next one is scheduled.
- Backup Complete
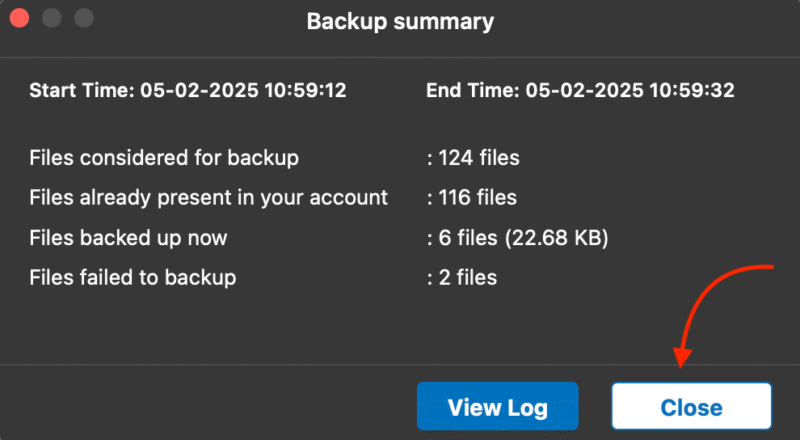
When your backup is complete, you’ll see a window showing a breakdown of all the backed-up files and any that were not successfully copied. You can choose to view the logs or close the window to complete the process.
The Best Mac Backup Software
If you’re looking for third-party backup software that offers more storage space and backup features than your Apple account does, IDrive, Backblaze and pCloud are some of the best alternatives we’ve come across. Let’s explore why we recommend these services.
10,000+ Trust Our Free Cloud Storage Tips. Join Today!
- Demystify cloud storage terminology and key concepts in plain language
- Discover easy-to-implement techniques to securely backup and sync your data across devices
- Learn money-saving strategies to optimize your cloud storage costs and usage
1. IDrive — Best Online Backup for Mac
IDrive is a secure online backup platform that you can use for your computer, server and mobile device backups. It is end-to-end encrypted and has a client-side encryption option that you can switch on for added security. IDrive allows you to add unlimited devices to your account for backup.
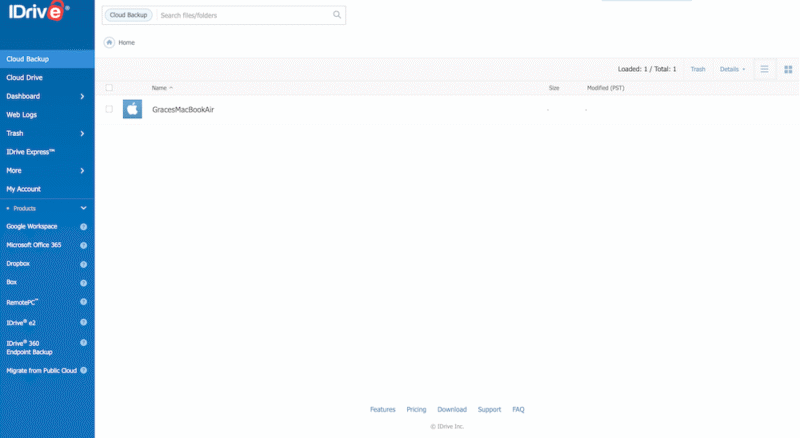
that makes it easy to locate key features.
With IDrive, you can schedule computer backups, set the backup frequency, back up an external drive or use a NAS device. You can also create image-based backups or have IDrive send you an IDrive Express external drive to store important files. You can use the backup disk to restore lost data or send it back to IDrive to upload to your account. Our IDrive review has more details.
- No credit card required.
- 10GB
- One user.
- 100GB
- One user, multiple computers. Plans starting from 5TB up to 100TB. Big discount for first-time signup.
- 5TB
More plans
- 5 computers, 5 users. Starting at 5TB up to 500TB. Big discount for first-time signup.
- 5TB
- Monthly Plan storage starts at 1.25TB up to 50TB Unlimited users, multiple computers and servers. NAS devices. 250GB storage. Starting at 250GB up to 50TB. Large discount for first-time signup.
- 250GB
- 5TB
2. Backblaze — Best Unlimited Online Backup
Backblaze is a simple-to-use cloud backup solution that offers unlimited storage space. Its “inherit backup” feature is accessible through the desktop app. This lets you seamlessly transfer your files to a new Mac from an old one. The files will appear on the new Mac as a separate backup file that you can either download or leave as is.
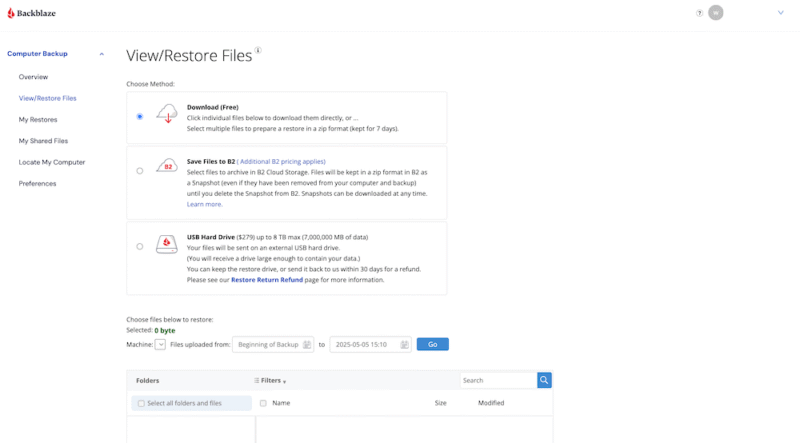
space for your documents and files.
Backblaze lacks advanced backup options such as NAS, hybrid, server and external drive backups. However, the service considers this its main selling point; having limited features by design ensures it remains simple to navigate and user-friendly for beginners. Backblaze focuses on helping you back up and restore files. Our Backblaze review has more details
3. pCloud — Best Cloud Storage for Backup
pCloud is the best solution for media content backups because of its fast speeds, integration with Kodi and advanced built-in media player. The tool automatically backs up files added to the backup folder as well as any changes made to files already in the folder. You can also upload files of any size to pCloud, as there are no file size restrictions.
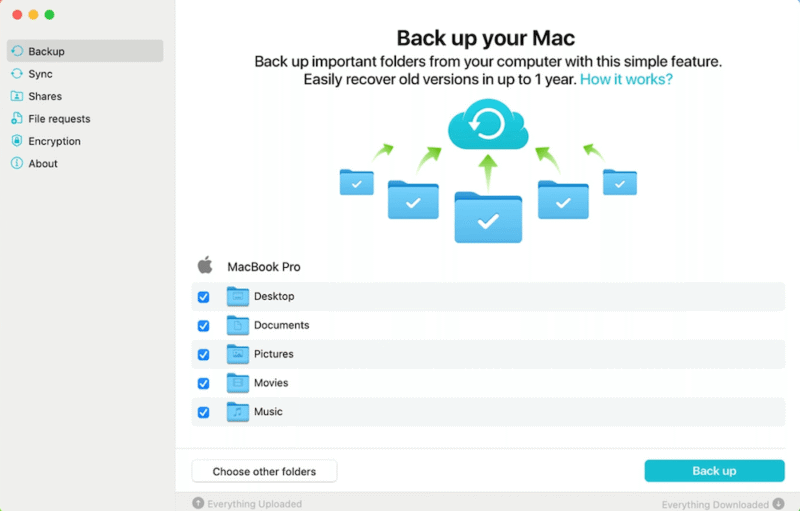
for backing up media like videos, photos and more.
The free version doesn’t let you recover files once they’ve been deleted. This means files are no longer accessible once you delete them from the cloud. Paid users get 30 days of free recovery or up to a year for an additional fee. pCloud offers end-to-end encryption, but you’ll pay extra to access this feature. Our pCloud review has more details.
- 10GB
- 500GB
- 2TB
More plans
- 10TB
- + FREE Encryption
- 2TB
- + FREE Encryption
- 10TB
- Price per user (minimum 3)
- 1TB
- Price per user (minimum 3)
- 2TB
- Encryption for pCloud Drive
What Is Time Machine on Mac?
Time Machine is a free, built-in backup software that comes with every macOS device. When you switch it on, it automatically backs up all your data and can be configured to perform automated backups hourly, daily, weekly or monthly. Time Machine lets you back up your documents, music, photos, videos, email and apps.
To back up your Mac using Time Machine, you’ll need an external storage device such as a hard drive. Ideally, the storage capacity should be twice as much as that of your device. It’s best to use this external storage just for your backups and to use a different one for other data you want to keep safe.
How to Back Up Mac to External Hard Drive Using Time Machine
Let’s go over the steps to back up your Mac using Time Machine. To complete this process, you’ll have to delete the contents from your hard drive. Make sure it’s empty and that everything is backed up elsewhere before starting.
- Connect Your Hard Drive to Your Mac
Use the USB port on your Mac to connect your external hard drive. Ensure your computer is reading the disk by checking that it appears in Finder or on your desktop.

- Add a New Backup Disk to Time Machine
Open “system settings,” then go to “general” and “Time Machine.” Click “add backup disk.” A window will appear showing the hard drive you’ve connected. Click “set up disk.”
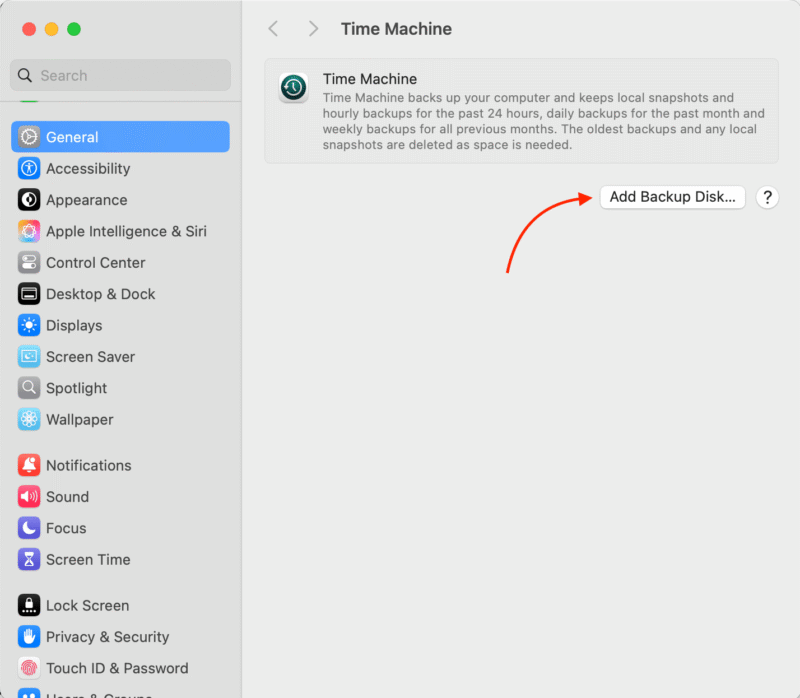
- Set Up Your Hard Drive for Backup
Choose your backup settings. The option to encrypt your backup is on by default. You can choose to add a password and leave a hint to help you remember it, or opt not to encrypt. You can also limit the space used for backups if you desire. Click “done” when you’re ready.
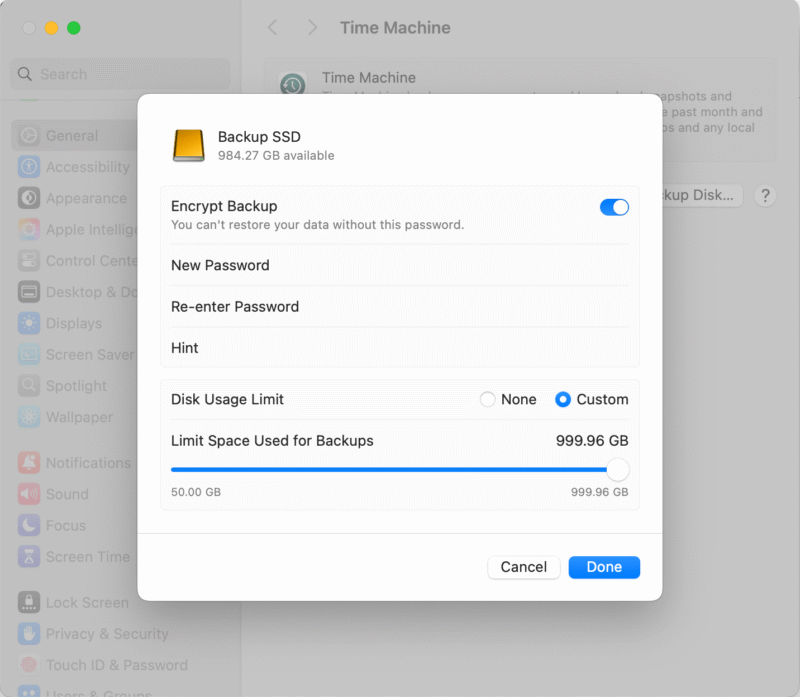
- Confirm You Want to Erase Your Hard Drive
In order to use your hard drive with Time Machine, you’ll have to erase all the content on it first. Make sure there’s nothing on your hard drive that you can’t live without, then click “erase” to confirm and start the process.
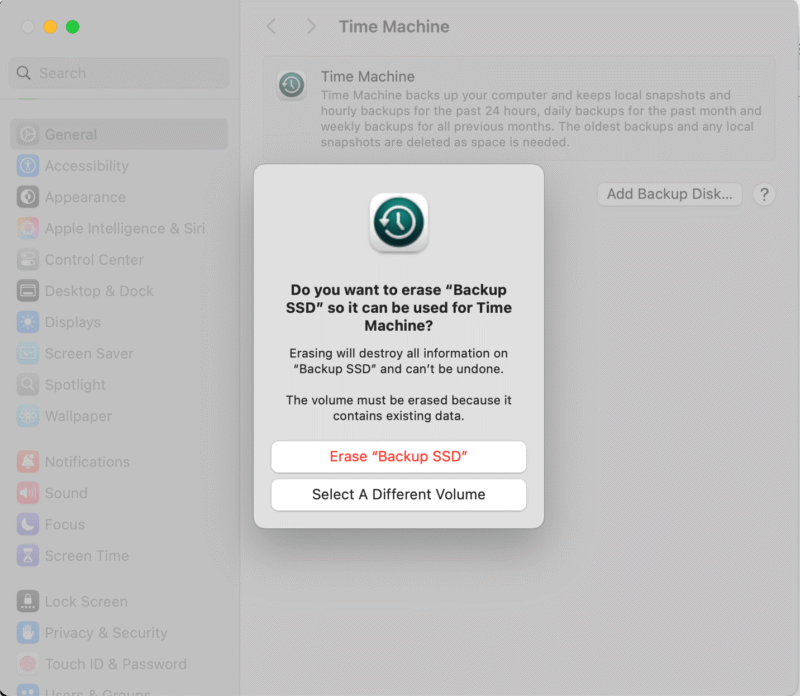
- Wait for Your Backup to Finish
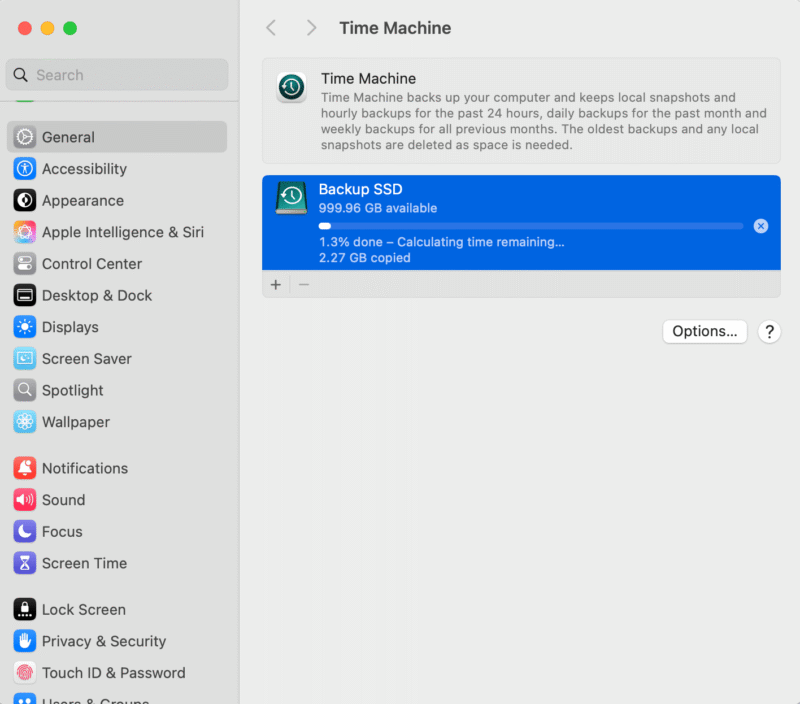
Once you’re done setting up your hard drive with Time Machine, your first backup will begin shortly. The time it takes depends on how much data you have to back up, but Time Machine will give you an estimate.
- Configure Future Backups or Trigger a Manual Backup
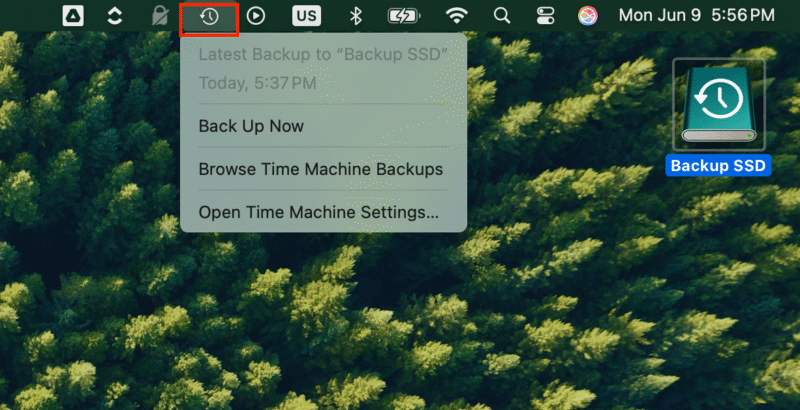
Once Time Machine is configured, you’ll see an icon in the menu bar. Click on it and you’ll be able to trigger a backup manually, stop a backup currently taking place or configure the frequency of future backups.
How to Back Up Mac to iCloud
Backing up your Mac to iCloud helps automatically sync your data across all your devices, providing convenient access to the latest version of your files.
- Update MacOS to the Latest Version
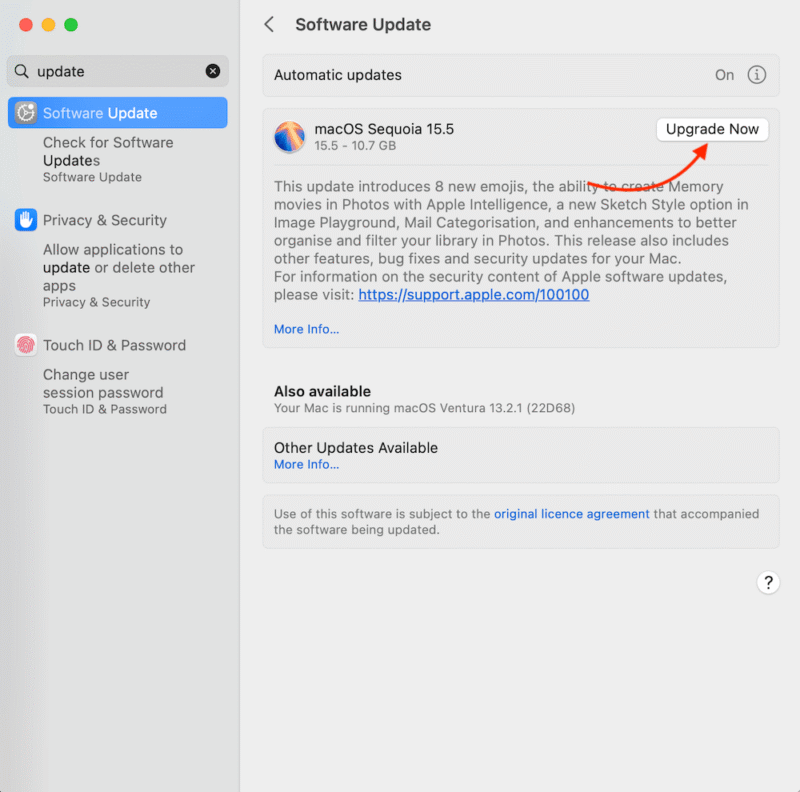
Begin by updating your Mac to the latest OS version to avoid any compatibility issues when you need to recover your files.
- Choose Items to Back Up
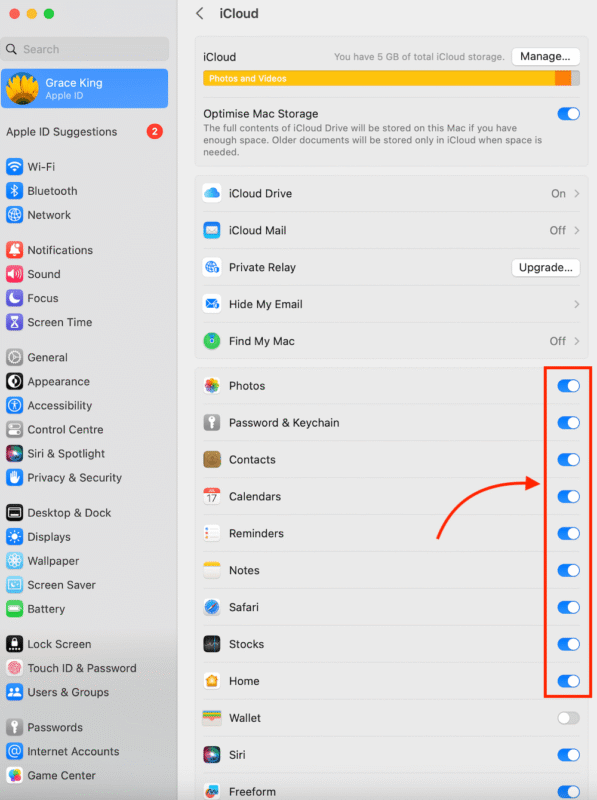
Toggle on the buttons that appear next to the items that you want automatically backed up.
- Choose Apps to Back Up
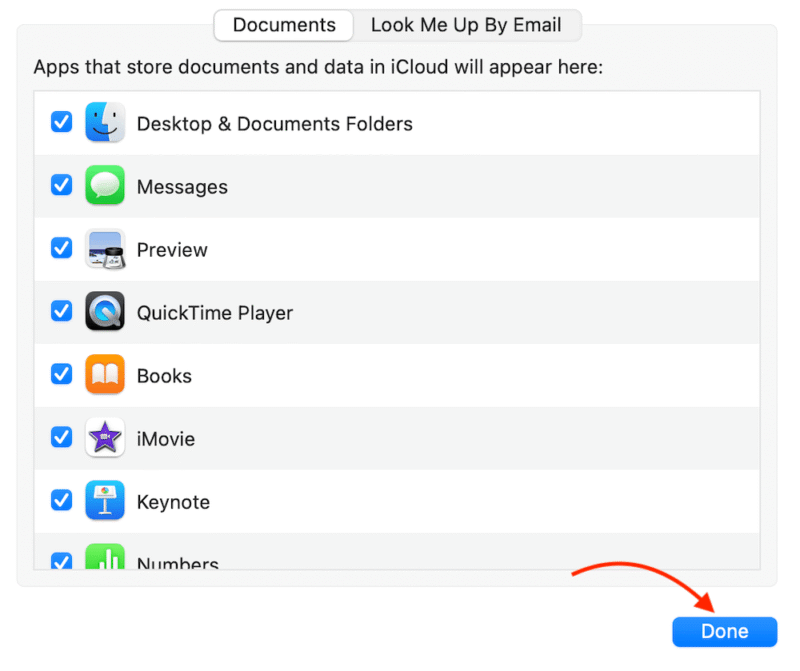
Click “iCloud Drive,” then select “options” to choose the apps you want backed up to iCloud. Then, click“ done.”
- Access Backed Up Files in Finder
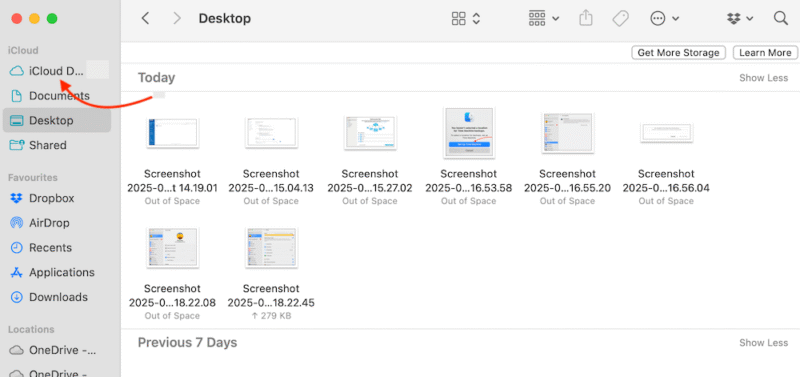
In Finder, click on the iCloud Drive icon in the left-side panel to access backed-up files. Anything you drag and drop into this folder will automatically be uploaded to iCloud. Final Thoughts
Final Thoughts
Now that you know how to back up Mac devices using built-in software and third-party tools, it’s time to test it out. Pick the method that works best for you of the ones we’ve discussed and get started securing your files in case of a data catastrophe.
Have you ever used any of the above software before? Which backup software have you been using? Does it work for you, or are you looking to upgrade to a better option? Let us know in the comments below, and as always, thank you for reading.
FAQ: How to Back Up Your Mac Device
When your Mac is fully backed up, the Time Machine icon in your menu bar will be static. If you see a rotating circle, it means a backup is in progress.
You can free up space on Mac devices by storing documents, media and other files in iCloud Drive, on an external hard drive or with a third-party cloud backup platform.
Turn on backup on your Mac by opening “system settings” and clicking “general,” then “Time Machine.” Choose your connected storage device and click “done” to complete the process.
The time it takes to complete a Time Machine backup depends on the size and number of files being backed up. You should expect it to take a few hours, but Time Machine is designed to work in the background so you can continue using your computer.


