How to Backup Social Media in 2025: Duplicating Your Second Life
Whether you’re afraid you might be banned, are looking to leave social media entirely or just don’t want to risk losing your photos and messages, you should consider saving your data somewhere else. To do this, read on and find out how to make a social media backup.
Between Facebook, Twitter, LinkedIn, Pinterest, Instagram and more, there’s a good chance you have some kind of social media. However, all that data you’ve stored on the service could disappear in a moment if you ever get kicked off the platform or decide to delete your account. Luckily, with all the tools these sites give you, making a social media backup is far easier than you may think.
Key Takeaways:
- Services like pCloud let you automatically backup some social media content.
- Most social media accounts have a way to manually archive your data.
- You can backup an archive file with most cloud storage providers, like IDrive.
Sadly, some providers — such as Acronis Cyber Protect Home Office — have removed the automatic social media backup services, usually because of a lack of use and the technical challenges involved with this kind of backup. However, there are still some options available.
Not all providers have removed the ability to backup Facebook to the cloud, so it’s still an option. You can also manually create an archive that holds all of your posts, tweets, comments and more (it can even include things like marketing information). Then you can save this data to the cloud or a local external hard drive, so you can access it at a later date.
-
08/18/2021
Cloudwards updated the information in this article and rearranged it into a step-by-step structure.
How to Backup Social Media Photos and Videos
The easiest way to backup your social media is by using the right cloud storage service. Certain providers, such as pCloud, have built-in tools for making backups for some of your social media content. This is a quick, easy and free way to keep your data safe, even if something happens to your account. (Read more about pCloud in our review of the service.)
10,000+ Trust Our Free Cloud Storage Tips. Join Today!

- Demystify cloud storage terminology and key concepts in plain language
- Discover easy-to-implement techniques to securely backup and sync your data across devices
- Learn money-saving strategies to optimize your cloud storage costs and usage
However, as these software solutions might not cover all the data you need — for example, often ignoring profile information and account settings — it can be worth making a manual backup. Every platform is a little different, so we’ll cover Facebook and Instagram to give you an idea of how it works. Then we’ll show you how to manually backup that data to the cloud.
Social Media Backup Removed: IDrive & Acronis
In the past, both IDrive and Acronis offered dedicated social media backups. However, this feature was removed from both services sometime between late 2018 and early 2019. Instead, we’ll use pCloud, which still offers this feature, though you can still manually backup your files with any online backup or cloud storage provider.
How to Backup Facebook With pCloud
If you’re looking to backup Facebook, pCloud has a great built-in way to do it. It isn’t easy to see from the main account page, but if you follow these six steps, you’ll be able to backup your photos, videos and other media from Facebook in no time.
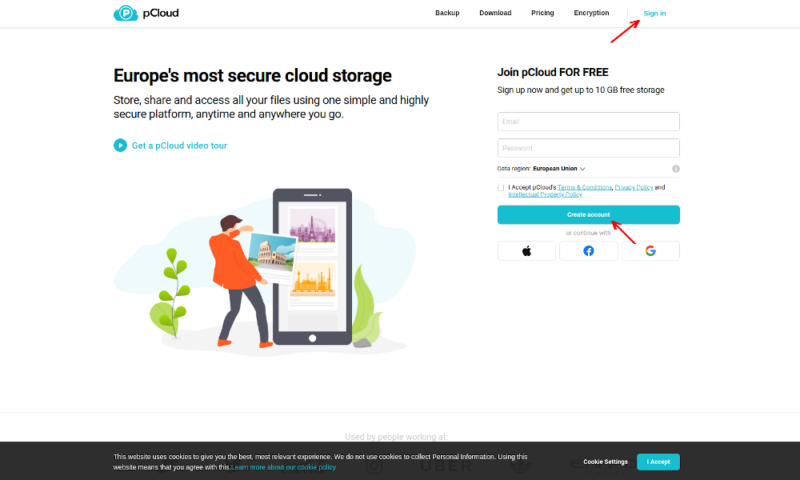
- Sign in to pCloud
Open pCloud.com in your web browser and either create a new account for free or sign in to an existing one.
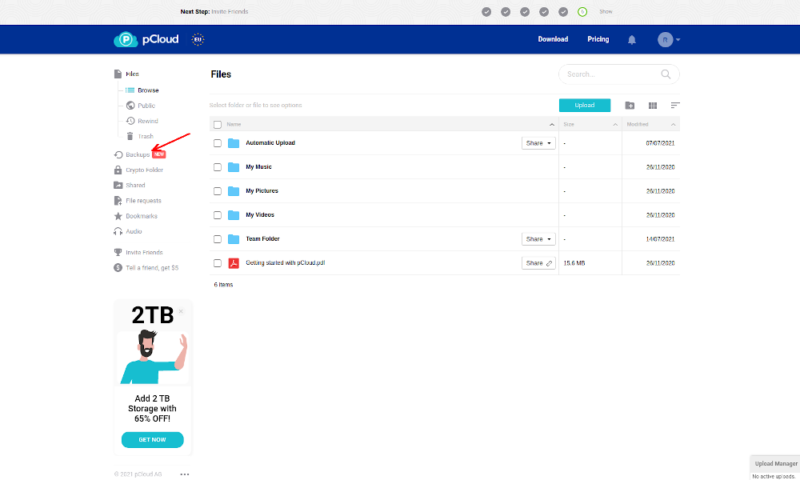
- Click on the “Backups” Tab
In your account, select “backups” on the left-hand menu to access pCloud backup.
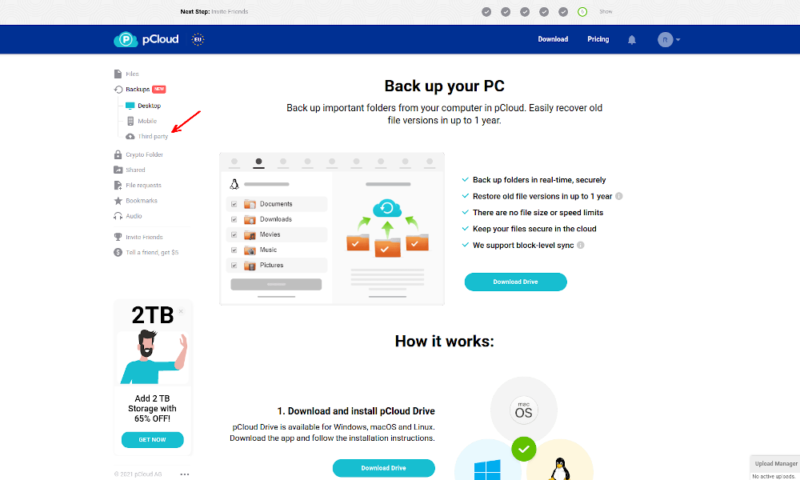
- Choose to Make a Third-Party Backup
Rather than downloading pCloud for a computer backup, select “third-party” in the new list that appears under “backups.”
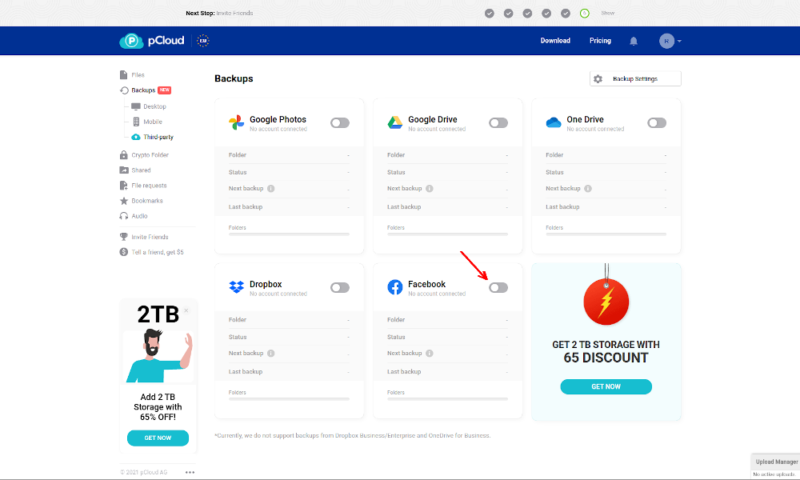
- Link Your Facebook Account
In the third-party backups page, you can choose to connect other cloud storage accounts or a Facebook account. Click the switch next to the service you want to backup.
- Sign in to Your Facebook Account
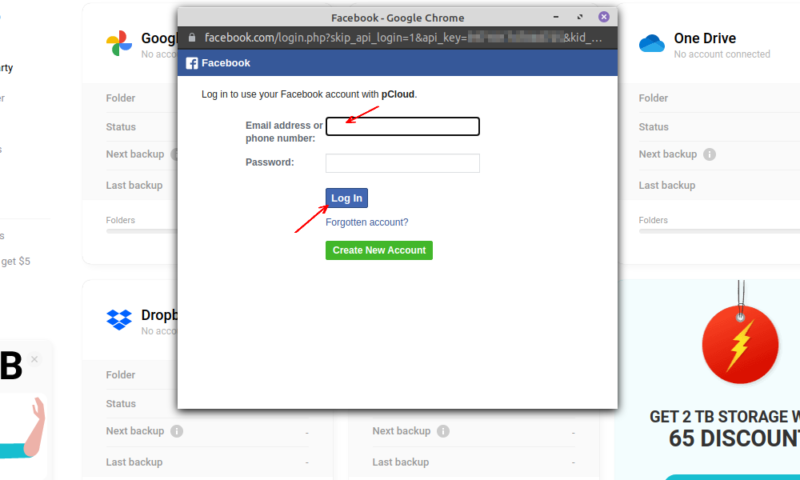
A new window will appear, asking you to sign in to your Facebook account. pCloud won’t be able to post or make comments, but it will be able to read everything so it can back your data up.
- Select Which Albums to Backup
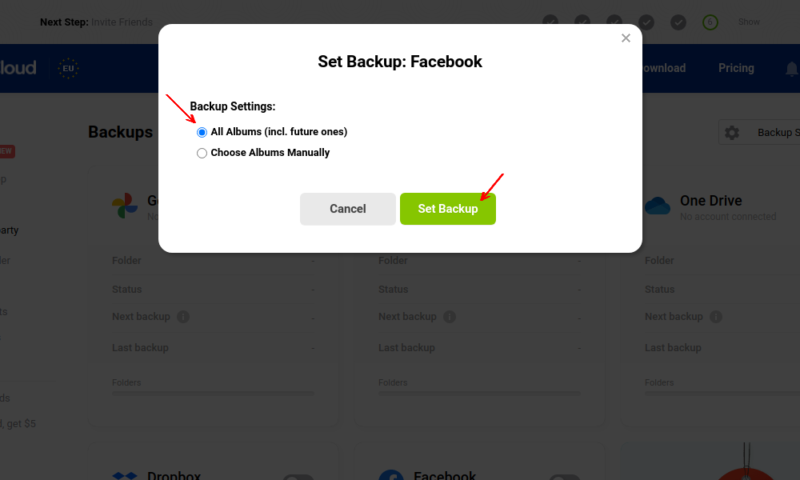
You can choose to make a more selective backup or just backup all of your albums. When you’ve done this, click “set backup” to create your backup.
How to Backup Social Media Manually
The major downside of using automatic social media backups is that they can only save data like your photos and videos, missing content like your friends or messages. You’re also limited in the cloud services you can use, and you can often backup only Instagram and Facebook data this way.
Luckily, most social media sites let you manually backup your accounts. These include Facebook, Twitter, Pinterest, Instagram and more, and you can backup these archives to any online backup service you want. This includes some of our favorites, like Sync.com and IDrive (read our Sync.com review and IDrive review here).
How to Download Social Media Data: Facebook
Since Facebook is still the most popular social media platform and has a relatively standard method for requesting a download of your data, we’ll start by manually downloading our Facebook data. These five steps are all straightforward, but remember that it may take some time after requesting to create the file before you can download it.
- Go to the Facebook Settings Page
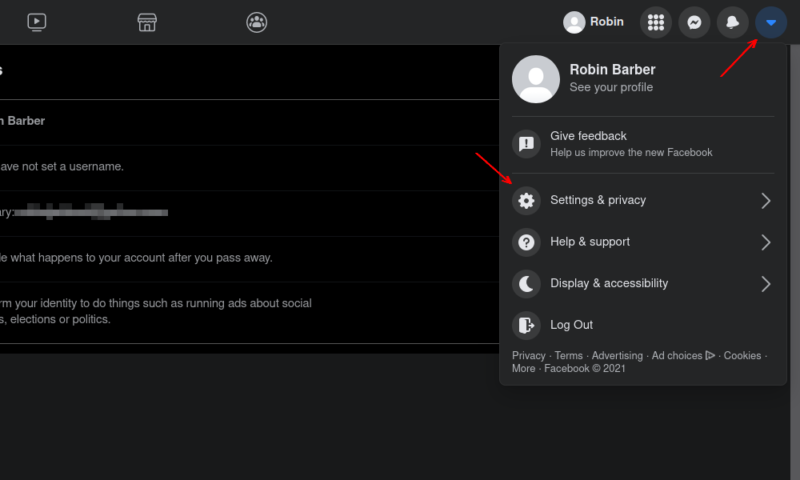
Either through the arrow in the top-right corner or by typing facebook.com/settings in your web browser’s navigation bar, find the Facebook settings page.
- Look at Your Facebook Information
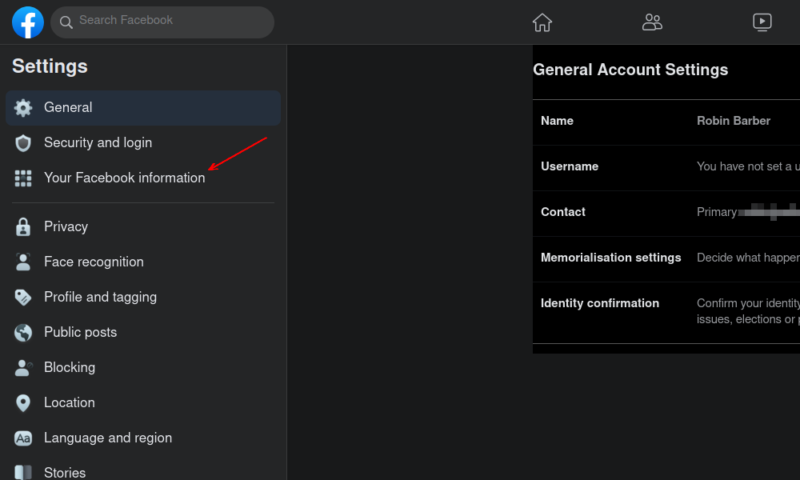
In the menu on the left, select “your Facebook information” for access to the data Facebook holds.
- Choose to “Download Your Information”
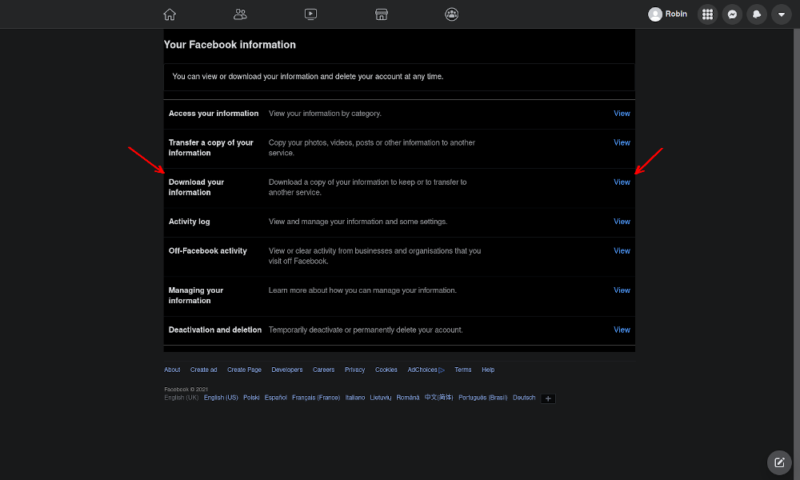
Click the “view” button next to the “download your information” option.
- Create Your Data File
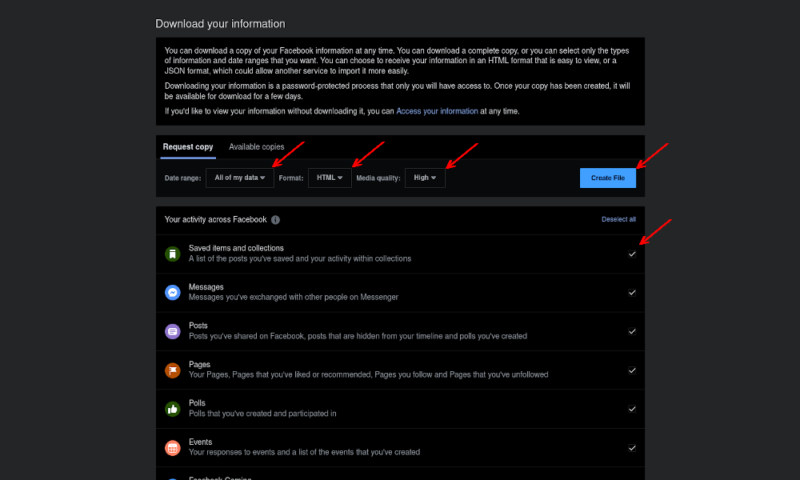
Choose what information you want to download, where you want to grab the data from, the quality of any media in the download and the format of the finished file. When you’re happy with your selections, click “create file.”
- Download Your Data
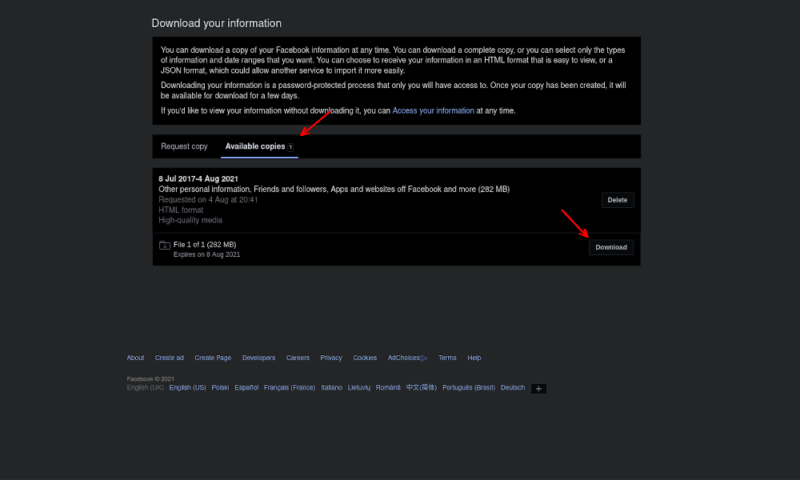
When you get a notification telling you the file is ready, go to the “available copies” tab and click “download” to get your ZIP file. You can then upload this file to the cloud, which we’ll go through later in the article.
How to Download Social Media Data: Instagram
Instagram is another social media that’s worth backing up, as this will protect any images that you’ve saved. This means that you won’t lose a picture because your friend took it down or you accidentally unsaved it. However, you can’t choose to exclude things from this backup, so if you’ve had your account for a while, it may create a large folder.
- Go to the Instagram Settings Page
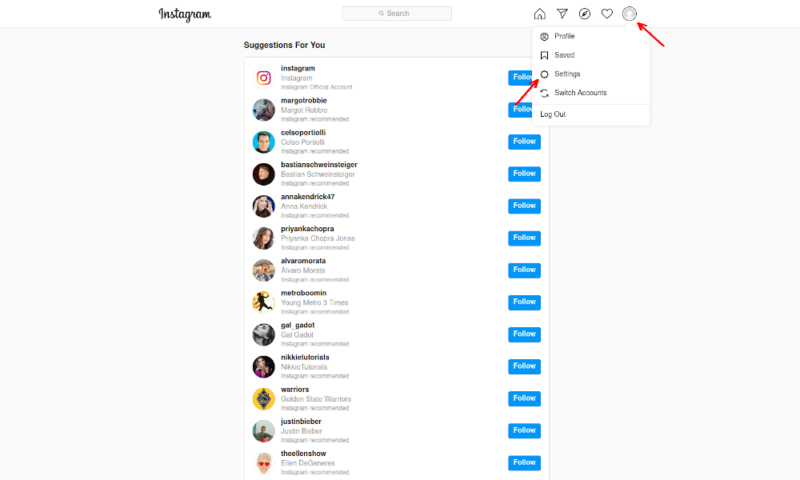
Click on your profile picture in the top-right corner, then select “settings” to get to the settings screen.
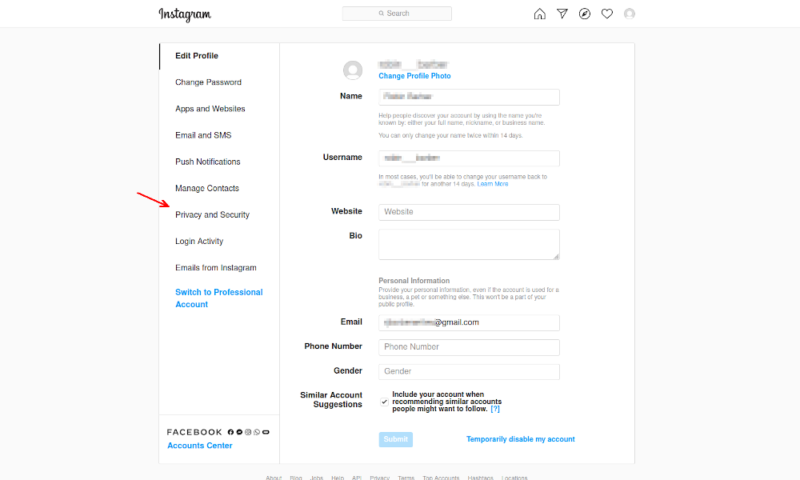
- Choose the “Privacy and Security” Tab
Select “privacy and security” from the sidebar.
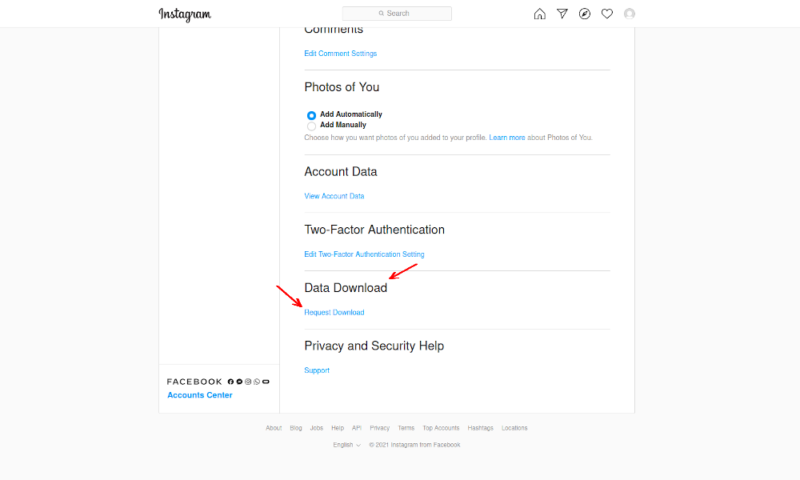
- Request a Download of Your Data
Scroll down until you find the heading “data download” and select the option underneath it called “request download.”
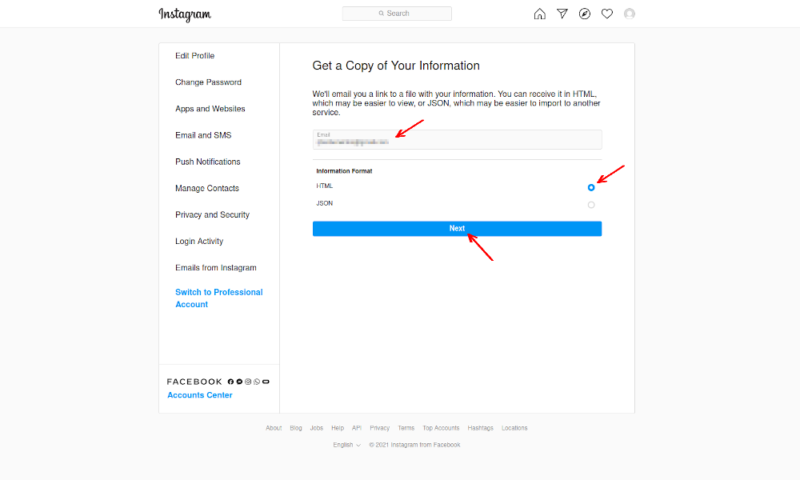
- Choose the Format for Your Data File
Select either the HTML or JSON format and enter the email address where you want the file sent, then click “next.”
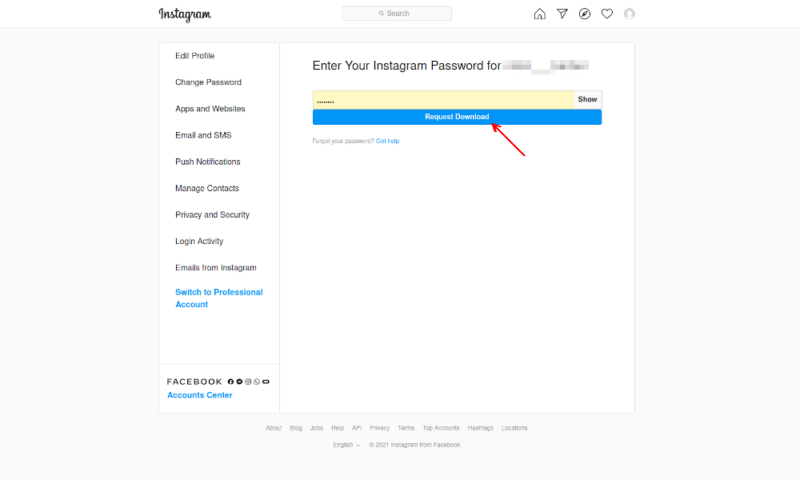
- Confirm Your Instagram Password
To confirm that you should have access to this data, enter your Instagram password. Within 48 hours, you’ll get an email with a link to download your ZIP file. Once you have the file, you can follow the steps in the next section to upload them to the cloud.
How to Manually Backup the Social Media Archives
Once you have your social media content in an archive file, you’ll probably want to back it up. To do this, we’ll use IDrive, but any decent cloud storage service will have similar steps for uploading a file. You can also do this with any social media platform, as long as it lets you archive your data.
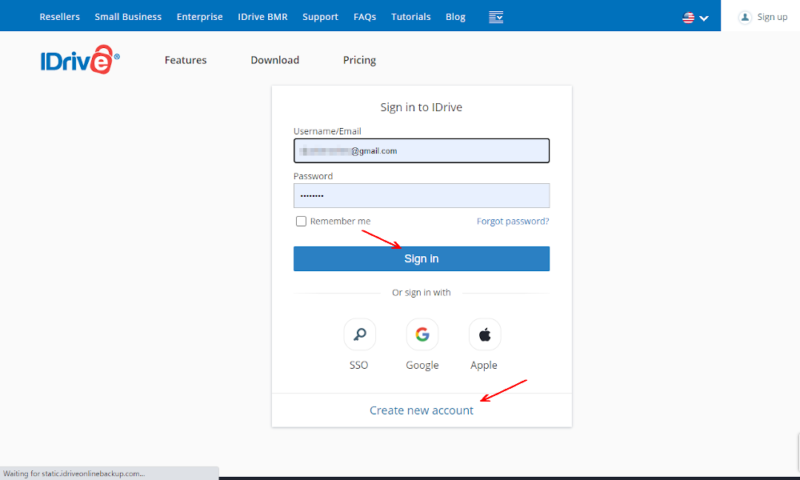
- Create an IDrive Account
Either create a free IDrive account or sign in to an existing one. You’ll need to make sure you have some excess space in your account before you do this.
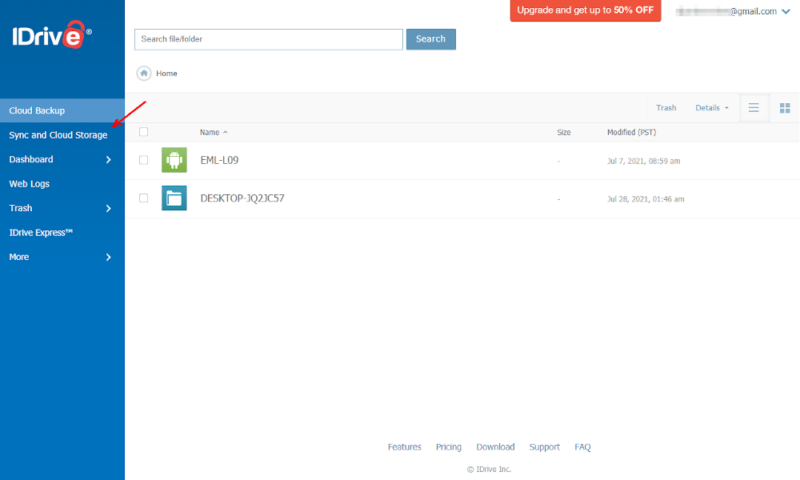
- Go to the Cloud Storage Page
Click “sync and cloud storage” in the menu on the left to get access to your personal storage drive.
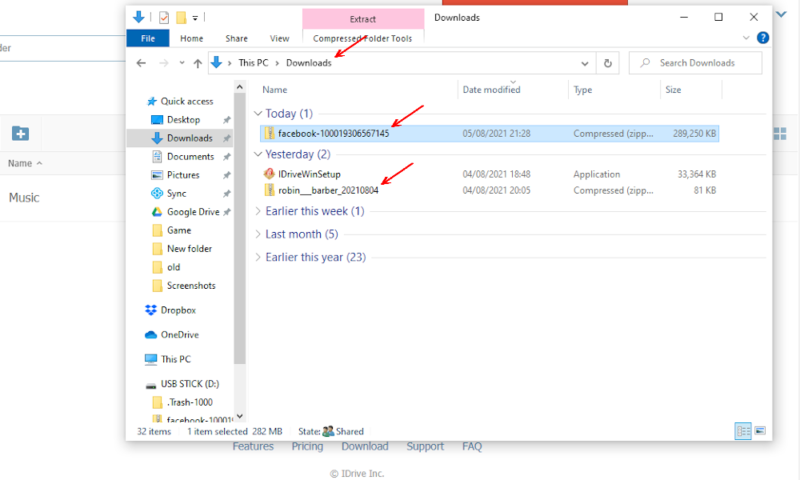
- Find the Archive Files
Open Windows file explorer and find the data you downloaded. This will normally be a ZIP file inside your “downloads” folder.
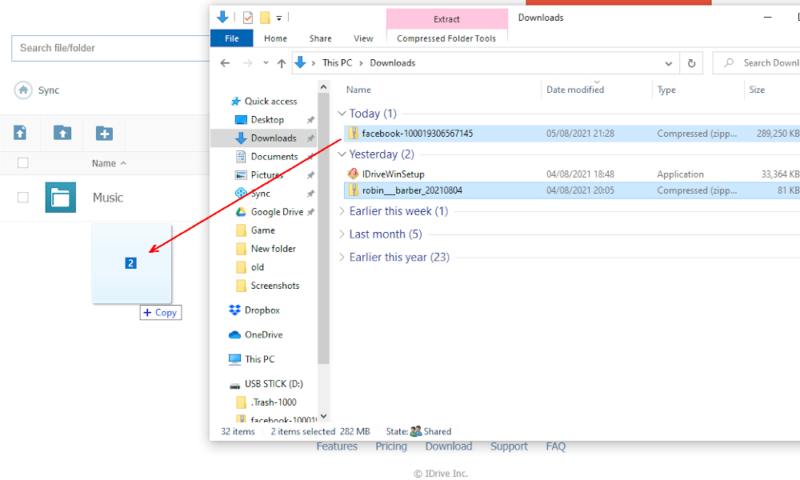
- Drag and Drop the Files Into IDrive
Drag the files into your IDrive cloud storage drive. The files will automatically upload to IDrive’s network, and you’ll be able to download the data on any device.
Final Thoughts
Being able to download your social media data gives you the freedom to do what you want with it. Whether you want to cut all ties with the app but don’t want to lose your photos or you just like keeping a local copy of everything, learning how to backup your data is a great start to keeping it all safe.
However, you shouldn’t settle with just keeping your Facebook and Twitter accounts protected; you could lose any file or device at any time, and your data will be irretrievable. To counter this, you should be sure to follow our guides to backup Windows and your Android phone (or our article on backing up a Mac if you prefer Apple devices).
If losing Twitter data is your biggest worry, fret not. We compiled a step-by-step guide to help you back up Twitter archives to the cloud.
Do you like to keep your data safe? Have you backed up your social media accounts? Did you use any of these methods? Let us know your thoughts in the comments section below. Thanks for reading.
FAQ
Some cloud storage services — such as pCloud — have built-in ways to save social media content to the cloud. You can also make a manual backup if these providers don’t include the files you want to save.

