Explaining Asana Time Tracking: Best Time Tracking Integrations in 2025
You can use Asana time tracking to monitor your progress, identify areas for improvement and estimate future projects more accurately. In this article, you’ll learn how to use Asana’s time tracker and integrate other time tracking tools with your Asana account.
Asana is one of the best free project management software options and comes with great time tracking tools. Using Asana time tracking, you can track the time spent by your team on any task with just a few clicks. You can also manually enter the time spent if the task has already been completed. Our experts thoroughly tested the feature to bring you this guide.
Key Takeaways: Asana Time Tracking
- Asana is one of the best project management software options that can help you with all your project requirements.
- Time tracking is a crucial part of project management, as it lets you see the time consumed by tasks to plan ahead on other projects.
- Asana’s time tracking is only available to paid users, and it’s still in beta. However, you can get the same benefit by integrating Asana with Clockify, Harvest or Hubstaff.
Asana allows you to track time for individual tasks and subtasks, but you can also track time for the entire project. The tracked time data is automatically logged and displayed in real time, making it easy for anyone on the team to see how much time a particular task or project is taking up.
In this article, we’ll show you how you can use Asana as time tracking software to improve time management at your workplace.
What Is Asana Time Tracking & Why Use It?
Asana time tracking simply allows you to track the time spent on any task or project. Team members can enter times using a live timer, or manually report the time once the task is complete. It is still in beta, so you can expect some quirks, but even this version works surprisingly well.
Avoid Costly Project Management Mistakes – Get Free Tips Today!

- Discover 10 fundamentals of project management
- Understand step-by-step plans for PM execution
- Learn tips to avoid 5 common mistakes by beginners
Tracking time can help your project managers monitor which tasks are taking the longest to complete. By keeping track of the time spent on each task, project managers can identify bottlenecks and allocate working resources more effectively.
You can also use Asana time tracking to estimate how long similar tasks will take in the future, allowing you to budget and forecast future projects with greater accuracy.
If you’re a small business looking for an affordable project management solution to track your project progress, Asana is one of the best project management softwares for startups.
Is Time Tracking Available on Every Asana Plan?
The time tracking tool in Asana is available only in the Advanced and Enterprise plans. However, you can integrate a free Asana account with other time tracking tools such as Clockify, Apploye, Harvest, Hubstaff, HourStack, Tick, Toggl Track and more.
Tour of Time Tracking in Asana
Let’s begin by explaining how to enable time tracking, then we’ll cover how to assign trackable tasks to your team.
Enabling Time Tracker
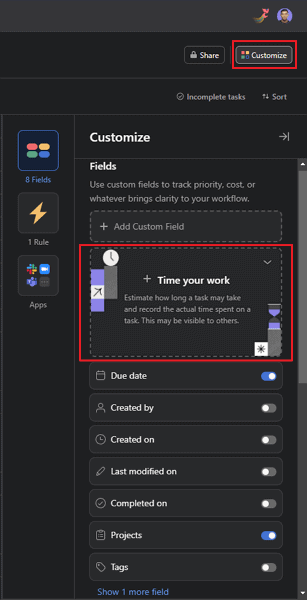
To add a time entry to an Asana project, click on the “customize” button — you’ll find it in the top-right corner of your tasks page, regardless of which view you’re using. Click on the “+ time your work” card under the “fields” section to see the time tracker option in the list.
You can enable estimated time to manually track time by entering a time value. You can also enable actual time to access a running timer that you can start and stop to track the actual time consumption for a task.
Customizing Your Time Tracking Functions
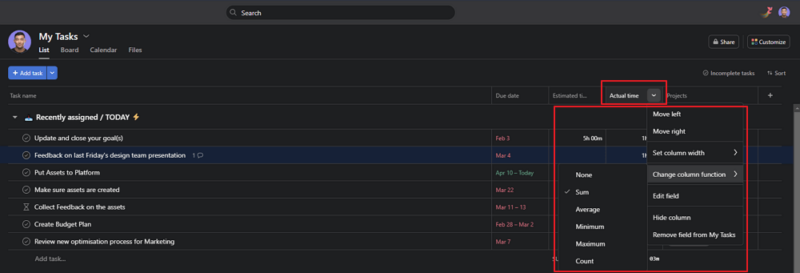
The “estimated time” and “actual time” fields will now appear on your screen, next to the parent task. Hover your cursor over the field name and click on the arrow. The function is set to the “sum” calculation by default, but you can customize the functions of your time tracker from the dropdown menu.
You’ll always see the sum of the total time tracked in the respective field of each task. At the bottom end of each project, you’ll see the time data based on the function you select.
“Sum” displays the total of all time entries. “Average” displays the average time taken for all tasks (best for repeated tasks). If you select “minimum,” you’ll see the entry that recorded the least amount of time; the opposite applies for “maximum.” Selecting “count” will display the number of tasks that you have tracked time for.
Tracking Time
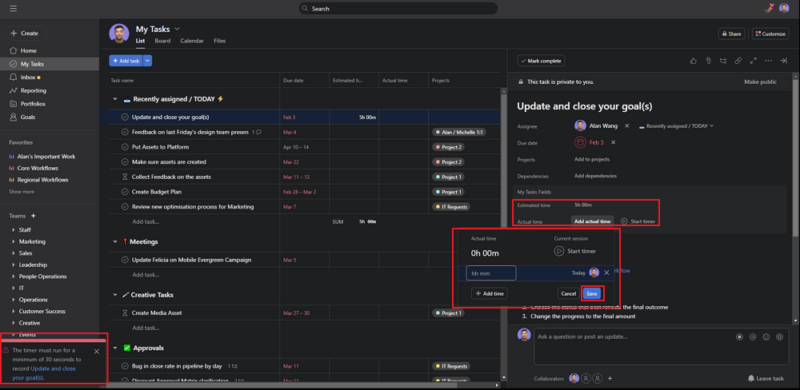
You can manually track time either by clicking on a task’s time tracking field or by opening the individual task window. Toggle tracking on and off by clicking on the start timer icon. You can also manually enter the time if the task has already been completed but not tracked.
The timer must run for a minimum of 30 seconds to be recorded in the detailed time sheets. Time sheets refer to the pop-up window you see when you click on a task’s “actual time” field. They show all the time entries with tracking dates and the people responsible.
Best Asana Time Tracking Integrations
Asana comes with a wide range of versatile integrations, one of the things that makes it a great project management software for multiple projects. While some of Asana’s features are available only on its paid plan, you also get the option to leverage these features through the third-party integrations available in Asana’s free plan.
Asana does not offer the time tracking tool in its free plan, but you can use other time tracker apps for your Asana projects. In this section, we’ll mention three of our favorite time tracking apps that integrate with Asana.
1. Clockify
Clockify helps you and your team keep track of the time spent working on different projects and tasks, and works very similarly to Asana time tracking. The highlight is that Clockify is completely free to use, regardless of how many people are on your team or how many projects you’re working on.
You can integrate your Asana and Clockify web accounts from the Asana app itself, or go through the Chrome web store.
2. Harvest
Harvest integrates seamlessly with Asana. Once you’ve integrated the two, you can track time and estimate task durations from the task pane without switching between apps. The main benefit Harvest provides is its approval-based time sheet function.
Harvest’s time sheet function provides a detailed breakdown into daily and weekly time data. The time you track goes through three stages. Time sheet data that requires approval can be viewed under the “pending approval” tab, and approved time can be viewed under the “approved” tab. You can also check your time data before submitting for approval under the “unsubmitted” tab.
3. Hubstaff
With Hubstaff you can analyze time data, invoice clients and automate team payments from a single dashboard. It’s quite similar to other apps that can help you track time and monitor the productivity of your team at your workplace.
Additionally, the free browser extension from Chrome lets you track time directly from Asana’s dashboard.
Final Thoughts
Using Asana as a work management platform can be a little tricky due to its complex user interface. However, once you get the hang of it, its time tracking tools and integrations can help you stay on top of all your project deadlines. Tracking time also ensures fair client billing by charging only the billable hours for all your customers.
Although the built-in time tracking requires an Advanced or Enterprise plan, the free plan offers plenty of integrations you can use to achieve much the same thing.
We hope this guide has helped you understand Asana’s time tracking features and integrations. If you’d like to learn how other Asana’s features work, check our our full Asana tutorial or guide on how to use Asana effectively.
Did you see any feature or integration that you liked? What app or tool are you currently using for time tracking and project management? Please share your thoughts below and let us know if you’d like any more details. Thanks for reading and happy time tracking!
FAQ
Yes, Asana has a time tracking feature. It’s only available on the Advanced and Enterprise plans, but free accounts can get similar functionality through integrations.
If you have Asana’s Advanced or Enterprise plan, you simply have to click on the “customize” button in the top-right corner of your screen and enable the “actual time” and “estimated time” fields.
There are multiple apps you can integrate with Asana. However, we recommend Clockify for time tracking with Asana, since it’s a totally free app.


