How to Install Tomato Firmware on Your Router in 2025: Supercharge Your Hardware
If you want to run a VPN directly on your router, chances are you need to ditch the stock firmware in favor of something better. Read this guide on how to install Tomato firmware to avoid bricking your router in the process.
If you’ve ever wanted to set up a VPN on your router or just tinker with advanced settings, you’ve probably noticed that the stock firmware installed on your router might be missing some features or is a pain to use. In this article, we’re going to look at how to install Tomato firmware, an open-source upgrade to your router’s existing firmware, and look at what it offers.
Key Takeaways:
- Tomato is an aftermarket firmware that can improve almost every aspect of your router’s performance.
- While it’s possible to brick a router during the installation process, it’s generally safe and doesn’t take very long.
- Although there are other third-party firmware options, Tomato is widely considered the easiest to use.
In short, Tomato will improve almost every aspect of your router’s performance, as it is widely considered to be more user-friendly than stock firmware. Tomato also offers much better VPN support than most competitors and will give you a much greater degree of control and security across your network.
If you want to skip straight to the good stuff, you can click the following links to go directly to the instructions on how to install Tomato firmware onto the following routers:
Before You Install Tomato Firmware… What Is Tomato?
Tomato is an open-source firmware upgrade that improves the usability and overall functionality of your router in almost every way. While there are other third-party firmware options, which we look at in more detail in our Tomato vs DD-WRT comparison, Tomato is widely considered one of the best and the easiest to use.
The Benefits of Upgrading a Router With Tomato Firmware
- Improves Overall Security and Control Over Your Router’s Settings
Tomato removes a number of old vulnerabilities in older firmware, such as taking WPS out of the list of security options. It also improves how much control you have over your router and the way it operates with tons of additional settings and QoS options. - More User-Friendly Interface
Most people find the Tomato user interface easier to use than any other firmware — third party or otherwise. - Excellent OpenVPN Compatibility
Tomato allows you to set up a VPN across an entire network easily and run up to two OpenVPN servers at the same time.
How to Install Tomato Firmware on Your Router
To get Tomato onto your router, you will need an ethernet cable to connect a computer to your router and a computer to manage the installation process. Other than this small step, almost nothing is required other than downloading the firmware and possibly a utility software from your router manufacturer.
Is My Router Supported by Tomato?
While Tomato does not support as many models of routers as its main competitor, DD-WRT, it still covers many of the most popular brands out there, including Asus, Netgear and Linksys. This table shows every model of router verified to work with Tomato and its compatible versions.
How to Install Tomato Firmware on an Asus Router
Many routers, as we’ll see throughout this guide, are able to have new firmware flashed to them directly within their existing firmware. While our router had this option, it would only accept official Asus firmware as an upgrade and not third-party firmware.
This meant we had to do things the entirely manual way, which we’ll outline step by step here. Granted, this is the more complicated way to do things, so hopefully looking at this process with pictures first will make understanding the next two methods a bit easier.
- Download the Firmware and Install the Restoration Utility
The first step of flashing the Tomato firmware onto any router will be roughly the same across compatible brands. You will need to download the firmware itself, as well as the firmware restoration utility required for your router.
This can be found on the company’s website and will allow you to install any firmware you want onto your router from your computer. We’d also recommend downloading the official stock firmware while you’re on the company’s website as a backup in case something is wrong with the Tomato firmware.
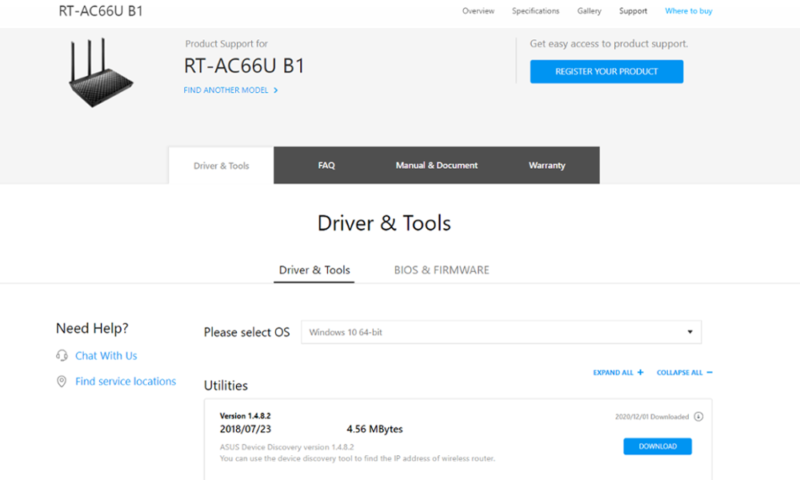 The manufacturer’s website will provide the necessary restoration utilities and backup firmware files you’ll need.
 - Clear the Router’s Memory
The next step when preparing an Asus router for new firmware is to clear the memory. This will reset most, if not all, of your current settings but will also ensure the device has enough memory to work with during the installation process.
For our particular router, there are two buttons on the back, in addition to the power button. One is labeled “reset,” and the other is labeled “WPS.” To clear the router’s memory, we had to turn the router off and on again while holding the WPS button for 10 seconds. After we released the button, the lights on the front of the router all blinked once to signal that the memory was cleared.
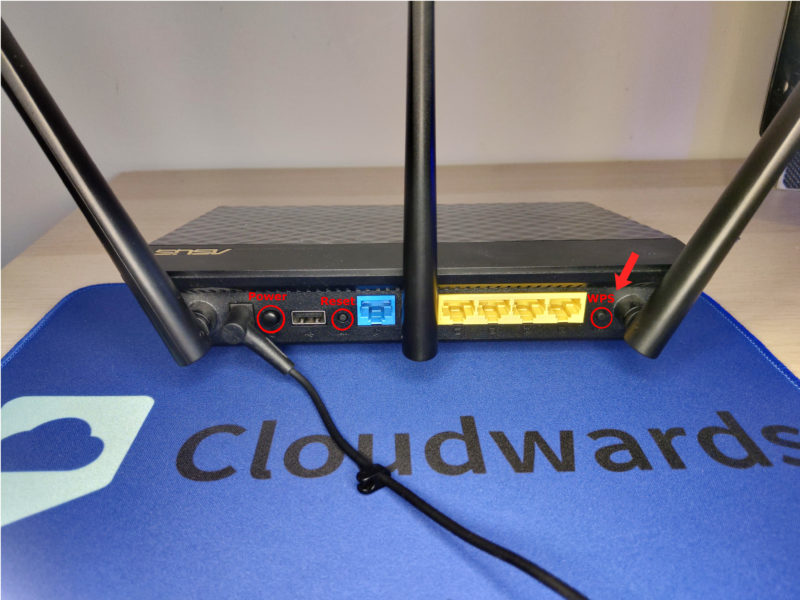 Giving the router a reset ensures that the memory will not be overloaded during the installation process.
 - Disable the WiFi and Enable the Static IP Address
Next, we had to disable the WiFi broadcasting on our router and set up a static IP address for the computer we had connected.
If we skipped this step, the restoration software on our computer would only get about a quarter of the way done before something with the router’s communication with the computer would change, interrupting the installation. A static IP address will ensure that no changes to the IP occur during the process.
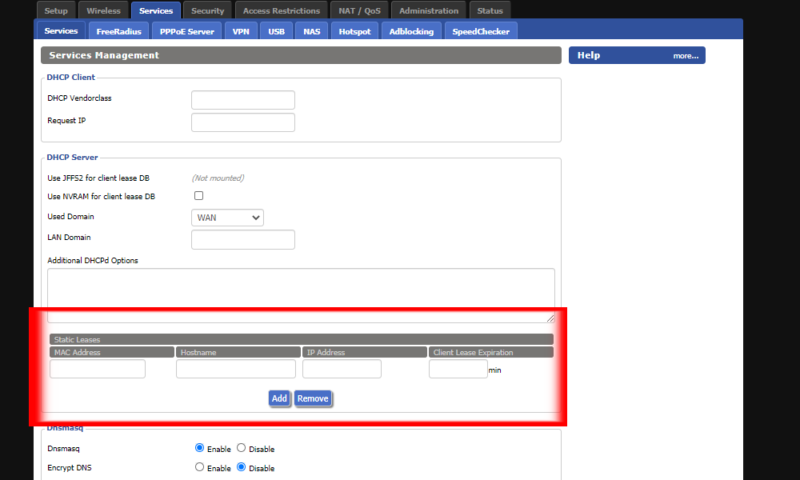 How you disable the WiFi and enable a static IP will depend on the model of router you have.
 - Enable the Firmware Restoration Mode
Now that the router is plugged into your computer, you have the firmware and restoration software ready on your PC and the router’s memory is clear, you’re ready to set the router to restoration mode. For our router, this meant turning it off and back on while holding the “reset” button.
After a few seconds, the power light began to blink slowly, which meant our Asus router was in restoration mode. One interesting quirk with our particular model of router was that the “reset” button had to be held down during the entire installation, or it would interrupt the process, but this will differ from model to model.
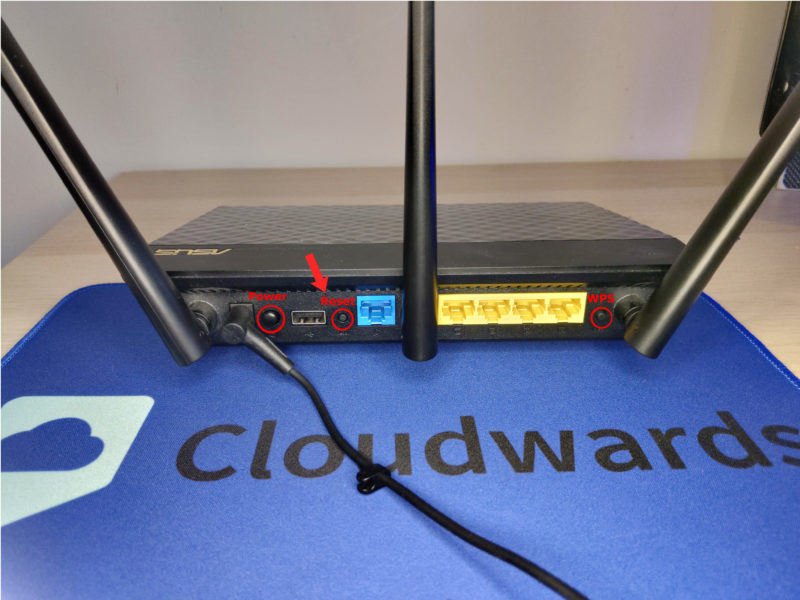 Enabling the firmware restoration mode also varies from router to router but often involves holding down a reset button.
 - Install the Firmware and Restart the Router
Once the router is in its firmware restoration mode, you can hit the “upload” button on the restoration utility on your computer to begin the process of flashing the firmware to the router. The progress bar on the software update will make its way to 100 percent within as little as 30 seconds but may take up to a few minutes. Once this is complete, you can restart the router and see if the process has worked.
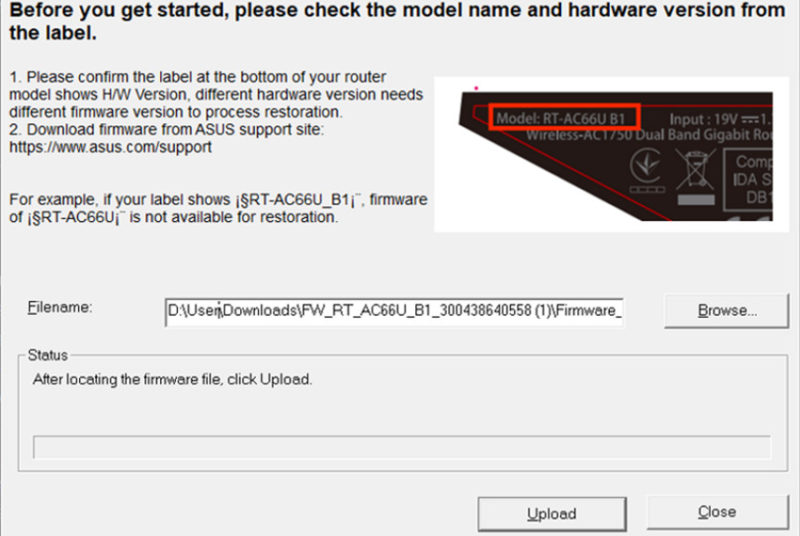 Use the firmware restoration utility to flash the new firmware onto your router.
 - Set Up the New Firmware
Once you restart your router, you should go directly to the default router’s IP address, which for most routers is 192.168.1.1, and set up your username and password for the router and the network. The default credentials are “root” and “admin” for the username and password, respectively.
However, these should be changed right away to prevent any lapses in security. Once that is complete, you can move on to setting up the configuration for your wireless network and wired connections.
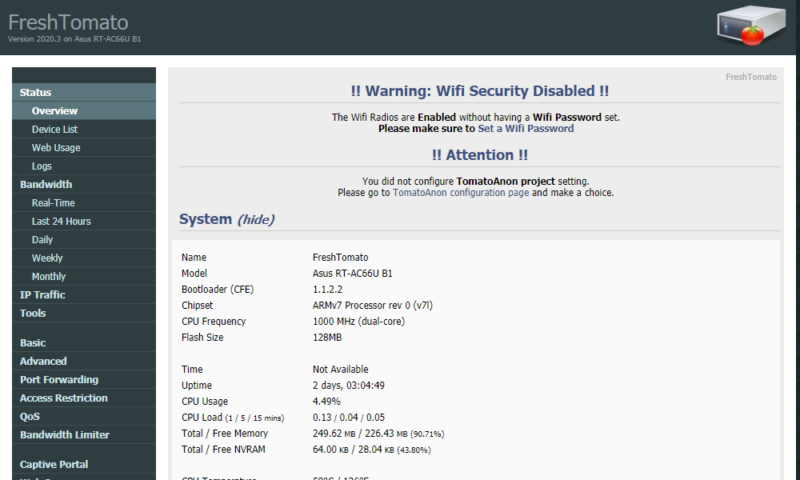 Set up a new password and username right away to avoid letting anyone else access your network.
How to Flash Tomato on a Linksys Router
The process we used for our Asus router is easily the most complicated out of all the ways to flash Tomato firmware onto a router. As we mentioned, many routers have a firmware utility built directly into their OEM firmware, which is much easier than having to send it through a restoration utility on a computer.
Many Linksys routers can have a new firmware flashed directly onto them from within their stock firmware. That drastically reduces the number of steps and the complexity of each step.
- Prepare and Download the Firmware
Just as we did in the first guide, the first step to flashing a router with Tomato firmware is to download the correct version of the firmware and unpack the compressed files. Before continuing, we still recommend downloading your router’s current firmware first, in case there is a problem with Tomato.
- Open the Linksys GUI in Your Browser and Select the Firmware Upgrader in the Admin Tab
Next, go to 192.168.1.1 to open the web browser interface for your router. From here, you’ll want to go to the “admin” tab. In the “admin” tab, you’ll see the firmware upgrader option, which is where you’ll select the Tomato firmware file from your computer and flash it to the router.
- Install and Set Up the New Firmware
Once the process is complete, restart the router again and return to the default IP, where you should now see the Tomato login screen. Just as before, “root” and “admin” are the username and password, respectively, and you’ll want to change them immediately before moving on to set up your router how you’d like.
How to Flash Tomato Firmware on a Netgear Router
Just like with the Linksys routers, Netgear allows you to flash firmware directly within the existing menus. However, the main difference is that the Netgear routers include a step to clear the factory settings and memory — like we did on our Asus router.
This is also a great troubleshooting step for setting up Tomato on any router, often done with a “reset” button on the back of the unit.
- Prepare and Download the Firmware
As we’ve already said, the first thing to do when installing new firmware is to download the right version of Tomato for your router. This will most likely come as a compressed file, so you’ll have to unpack it as well once it downloads.
- Restore the Factory Default Settings
The next step to flashing firmware onto a Netgear router is to restore the default factory settings. If something is wrong during the setup process for one of the other routers, this is also a good troubleshooting step to try.
For many routers, this can be done in a similar way to what we saw with the Asus for clearing the memory. There is often a “reset” button that you can hold down to restore the factory settings. On many Netgear routers, though, this option is found within the “advanced settings” tab under “administration” and “backup settings.”
- Open the GUI and Flash the Tomato Firmware
After the router is set back to the factory defaults, you can open your browser again and log back into the router. This time, the credentials will be the defaults given to you in your router’s manual. From here, go to the “backup settings” page in the “administration” tab again and flash the new firmware onto the device.
- Finish Setting Up the Tomato Firmware
Finally, the last step is to head to your router’s default IP address and use the default Tomato credentials to log in. You’ll want to change these default credentials as soon as possible so that others can’t get into your router and make changes to your network.
Final Thoughts: How to Flash Your Router With Tomato Firmware
While Tomato isn’t available on every router, it covers most Netgear, Asus and Linksys routers as well as some others. If your router is on the list, then you could benefit from improved router performance, an easier-to-use interface as well as more options/settings, all within only a few short minutes by following our guides.
Let us know about if you’ve used an open-source firmware. Did you try Tomato, or did you go for another option? Did it improve your router’s performance or cause any problems? We’d love to hear about it in the comments below and, as always, thanks for reading.
FAQ
Not all routers work with Tomato, but many of the major manufacturers and models are verified to work. The main brands that Tomato is compatible with are Netgear, Asus and Linksys routers, but a few others are covered as well.
The installation process varies slightly from one router to another but should only require a computer and an ethernet cable as well as about five to 10 minutes if everything works properly. Read our guide for the complete step-by-step instructions.
Tomato is more secure than the standard firmware installed on your router. It gives you much more control over your network’s behavior and removes a number of existing vulnerabilities from older firmware.
Tomato and DD-WRT both specialize in different areas. Tomato delivers a user-friendly experience while still improving router functionality. DD-WRT is geared toward power users that want the absolute most out of their router without concern for how complicated it might get.

