How To Back Up iPhone to iCloud in 2025: Protect Your iOS Devices With Built-In Backup
In a few steps, you can back up your iPhone and protect your precious data from unexpected loss. iCloud backups let you restore your data or transfer it over if you upgrade to the latest iPhone. In the following sections, we cover how to back up iPhone to iCloud.
Backing up your iPhone isn’t something that you should put off any longer. Your device is full of your digital life, and losing your data means that information is gone forever. There are several excellent online backup services available. However, Apple’s iCloud is the most direct way to back up your device. Knowing how to back up iPhone to iCloud will protect your data.
No one wants to lose years of pictures, videos and contacts due to a malfunctioning device or even theft. Backing up your iPhone using iCloud is the simplest way to make sure you don’t lose your previous data. It only takes a few steps, which we will cover in the sections below.
-
07/09/2021
New images added. More details on backing up to iTunes.
-
02/22/2024 Facts checked
This article was rewritten to capture current steps and processes.
How To Manually Back Up iPhone to iCloud
You can start an iPhone backup manually in the “settings” app. This allows you to safely back up your device’s data using iCloud in a few steps. With manual backups, you can initiate the process whenever you want.
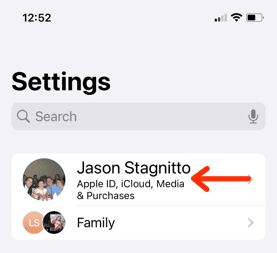
- Locate Apple ID
Open the “settings” app. At the top of the page is your Apple ID. Click it to access your iCloud options. You shouldn’t need to log in, but if prompted, use your Apple ID and password to continue.
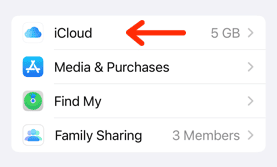
- Select the “iCloud” Option
In the menu, tap the “iCloud” option, which opens all of the available choices for your iCloud account.
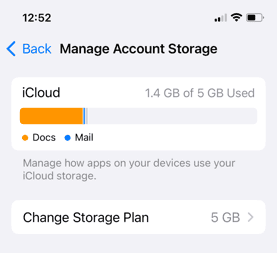
- Check Your Storage
You only have 5GB of free iCloud storage space. You can check how much you’ve used on the data screen. If you need more storage space to back up your iPhone, you’ll need to consider purchasing an iCloud+ plan.
- Tap “iCloud Backup”
One of the menu options is “iCloud Backup.” Tap it to open the iCloud backup menu.
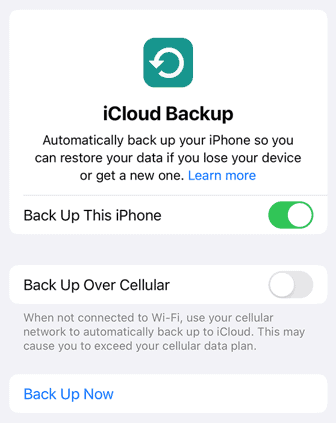
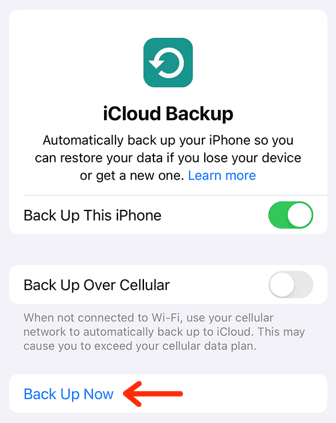
- Select “Back Up Now”
To manually back up your device, tap the “back up now” option in the menu. This will initiate a backup of your iPhone to iCloud.
How To Automatically Back Up iPhone to iCloud
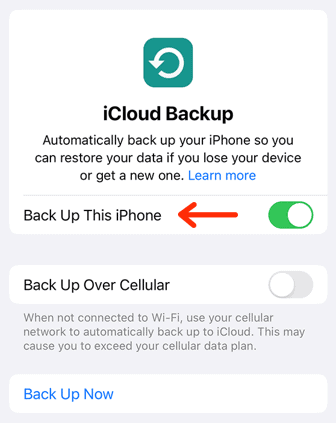
If you’d rather not remember to back up your device regularly, you can leave it to iCloud. Keeping your iPhone backed up automatically means you won’t have to worry about protecting your data. The process is similar to a manual backup.
10,000+ Trust Our Free Cloud Storage Tips. Join Today!
- Demystify cloud storage terminology and key concepts in plain language
- Discover easy-to-implement techniques to securely backup and sync your data across devices
- Learn money-saving strategies to optimize your cloud storage costs and usage
Back Up iPhone to Computer Instead of iCloud
If you don’t have enough iCloud storage space and don’t want to purchase yet another subscription, you can back up your iPhone using your computer. It works with a Mac or a Windows PC.
Back Up iPhone Using Mac
For macOS Catalina or later, you can back up your iPhone using the “finder” window once you connect it to your Mac.
- Open the “finder” window
- Connect your iPhone to your Mac using a USB cable
- Enter the passcode on your iPhone if asked
- Encrypt local backup; this is recommended if you’re syncing data from the “health” app
- Click “back up now” to begin the backup process
Back Up iPhone Using Windows PC
You don’t need a Mac to back up your iPhone to a computer, as it also works on a PC. You will need to download iTunes for Windows.
- Open the “iTunes” app
- Connect your iPhone to your PC using a USB cable
- Enter the passcode on your iPhone if asked
- Click on the small “iPhone” icon in the menu bar
- Click “summary” in the left sidebar
- Encrypt local backup, if needed
- Click “back up now” to begin the backup process
Final Thoughts
iPhone backups are the smartest and safest way to ensure you don’t lose your data. They protect your iCloud photos and videos, along with the other irreplaceable content we keep in our pockets. You have several options to back up your data, the simplest being Apple’s built-in solution.
Every iOS device comes with iCloud, which is an easy way to back up your data, including text messages and media files in iTunes, as long as you have enough storage space. We review the service in depth in our iCloud review. Additionally, iCloud is one of many options available. We provide several excellent alternatives in our best backup for iPhone article.
If you ever need to learn how to restore your device, check out our guide on how to restore iPad from iCloud.
Do you back up your iPhone? If so, what backup do you use? Is your backup option cloud-based or on your computer? Let us know in the comments section below. Thanks for reading our article.
FAQ: Ways To Back Up iPhone to iCloud
You can back up the contents of your iPhone via iCloud from the “settings” app in a few short steps. The main issue that might prevent you from backing up your data is not having enough iCloud storage space.
When you turn on an iPhone that isn’t linked to an Apple ID, you can select “restore from iCloud backup” to begin the restore process.
The most direct way is to back up your data using iCloud. You can access this option within the “settings” app.
When you first start your new device, you will see several options to transfer your data and apps. If you have a backup in iCloud, you can choose the “restore from iCloud backup” option.


