Cloudwards.net may earn a small commission from some purchases made through our site. However, any earnings do not affect how we review services. Learn more about our editorial integrity and research process.

117 (How to Backup Your iPad to iCloud)

How to Backup Your iPad to iCloud

Mauricio PreussJackie Leavitt

Written by Mauricio Preuss (CEO & Co-Founder)

Reviewed by Jackie Leavitt (Chief Editor)

Last Updated: 2024-03-07T16:48:21+00:00

All our content is written fully by humans; we do not publish AI writing. Learn more here.

Many people live their lives with their iPad as a constant companion, keeping everything from their pictures to important documents on the hand-held devices. Often you’ll find that not everyone has a backup set up in case their device gets lost or stolen.

In this article, we at Cloudwards.net are going to show you how to backup your iPad’s data to the iCloud, Apple’s very own cloud. The iPad, like many other Apple devices, has rather constrictive rules on how the data on it can be stored and accessed, which means that users need to follow a specific sequence of steps.

Once you’ve set up a backup, you never need worry again about the data stored on it: no matter what happens to the device itself, your data will be safe. Any time you buy a new device, just download the backup and all your files will be there, ready to use.

The backup process for most iOS devices is more or less the same. However, in this article we will focus on backing up with iCloud, which is different from the process with iTunes. Once you have set up a backup, restoring it is easy.

You are of course free to use both separately. Do keep in mind that no separate app is needed to backup an iPad’s data to the iCloud.

What You Will Need

  • Your iPad
  • An iCloud account
  • A WiFi connection

For this guide, the iPad needs to be relatively new, since the instructions are aimed at devices that have iOS 8.1 or later installed. Earlier versions of the operating system generally have slightly different instructions. If you bought a new iPad during the last couple of years, you should be okay.

The process is simple, it’s just three steps:

Step 1: Connect to WiFi

The first step in the backup process is to make sure that you connect your iPad to a stable WiFi network. Since we’re likely dealing with several gigabytes worth of data, a sudden drop in the connection can be very frustrating.

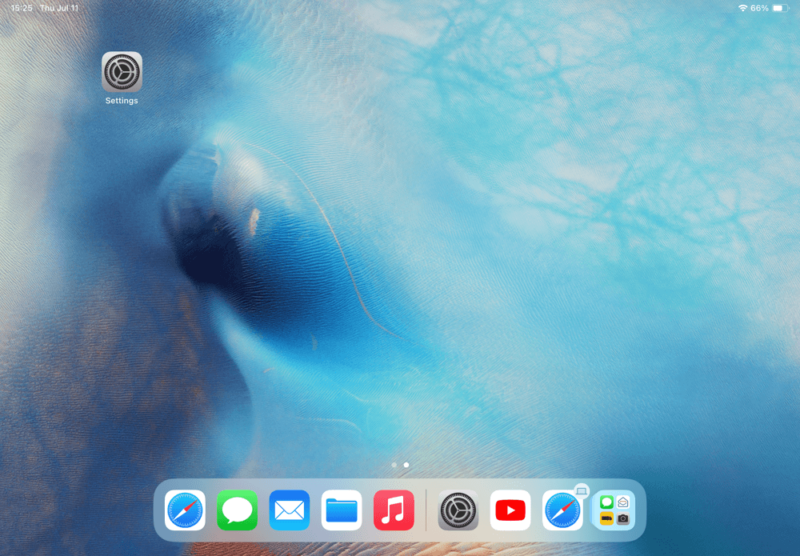
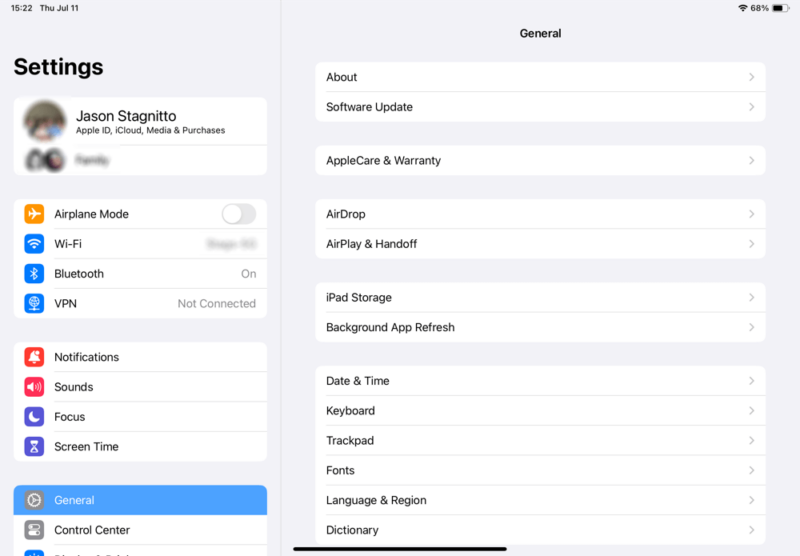
For this you need to go to Settings > WiFi from your iPad’s home screen and pick the WiFi network you want to connect to.

Step 2: Access iCloud Settings

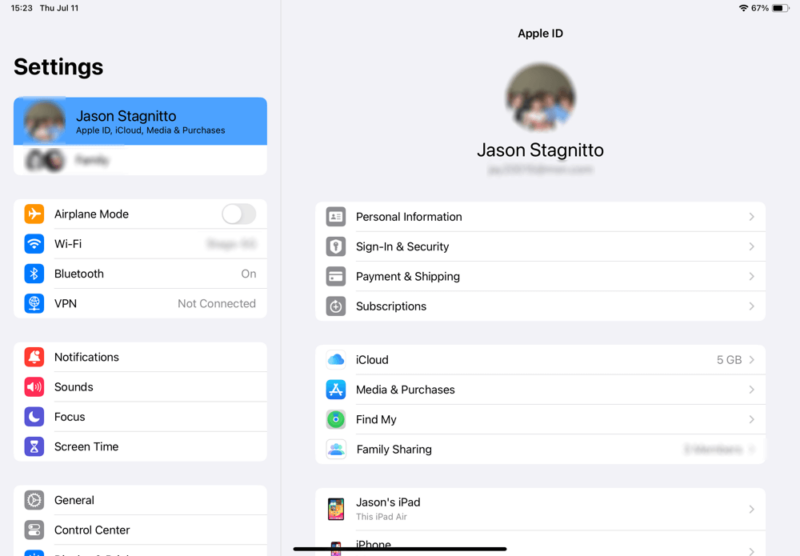
The second step is connecting to the iCloud. From the same home screen on your iPad, access Settings, but this time you have to scroll down and tap on “iCloud.” It will usually mention your iCloud address if you have one.

[review_bar id="disabled" all="true"]

Many people live their lives with their iPad as a constant companion, keeping everything from their pictures to important documents on the hand-held devices. Often you’ll find that not everyone has a backup set up in case their device gets lost or stolen.

In this article, we at Cloudwards.net are going to show you how to backup your iPad’s data to the iCloud, Apple’s very own cloud. The iPad, like many other Apple devices, has rather constrictive rules on how the data on it can be stored and accessed, which means that users need to follow a specific sequence of steps.

Once you’ve set up a backup, you never need worry again about the data stored on it: no matter what happens to the device itself, your data will be safe. Any time you buy a new device, just download the backup and all your files will be there, ready to use.

The backup process for most iOS devices is more or less the same. However, in this article we will focus on backing up with iCloud, which is different from the process with iTunes. Once you have set up a backup, restoring it is easy.

You are of course free to use both separately. Do keep in mind that no separate app is needed to backup an iPad’s data to the iCloud.

What You Will Need

  • Your iPad
  • An iCloud account
  • A WiFi connection

For this guide, the iPad needs to be relatively new, since the instructions are aimed at devices that have iOS 8.1 or later installed. Earlier versions of the operating system generally have slightly different instructions. If you bought a new iPad during the last couple of years, you should be okay.

The process is simple, it’s just three steps:

Step 1: Connect to WiFi

The first step in the backup process is to make sure that you connect your iPad to a stable WiFi network. Since we’re likely dealing with several gigabytes worth of data, a sudden drop in the connection can be very frustrating.

For this you need to go to Settings > WiFi from your iPad’s home screen and pick the WiFi network you want to connect to.

Step 2: Access iCloud Settings

The second step is connecting to the iCloud. From the same home screen on your iPad, access Settings, but this time you have to scroll down and tap on “iCloud.” It will usually mention your iCloud address if you have one.

[thumb id="14968" nocopy=true]

If you don’t have one, you’ll need to create an Apple ID, which is an easy process. You can access all Apple services (including iCloud) using the same credentials. Instructions for setting up an Apple ID can be found here.

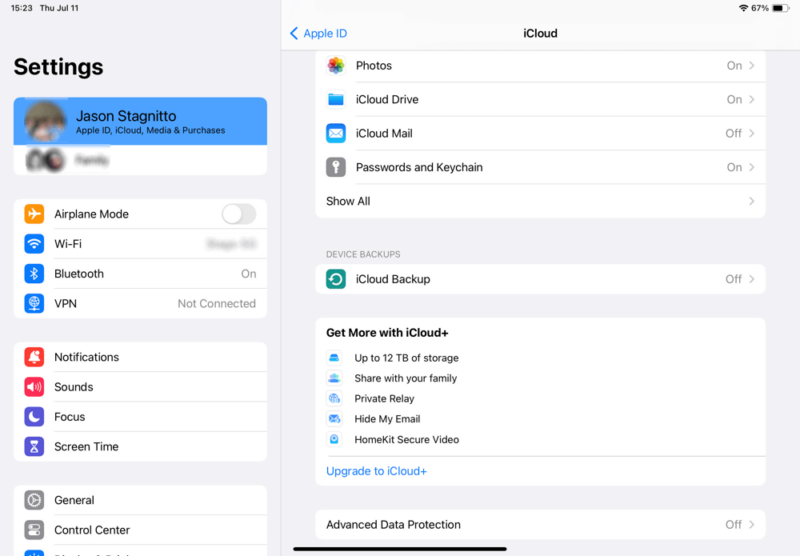
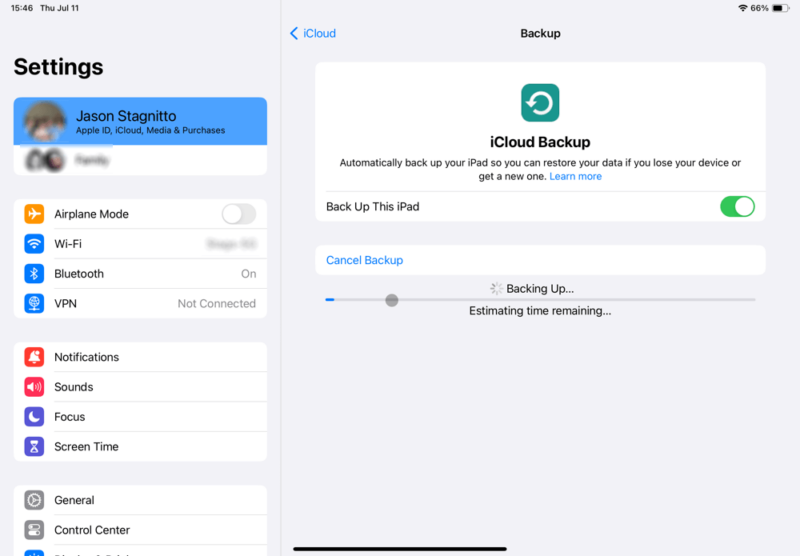
Once you are in, you need to scroll down and tap on “backup.” Now, make sure that iCloud backup is activated.

Step 3: Backup and verify

Tap on “back up now.” Do not disconnect from WiFi until the backup operation is completed. Depending on the amount of data that you want to backup and, of course, your connection speed, this will take a few hours. For example, if you want to backup about 30GB and your connection’s upload speed is 10 Mbps, it will take minimum of seven hours.

Once done, check that the backup actually went through. To verify this, go back to the iCloud settings as mentioned in step 2. Tap on “storage” instead of “iCloud,” then go to “manage storage” and then select your device.

[thumb id="14965"]

If the backup was successful, you should now be able to see all kinds of details, including the time of the backup as well as its size.

Automating Backups

Often you can end up skipping a manual backup immediately after getting some new data. We recommend setting up automatic backups to iCloud as they are done daily. The best part is that there is hardly anything that you need to do to separately turn them on. No additional settings to configure, nor forms to fill out.

While the total size of different backups that you can do using iTunes is certainly limited by the amount of free space that you have on your PC or Mac, in case of iCloud you can use up to 2TB (with the first 5GB free) and that’s more than what any iPad out there offers.

[thumb id="14966"]

After ensuring that WiFi connectivity has been established as mentioned in step 1 and iCloud Backup is activated as mentioned in step 2, connect the iPad to a power source and ensure that the screen is locked.

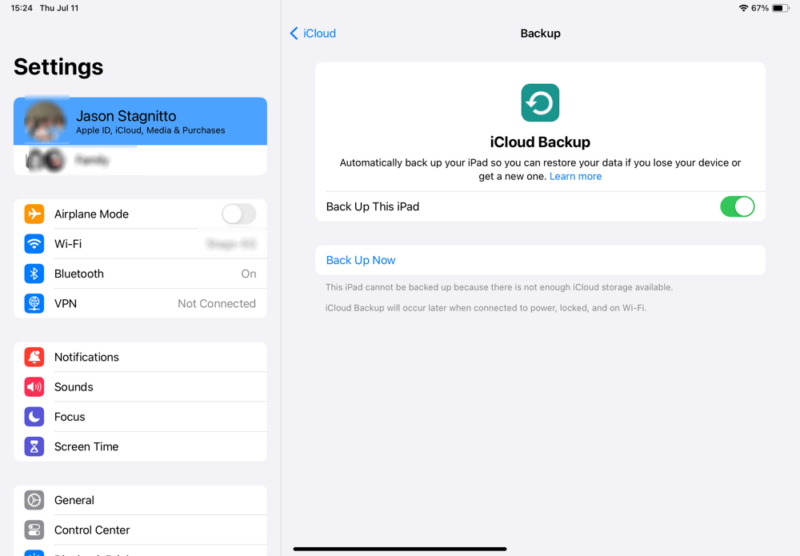
That’s it! As long as there is sufficient free space available in your iCloud account, the backup will take place automatically.

How to Control What Photos and Videos are Included in Your iCloud Backup

You may want to backup your iPad photos and videos to the cloud. However, there are 2 things to keep in mind:

  • Photos and videos usually occupy more space than some other types of files, like documents and email messages
  • Only the first 5 GB of storage space is free in iCloud
[thumb id="14967"]

If your backups are getting too large, you might want to delete some of these photos and videos so that you don’t end up paying for what you don’t need. If you want to avoid these extra costs, check if the iCloud photo library has been turned on.

If it has, you can delete the photos and videos in the library straightaway. This will even work from a Mac, provided it is running OS X version 10.10.3 (Yosemite) or later. You can of course download the photos and videos to your computer before deleting them from the iCloud Photo Library.

Deletion is a very simple process:

  1. Open the photos app on your iPad
  2. Tap “photos” at the bottom of the screen
  3. View your photos and videos by moments
  4. Tap select and then tap each of the photos and videos that need to be deleted
  5. Now tap the icon that looks like a trash can
  6. Tap on “delete [items]”

For deleting from a Mac you can also use the photos app. You can also delete them from iCloud.com itself.

You don’t need to worry about accidentally deleting photos and videos as they will be there in the “recently deleted” album on your iPad for 30 days. If they are not restored by that time, they will get permanently deleted from all devices that are configured for the iCloud photo library.

You can also get rid of them sooner if you wish. To do so, the instructions are more or less the same as those just mentioned, except that in this case, you will need to go for the “recently deleted” album and then make your selection.

If iCloud Photo Library has not been turned on, you need to delete these photos and videos from the “camera roll” album on your iPad. This will make sure they don’t get included in the iCloud backup. Here too it is recommended to import photos and videos to your computer before deleting them from the iPad.

This is what you need to do:

  1. Open the photos app on your iPad
  2. Tap “albums”
  3. Tap “camera roll”
  4. Tap select and then tap each of the photos and videos that need to be deleted
  5. Now tap the icon that looks like a trash can
  6. Tap on “delete [items]”
[box] Pro Tip: Backup Your iPad’s Data to Another Cloud Maybe you are not comfortable with iCloud and you want to backup your iPad’s data to another cloud service. One option we'd like to recommend is ElephantDrive for iOS.[/box]

Conclusion

We hope you enjoyed this guide. If you ever try to restore your backup, you may run into various error messages while doing so. We have provided help on how to solve these issues here. What do you think about this topic? Have you faced issues backing up your iPad’s data? Let us know in the comments below, and check out our other guide to help you delete duplicate photos on iPhone.

In this handy guide, Cloudwards.net shows you how to quickly backup your iPad's data to the iCloud. Never again lose your data, just because your iPad was lost or stolen.

If you don’t have one, you’ll need to create an Apple ID, which is an easy process. You can access all Apple services (including iCloud) using the same credentials. Instructions for setting up an Apple ID can be found here.

Once you are in, you need to scroll down and tap on “backup.” Now, make sure that iCloud backup is activated.

Step 3: Backup and verify

Tap on “back up now.” Do not disconnect from WiFi until the backup operation is completed. Depending on the amount of data that you want to backup and, of course, your connection speed, this will take a few hours. For example, if you want to backup about 30GB and your connection’s upload speed is 10 Mbps, it will take minimum of seven hours.

Once done, check that the backup actually went through. To verify this, go back to the iCloud settings as mentioned in step 2. Tap on “storage” instead of “iCloud,” then go to “manage storage” and then select your device.

If the backup was successful, you should now be able to see all kinds of details, including the time of the backup as well as its size.

Automating Backups

Often you can end up skipping a manual backup immediately after getting some new data. We recommend setting up automatic backups to iCloud as they are done daily. The best part is that there is hardly anything that you need to do to separately turn them on. No additional settings to configure, nor forms to fill out.

While the total size of different backups that you can do using iTunes is certainly limited by the amount of free space that you have on your PC or Mac, in case of iCloud you can use up to 2TB (with the first 5GB free) and that’s more than what any iPad out there offers.

After ensuring that WiFi connectivity has been established as mentioned in step 1 and iCloud Backup is activated as mentioned in step 2, connect the iPad to a power source and ensure that the screen is locked.

That’s it! As long as there is sufficient free space available in your iCloud account, the backup will take place automatically.

How to Control What Photos and Videos are Included in Your iCloud Backup

You may want to backup your iPad photos and videos to the cloud. However, there are 2 things to keep in mind:

  • Photos and videos usually occupy more space than some other types of files, like documents and email messages
  • Only the first 5 GB of storage space is free in iCloud

If your backups are getting too large, you might want to delete some of these photos and videos so that you don’t end up paying for what you don’t need. If you want to avoid these extra costs, check if the iCloud photo library has been turned on.

If it has, you can delete the photos and videos in the library straightaway. This will even work from a Mac, provided it is running OS X version 10.10.3 (Yosemite) or later. You can of course download the photos and videos to your computer before deleting them from the iCloud Photo Library.

Deletion is a very simple process:

  1. Open the photos app on your iPad
  2. Tap “photos” at the bottom of the screen
  3. View your photos and videos by moments
  4. Tap select and then tap each of the photos and videos that need to be deleted
  5. Now tap the icon that looks like a trash can
  6. Tap on “delete [items]”

For deleting from a Mac you can also use the photos app. You can also delete them from iCloud.com itself.

You don’t need to worry about accidentally deleting photos and videos as they will be there in the “recently deleted” album on your iPad for 30 days. If they are not restored by that time, they will get permanently deleted from all devices that are configured for the iCloud photo library.

You can also get rid of them sooner if you wish. To do so, the instructions are more or less the same as those just mentioned, except that in this case, you will need to go for the “recently deleted” album and then make your selection.

If iCloud Photo Library has not been turned on, you need to delete these photos and videos from the “camera roll” album on your iPad. This will make sure they don’t get included in the iCloud backup. Here too it is recommended to import photos and videos to your computer before deleting them from the iPad.

This is what you need to do:

  1. Open the photos app on your iPad
  2. Tap “albums”
  3. Tap “camera roll”
  4. Tap select and then tap each of the photos and videos that need to be deleted
  5. Now tap the icon that looks like a trash can
  6. Tap on “delete [items]”
Pro Tip: Backup Your iPad’s Data to Another Cloud

Maybe you are not comfortable with iCloud and you want to backup your iPad’s data to another cloud service. One option we’d like to recommend is ElephantDrive for iOS.

Conclusion

We hope you enjoyed this guide. If you ever try to restore your backup, you may run into various error messages while doing so. We have provided help on how to solve these issues here. What do you think about this topic? Have you faced issues backing up your iPad’s data? Let us know in the comments below, and check out our other guide to help you delete duplicate photos on iPhone.

↑ Top