How to Fix Kodi Buffering Issues in 2025
Buffering is every streamer's worst nightmare, and it can ruin what could be a great home movie theater experience. To put an end to Kodi buffering issues for good, have a gander at the methods in this dedicated guide.
Kodi is a popular open-source software for creating your very own streaming media library to enjoy plenty of movies and shows from across the great wide web. However, like any streaming software, it’s not immune to buffering and lags. In this guide, we’ll help you get to the root of what might be behind your Kodi buffering issues and share options to fix them.
As annoying as buffering can be, there are plenty of tricks that Kodi users can try to get back on track, from adjusting the Kodi cache settings to using a VPN. If you’re curious about Kodi and VPNs, check out our best Kodi VPNs guide. For now, let’s look at some options for solving the issue at hand so you can get back to smooth playback quickly.
-
01/06/2025 Facts checked
We have rewritten this guide to include up-to-date methods for stopping Kodi buffering.
Why Is Kodi Buffering?
Kodi gets stuck buffering for a variety of reasons ranging from temporary internet speed issues to video cache issues. To effectively eliminate Kodi buffering, you need to suss out what’s causing the problem in the first place.
The following are among the most common causes:
- A video cache that’s too full
- Slow internet speed (download speed, etc.)
- Network issues
- Overloaded sources (too many people using one streaming source at once)
- Internet service provider (ISP) throttling
- Outdated add-ons
- Heavy Kodi skins
How to Fix Kodi Buffering Issues: 5 Easy Methods
Here, we’ve laid out five methods (some easier than others) to help you stop Kodi buffering in its tracks. You might have to try a few methods before finding one that works, especially if you aren’t sure what’s causing the buffering.
1. Increase Your Kodi Cache Memory Size
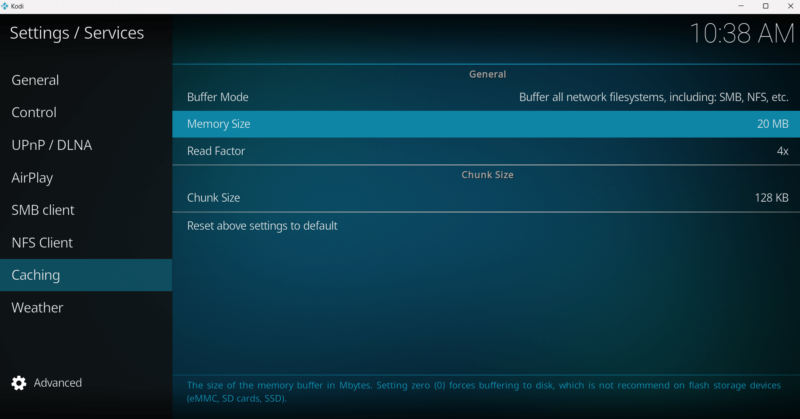
Sometimes, an overloaded Kodi streaming cache is the culprit behind Kodi buffering. By default, Kodi’s memory size in the “caching” settings is 20MB, but expanding this could help things run more smoothly.
A Reddit user suggested this fix and received several replies saying that it made a big difference in stopping the buffering.
Follow these steps to increase your Kodi cache:
- Open Kodi and go to the “settings” cog, then go into “services.”
- Open the “caching” tab on the left. If you don’t see the “caching” tab, go down to the bottom-left corner and click the cog that says “basic” or “standard” until it switches to “advanced” or “expert.”
- In the “caching” tab, click “memory size” and choose your ideal number of MB. The Reddit user who recommended this method said that they set it to 256MB on PC, 192MB on Fire Stick and 284MB on a phone. You may need to try a few settings to see what works best for you.
2. Use a VPN to Prevent ISP Throttling
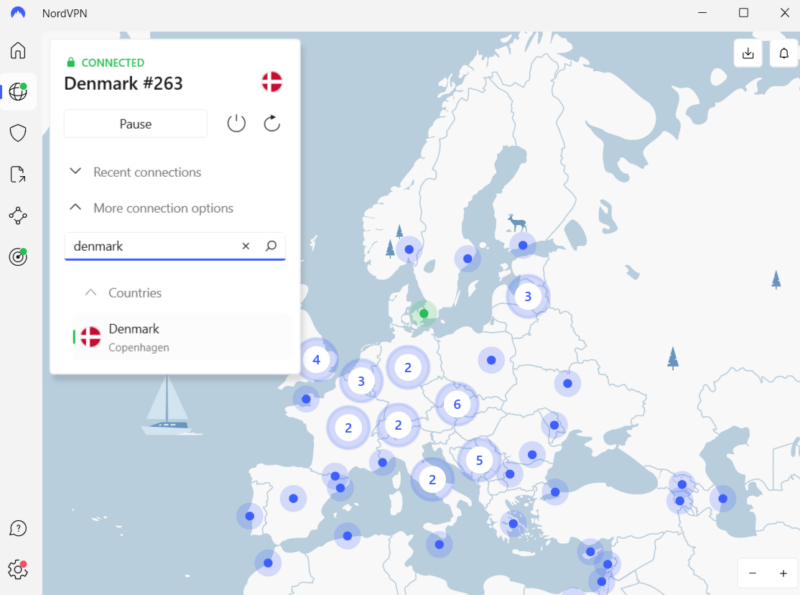
ISP throttling happens when your internet service provider slows down your connection on purpose, often with the goal of cutting data and saving on costs. This can cause buffering while you’re trying to enjoy a stream, and it’s a real pain. It tends to happen most often at peak times for internet use, like in the evening after many people get off work.
This is where a virtual private network (VPN) comes in to save the day. A good Kodi VPN prevents your ISP from seeing what you’re doing online and, as a result, stops it from throttling you. You can learn more about this in our guide on how to bypass ISP throttling.
In this example, we’ll show you how to obtain and connect to a VPN like our favorite provider, NordVPN, to keep ISP throttling at bay.
- Sign Up for a VPN
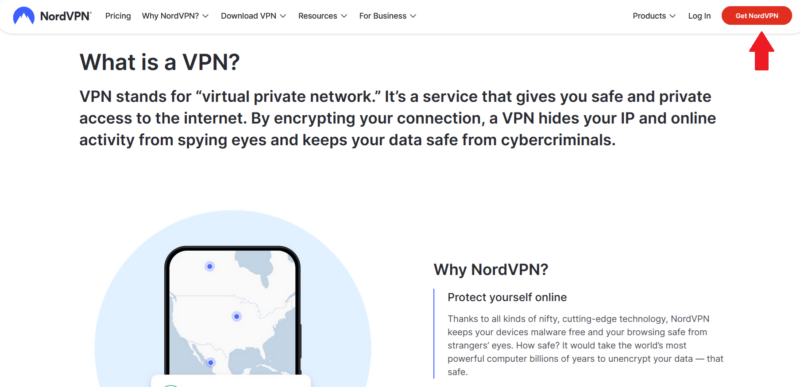
Go to a VPN’s website and sign up for a plan that fits your needs. NordVPN comes with a 30-day money-back guarantee, so you can try NordVPN risk-free if you’re undecided.
- Download and Install the VPN App
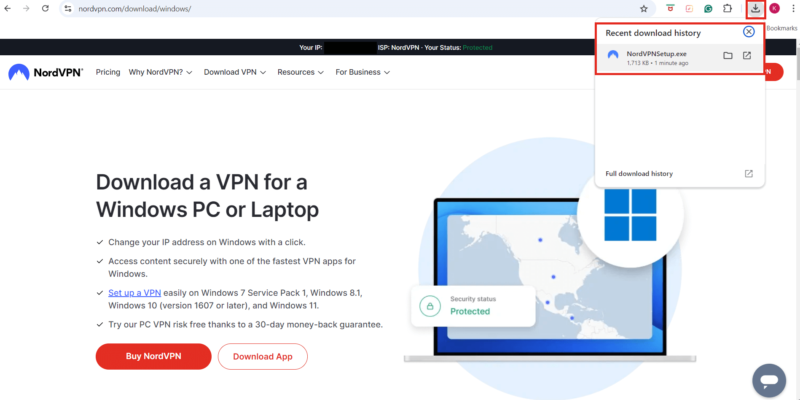
Find the “download” tab and select the device you want to use with your VPN. Click “download.” Once the file has downloaded, open it by clicking the arrow in the top-right corner of your browser and selecting the file. This will start the installation.
- Connect to a VPN Server Nearby
Open the VPN and connect to a server close to your location, which will offer better speeds. Finally, open Kodi and use it as normal. If you still experience buffering, try quitting the Kodi app and restarting it with your VPN active.
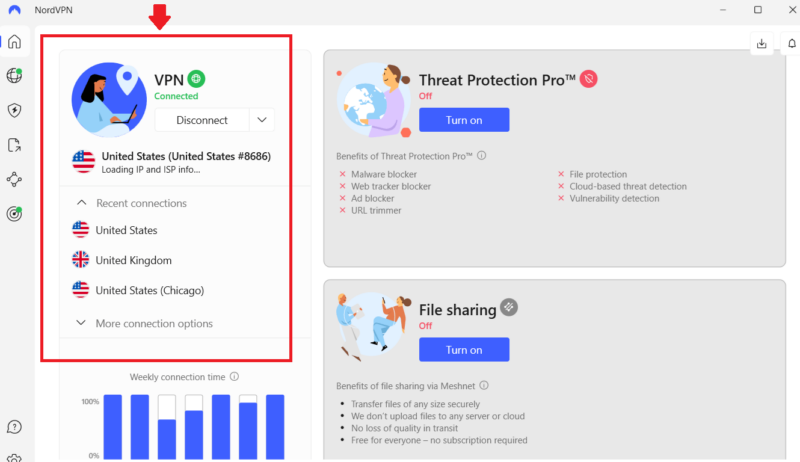
If you aren’t experiencing ISP throttling, then using a VPN might slow your connection even more, as it adds a layer of encryption to your internet connection.
3. Get Real-Debrid (Paid Method)

people use to enhance the Kodi experience.
Real-Debrid and similar software, like AllDebrid and Premiumize, speed up the file downloading process and let you stream from HD links. Therefore, many sources recommend giving Real-Debrid a shot if you consistently experience buffering issues. Here’s how to sign up for Real-Debrid and integrate it with Kodi.
Some sources recommend using an anonymous email address to sign up with Real-Debrid for privacy reasons.
- Go to Real-Debrid’s website and register for an account. Confirm your email address.
- Log in and purchase a plan. You’re placed on the free plan by default when you sign up, but this version is very limited.
- Once you have a paid plan, open Kodi and go to “settings,” then “system.”
- Scroll down to “add-ons” and click “manage dependencies.”
- Find and click the URL resolver in the list. The one we found is called “ResolveURL.” Click “configure” on the next page. If you don’t find a URL resolver, you can install any add-on that supports a URL resolver dependency and is compatible with Real-Debrid.
- Look through the “universal resolvers” tabs until you find Real-Debrid. We found it in “universal resolvers 2.”
- Click on the “priority” tab and change the number to 90. Click “done,” then “OK.”
- Open up the “universal resolvers” tab again and go back to the “Real-Debrid” tab. Then click “(re)authorize my account.”
- Go to the URL shown in the tab and enter the code given. This should integrate your Real-Debrid account with Kodi.
4. Reduce the HQ Scaler Percentage (Stuttering Issues)
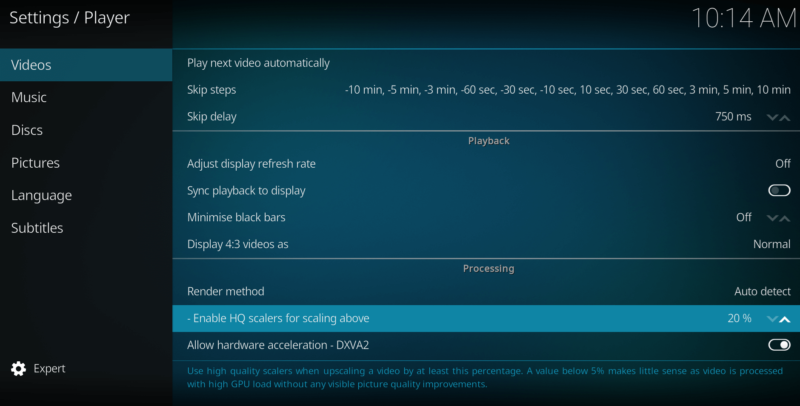
The default HQ scaler setting in Kodi is 20% because it’s ideal for streaming in low quality. However, if your Kodi stream is stuttering, bringing down the percentage might help. To do this, follow these steps:
- Open “settings,” then go to the “player” tab.
- In the bottom-left corner, make sure the “settings” cog reads “expert.” You can change this by clicking on the cog.
- Go to “videos” in the bar on the left and scroll down to “processing.”
- Reduce the HQ scaler from 20% to 10%. Try streaming again to see if there’s any difference. If not, you can try setting it to 0%.
5. Clear Your Kodi Cache
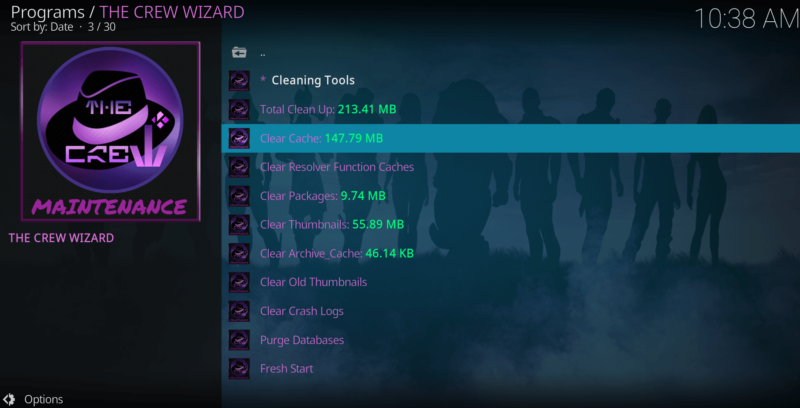
The Crew is a third-party wizard, which means some of the streaming content could be from pirated sources. When streaming on Kodi, we urge our readers to stick to content from known and licensed sources, especially as watching pirated streams is illegal in some countries.
Certain Kodi add-ons — The Crew being one example — come with maintenance tools that let you clear your Kodi cache. This may help clear up buffering issues. If you’re not sure how to install an add-on, check out the tutorial in our Kodi add-ons guide. We also have an article on Kodi builds if that interests you.
Once your chosen add-on has been installed, follow the steps below. We’re using The Crew as an example:
- Click the “settings” cog on the Kodi home screen. Now click the “add-ons” tab.
- Go to “install from repository” and click “The Crew Repo” or your chosen repository.
- Click on “program add-ons,” and then open and install “The Crew Wizard.” If you get a prompt about installing a build, ignore it.
- Open the wizard and go to “maintenance,” then “cleaning tools.”
- Select “clear cache” and let the tool do its work. Try streaming again to see if the problem has been solved.
Final Thoughts
Nothing is more frustrating than a slow stream, but luckily, there are buffering fixes aplenty. Hopefully, one of these methods will work to get you back to streaming your YouTube videos, shows and movies in no time. If you’re new to Kodi and would like to learn more about it, we have a guide on how to use Kodi.
On a final note, to make sure your streaming activity and data stay private when using Kodi and to prevent ISP throttling (a common cause of buffering), we recommend getting a secure VPN service like NordVPN; This VPN offers a 30-day money-back guarantee.
Have any of these Kodi buffer fixes worked for you? If so, which one? Let us know in the comments box below. Thanks for reading.
FAQ: How to Stop Kodi Buffering
Kodi streams might keep stopping because of slow internet, an overloaded video cache, ISP throttling or outdated add-ons. There may be more causes, but these are among the most common.
It depends on the cause, but you can try various things including using a VPN to thwart ISP throttling, increasing your Kodi cache memory size, clearing the Kodi cache, reducing the HQ scaler (for stuttering issues) and using a service like Real-Debrid.
Some people use multihoster services like Real-Debrid, which optimizes download speed and lets subscribers stream from high-quality links. Note that there is a fee to sign up. Alternatively, you can try one of the free fixes mentioned in this guide, like increasing your Kodi cache size, to see if that stops the buffering.


