How to Use Wireshark to Capture VPN Traffic in 2026
Wireshark’s complex interface can be intimidating for beginners, and using it requires a basic understanding of some complex concepts. This guide aims to show you a simplified way of how to use Wireshark to test your VPN for leaks in its encryption in a few easy-to-follow steps.
Key Takeaways:
- Wireshark is a powerful tool for many things, and despite its daunting interface, it’s easy to use for some niche cases, like testing VPN encryption.
- Testing a VPN for leaks involves capturing a stream of data packets and analyzing them to see if any of them are unencrypted.
- Sniffing out the unencrypted packets is the hardest part of the process, but you can use Wireshark’s filtering and sorting tools to make the job easier.
Wireshark is a free, open-source packet inspection tool. Founded in 1998 under the name Ethereal, it is the world’s most widely used network packet inspector, or packet sniffer. At Cloudwards, we use it to inspect network traffic and data packets to make sure that the VPNs we test are properly encrypting traffic. This guide will show you how to use Wireshark.
In this guide, we’ll go over how to install and set up the Wireshark software. Then we’ll teach you how to capture packets and analyze them using Wireshark’s built-in tools.
In all honesty, the process is difficult to understand. Unless you’re testing your own custom VPN, we recommend going through our VPN reviews to check for previous tests, or just use one of the providers on our best VPN list instead.
If your use case differs, Wireshark itself provides a bucket load of documentation and user guides, and, although it doesn’t have its own forum, there is an active subreddit where you can ask other users for help. That said, if all you need to do is analyze your VPN traffic, then read on.
Protect Your Privacy. Get Our Free VPN Guide Now!

- Comprehend the essential role a VPN plays in safeguarding your digital life
- Gain a deep understanding of how VPNs function under the hood
- Develop the ability to distinguish fact from fiction in VPN promotions
-
01/01/2023 Facts checked
We reworked this guide to focus on Wireshark’s use as it pertains to VPN encryption.
How to Use Wireshark: Download and Set Up
Here is a quick overview of how to download and install Wireshark.
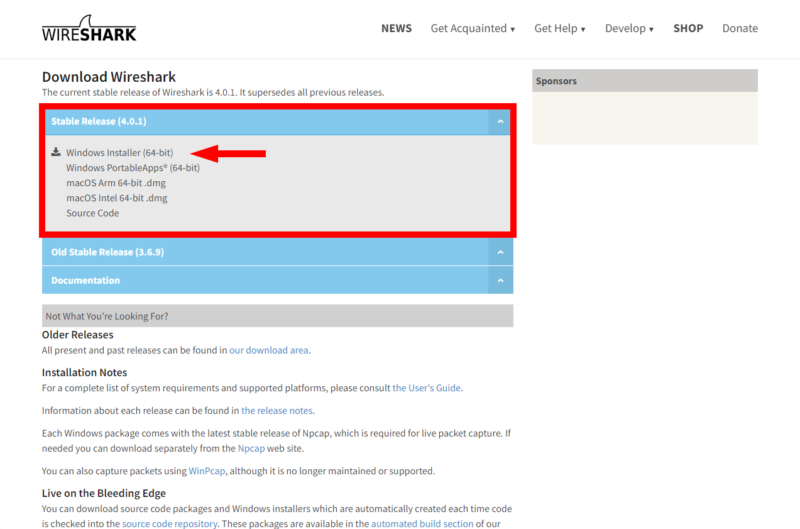
- Download Wireshark
The first thing you need to do is go to Wireshark’s website and download the installer file for your operating system. Wireshark is currently available on Windows, macOS and several Linux distros.
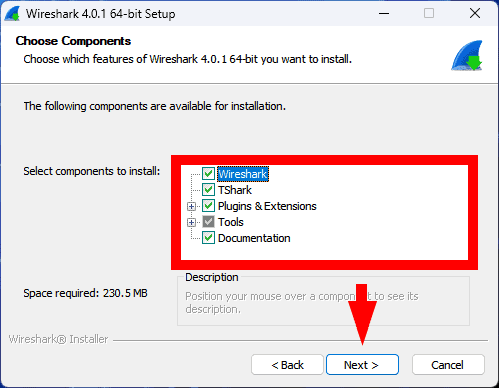
- Run the Installer File
Once you’ve downloaded the version you need, open the file to start the installation process.
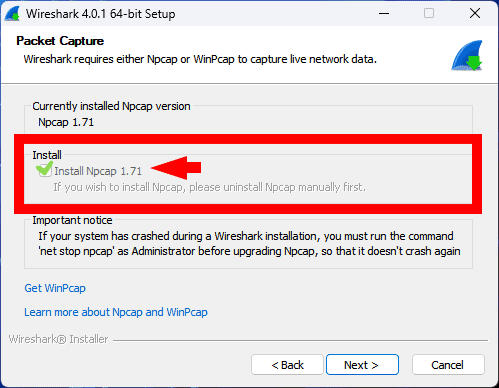
- Choose Your Preferences and Install Extras
Choose your preferred install directory, and make sure you install NPcap, if you don’t have it installed already (there’s a setting for it in the installation wizard). If you want to capture USB traffic, you’ll also need to install USBcap, though you won’t need it otherwise.
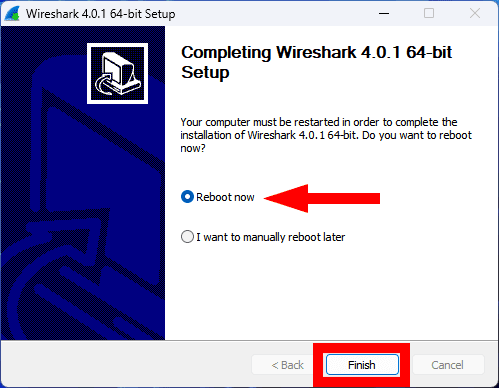
- Reboot Your Device
Once the setup is done, reboot your device to finalize the installation process. You can now start using Wireshark.
How to Capture Data Packets With Wireshark
Capturing DNS packets is the easy part of using Wireshark. Follow the steps below to start capturing packets.
- Open Your Active Connection
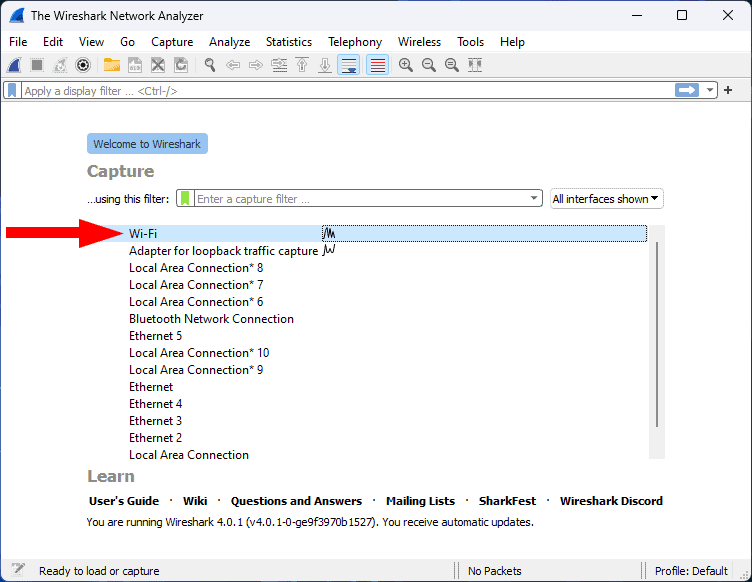
Fire up Wireshark and locate your active connection. In our case it’s “WiFi,” but it could also be your ethernet connection if that’s what you’re using.
- Initiate Packet Capturing
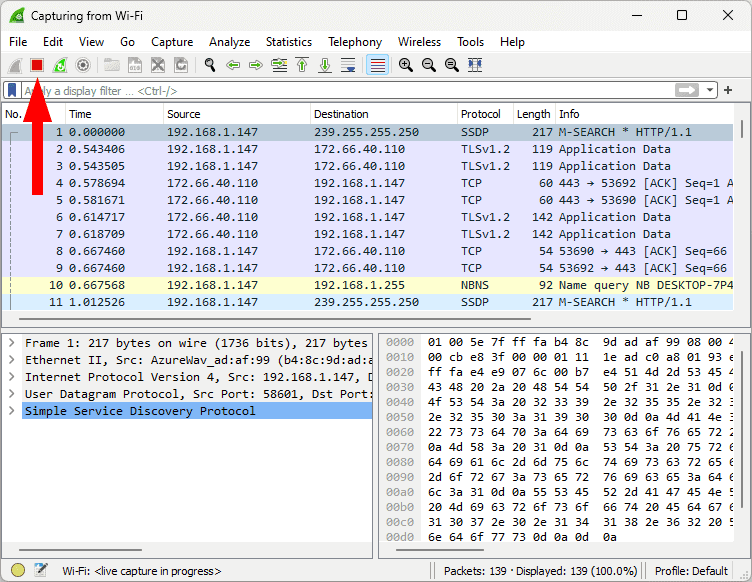
Selecting “WiFi” in the previous step will automatically start the packet capture process. However, you don’t want to capture for too long because it will generate too much data to analyze. After a few seconds, press the square red stop button to stop capturing.
- Restart the Capture (Optional Step)
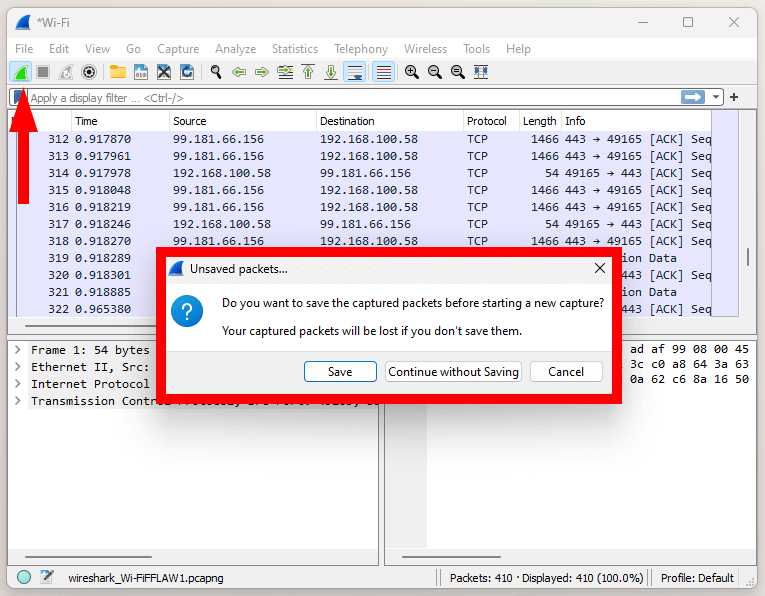
If you made a mistake at any point, or you just want to redo everything, you can restart the capture by pressing the shark fin icon to the left of the stop button.
How to Analyze Captured Packets With Wireshark
Now that you know how to capture network packets, let’s learn how to analyze that packet data. For the purposes of your VPN encryption analysis, you’ll need two stream captures: one unprotected control data set, and another one with VPN protection on.
How to Perform the Control Capture
You first need to open an unprotected HTTP website in your browser. Traffic on HTTPS websites is already encrypted, which makes it difficult to tell if your VPN is encrypting the data.
Make sure that the unsecured website is the only thing open in your browser, and close all other online applications to promote as clean a stream as possible. Of course, you can’t prevent all communication between your device and the internet, but this should be good enough for the job.
- Capture Your Unprotected Network Traffic
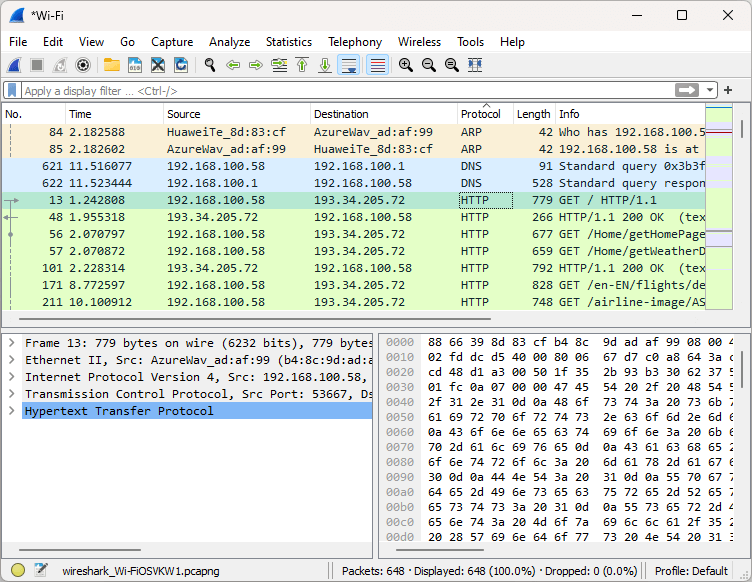
With the HTTP website open in your browser, perform all of the previous steps from the guide on capturing packet data. Your packet list pane should look similar to the image below.
- Inspect Individual Packets
Choose an unencrypted packet to inspect. Most of the packets should be unencrypted, though you’ll still see some encrypted traffic flow. Thankfully, you can easily tell an unencrypted packet by its protocol. Locate a packet sent over the HTTP protocol, right-click it and in the menu choose “follow,” then “TCP stream.” Alternatively, click “UDP stream” or “HTTP stream” if the TCP option is unavailable.
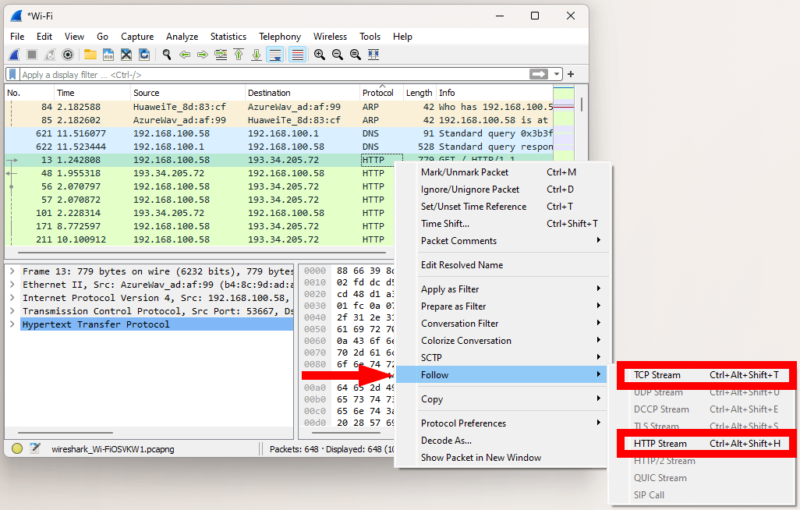
- Analyze the Captured Packet Details
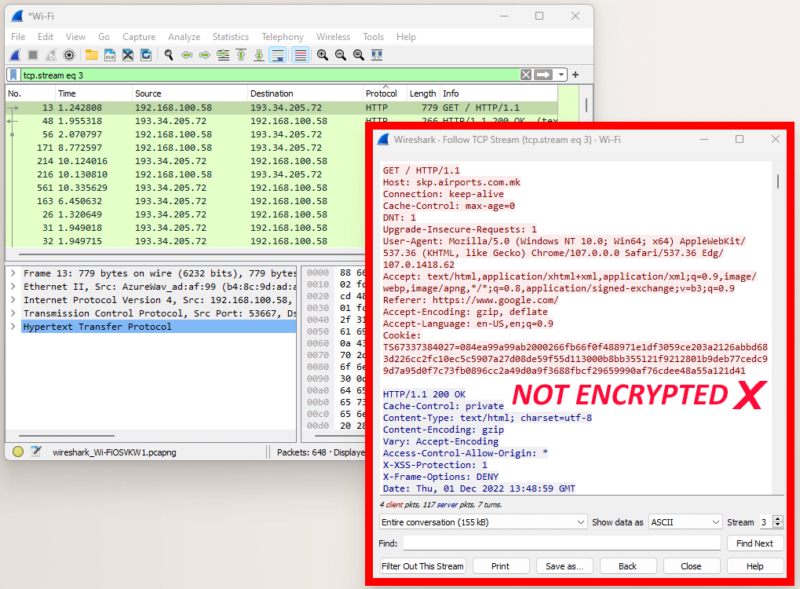
Following the TCP stream should open a window with the packet bytes and details. If you can see any kind of legible text, that packet is not encrypted. For the purposes of this control test, that’s exactly what we want.
How to Perform the VPN Test
For this step, besides having the HTTP site open, you’ll also need a VPN connection, so make sure that your VPN is on and connected to a server. With those two things taken care of, you can move on to the data packet capture process.
- Capture your Protected Traffic
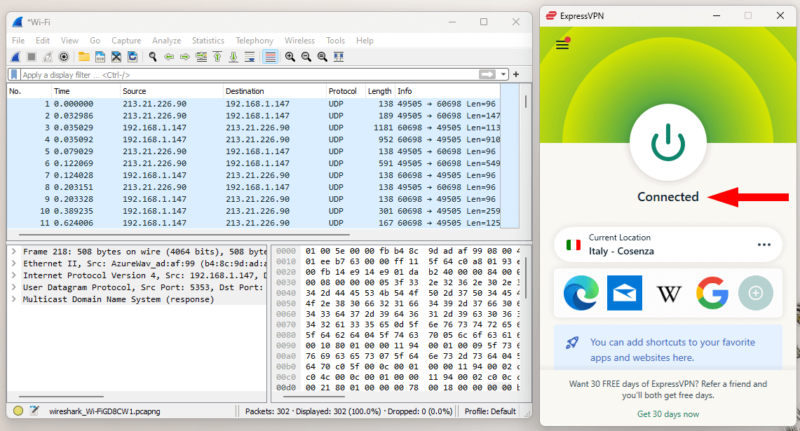
As before, first follow the steps in the packet capture guide. This time, you shouldn’t see any HTTP packets in the stream, and the color bar on the right side of the packet list pane should be mostly light blue (we’ll discuss Wireshark’s coloring scheme later), as in the picture below.
- Inspect Encrypted Packets
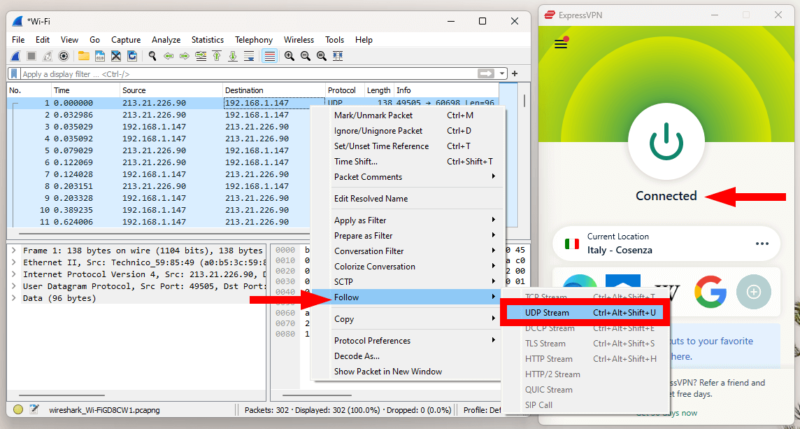
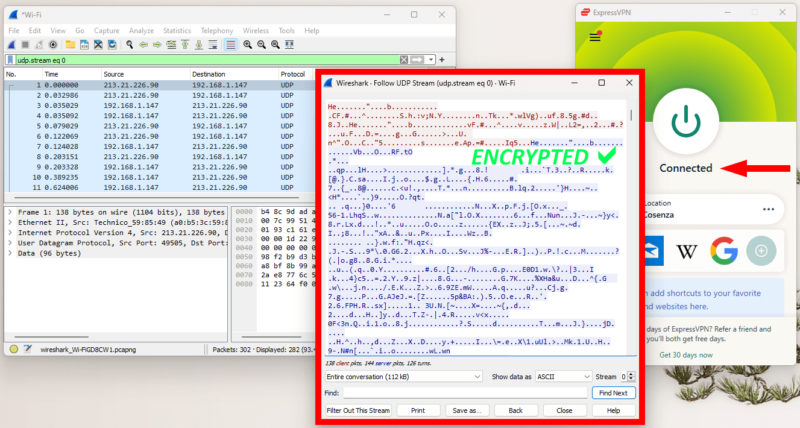
Pick a packet to inspect. Suspects here should be packets sent over HTTP (this shouldn’t happen with a VPN), or over a protocol different from the one your VPN is using. Follow the TCP or UDP stream, as in the control capture. In this example, we’re using ExpressVPN’s Lightway protocol over UDP. We’ll talk more about finding unencrypted packets below.
- Analyze the Captured Packet
If the packet you opened shows any legible words, then the VPN’s encryption has failed. If you only see random characters, as in the image below, you’re protected.
How to Spot an Unencrypted Packet
Although the steps above should be enough to get you started, there’s so much more to take into account when looking for unencrypted data. Even packets sent over a secure protocol might still be unencrypted, so there’s no guaranteed method of filtering for unencrypted packets. Here are a few things you can do to detect a leak in your VPN’s encryption.
1. The “Protocol” Column
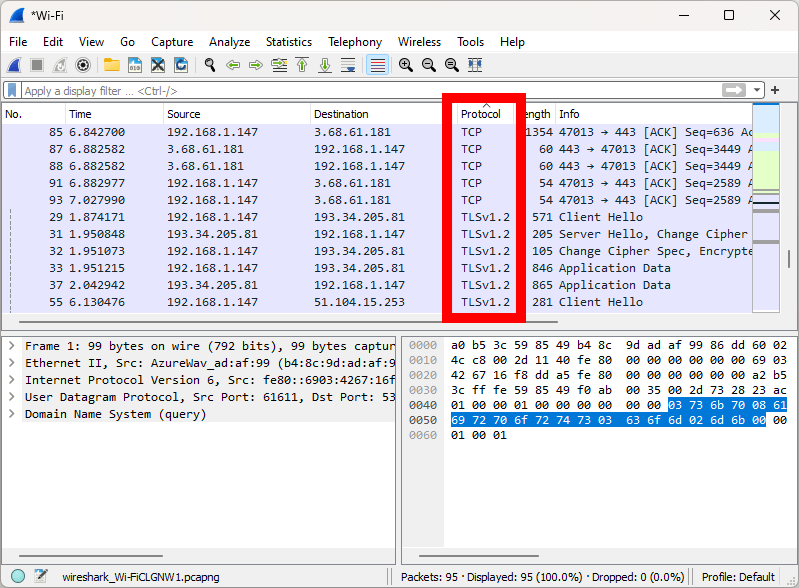
Depending on what protocol your VPN is using, you can easily see packets that were sent via a VPN protocol in the “protocol” column. VPN protocols can display differently than their listed name in the VPN app. Here’s how some popular protocols show up in Wireshark.
- WireGuard — WireGuard
- OpenVPN — UDP or TCP
- IKEv2 — ESP
- Custom protocol (ex. Lightway) — UDP or TCP
Apart from these, you might see different protocols stemming from internal communication between your device and other devices on your network, or between your device and your router. Keep in mind that internal communication on your network, like your computer talking to your printer, is not encrypted.
Sometimes when you’re connected to a VPN you’ll also see other kinds of packets used by the VPN, like encapsulated communication; these will also go through a different protocol.
If you see packets sent via any of the following protocols, they might carry unencrypted data, but know that that data never leaves your local network and isn’t transmitted to the internet.
- MDNS
- SSDP
- IGMPv3
- LLMNR
- MADCAP
- ICMPv6
- ARP
- UDPENCAP
You can click on the “protocol” column’s label to sort all data packets by the protocol used for transmission.
2. The “Info” Column
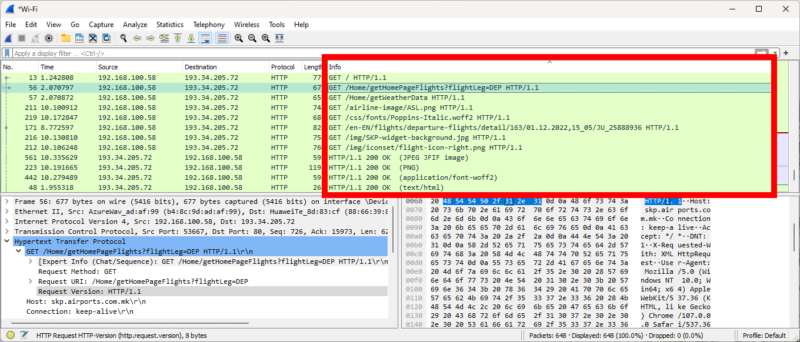
In the main window, the column labeled “info” shows what kind of communication the packet is trying to achieve. It could be a handshake between your device and the server, an image or any number of DNS queries. If you can see “application data,” that package is likely encrypted. On the other hand, a line starting with “GET” or “HTTP” shows unencrypted communication.
Clicking on the “info” column’s label will group packets with identical or similar information for a quick overview of all the unencrypted packets.
3. Packet Coloring Rules
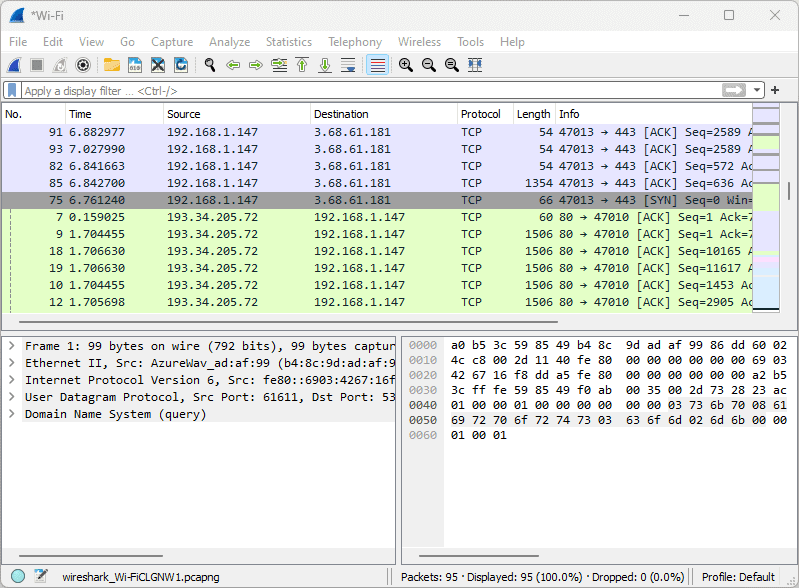
Wireshark’s color coding can be very useful for detecting unencrypted traffic. It uses several packet colorization rules that it applies according to protocols used, or the type of communication. For example, lime green indicates HTTP packets, while light blue is used for UDP and TCP traffic by default.
However, for the most part, captured packets hosting encrypted traffic will all be a shade light blue regardless of the protocol used for their transfer. Likewise, the lime green packets are almost always unencrypted, and you’ll see the color applied to UDP and TCP packets as well. This is because the lime green color is applied to routing and remote file access protocols.
Unfortunately, like the protocol information, colors can also be misleading, so you’ll still need to check the packets manually.
4. The Packet Bytes Pane
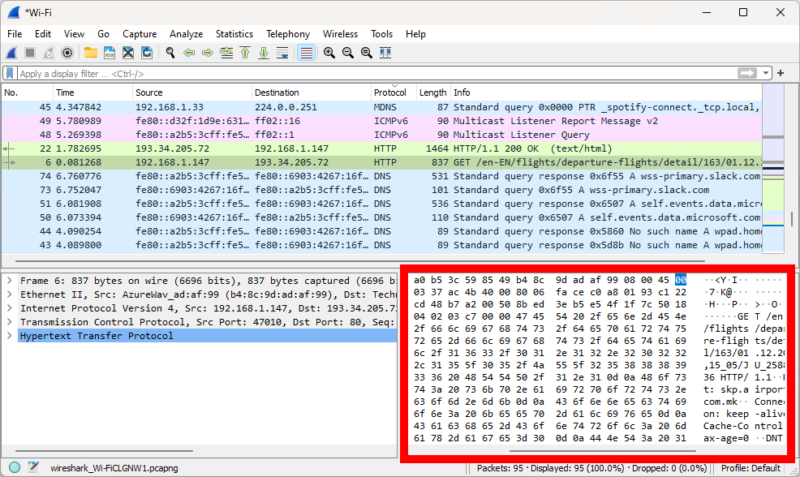
One way to locate stray unprotected packets is to power through all the packets using the packet bytes pane, otherwise known as packet details pane. This is the lower-right pane in the main window, and it displays the same information that you see when you manually inspect the packet (you might have to scroll to the left to see it).
You can click on the topmost network packet and use the down arrow on your keyboard to quickly gloss over every packet, keeping an eye out for any legible data in the packet details pane.
The pane doesn’t always display unencrypted information, though. For example, if there’s an unencrypted TCP packet, it’ll show as gibberish in the details pane, but an inspection will show plaintext information contained in the packet.
5. Redoing the VPN Test
When testing a VPN’s encryption, you want to have definitive proof of failure. The failure must be reproducible, which is why you need to run at least three tests. Simply redo all of the steps you took when you first discovered the failure. If you found nothing suspicious on the first go-round, still redo the test, potentially employing filters, which we’ll talk about next.
How to Filter Network Packets With Wireshark
Filtering network packets can be an easy way to discover a leak. Wireshark employs two types of filters: capture filters and display filters. Capture filters, filter out packets before the capture starts, while display filters are applied to an already captured stream.
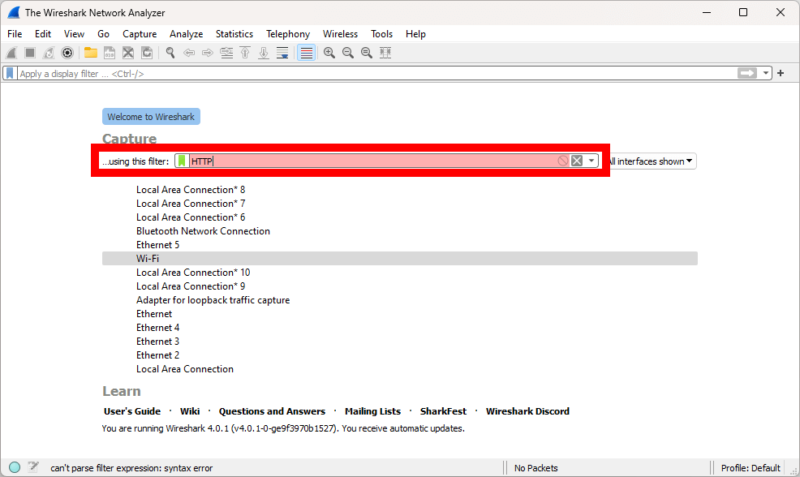
To test a VPN using filters, you could start by filtering for only HTTP network traffic and let the capture run until you find a leak. However, TCP packets can be unencrypted as well, which means that filtering for only HTTP packets could leave out a leak of a different kind.
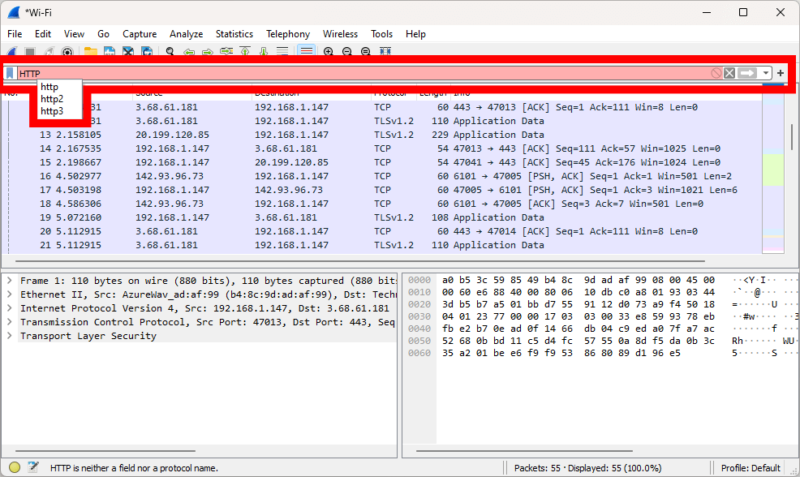
Display filters provide a bit more utility. Even if you end up with a very large capture, a display filter can single out one type of packet and greatly simplify your search, while still keeping network traffic data that might be relevant.
To use either filter, type the kind of packet you want to see into the filter, and select the appropriate filter from the list in the dropdown menu. You can find the capture filter bar on the home screen above the list of connections, and you’ll see the display filter above your capture’s packet list once the capture has stopped.
Final Thoughts: How to Use Wireshark
Although it might seem complicated, using Wireshark to test your VPN can be pretty straightforward once you get the hang of it. We hope this guide helped you on your path toward better online security.
Of course, Wireshark can be used for much more than just testing VPNs. In fact, it’s mostly used to test network traffic and compile usage statistics. However, this guide should be enough to get you started with Wireshark and its use regarding VPN traffic.
Have you ever used Wireshark? Have you had a VPN fail and leak data? Let us know in the comments below. If you end up using this guide to test a VPN, we’d love to hear about your results. If you have a suggestion on a VPN you’d like us to test, you can leave your suggestion in the comments as well. As always, thank you for reading.
FAQ
Wireshark is a so-called packet sniffer that captures packets of network traffic data. It’s a complex piece of software that isn’t very easy to use unless you already have an understanding of networks and encryption.
You can use Wireshark for many things, including collecting network usage statistics, testing communication between devices on a network and analyzing communication between your device and the internet. Here at Cloudwards, we use it to test VPNs for leaks.
Wireshark isn’t exactly easy to learn, unless you have a background in IT or are experienced with networks and encryption. However, if you only have a niche use for Wireshark, you could learn how to use it for only that use case, without learning about all of its complexities.


